Hi!Good news - Olivieryuyu started his own blog:https://olivieryuyu.blogspot.com/The blog is mainly dedicated to Nintendo 64 RCP chip. It is not mere technical specifications, which you can find on Wiki. No, it's different. Olivieryuyu successfully decoded from scratch several microcodes for RSP, from poorly written microcode for Toukon Road to masterpiece graphic microcode created by Factor 5 for Battle for Naboo. It gave him ideas how to write a custom optimized microcode. You will find great
The blog is mainly dedicated to Nintendo 64 RCP chip. It is not mere technical specifications, which you can find on Wiki. No, it's different. Olivieryuyu successfully decoded from scratch several microcodes for RSP, from poorly written microcode for Toukon Road to masterpiece graphic microcode created by Factor 5 for Battle for Naboo. It gave him ideas how to write a custom optimized microcode. You will find great amount of ideas, in-depth information and even practical results in his blog!
Hi!
In the previous article I described a new approach to processing N64 low-level polygons. This approach helped me to solve several serious issues with LLE rendering in general. However, main practical benefit was expected in Golden Eye, Perfect Dark and Killer Instinct Gold - the only games, which can't work properly without LLE support. Does the new method help to fix LLE-related issues in these games? Unfortunately, no. For example, KI with old method looks like this:
It looks nearly the
In the previous article I described a new approach to processing N64 low-level polygons. This approach helped me to solve several serious issues with LLE rendering in general. However, main practical benefit was expected in Golden Eye, Perfect Dark and Killer Instinct Gold - the only games, which can't work properly without LLE support. Does the new method help to fix LLE-related issues in these games? Unfortunately, no. For example, KI with old method looks like this:
It looks nearly the same with the new method.
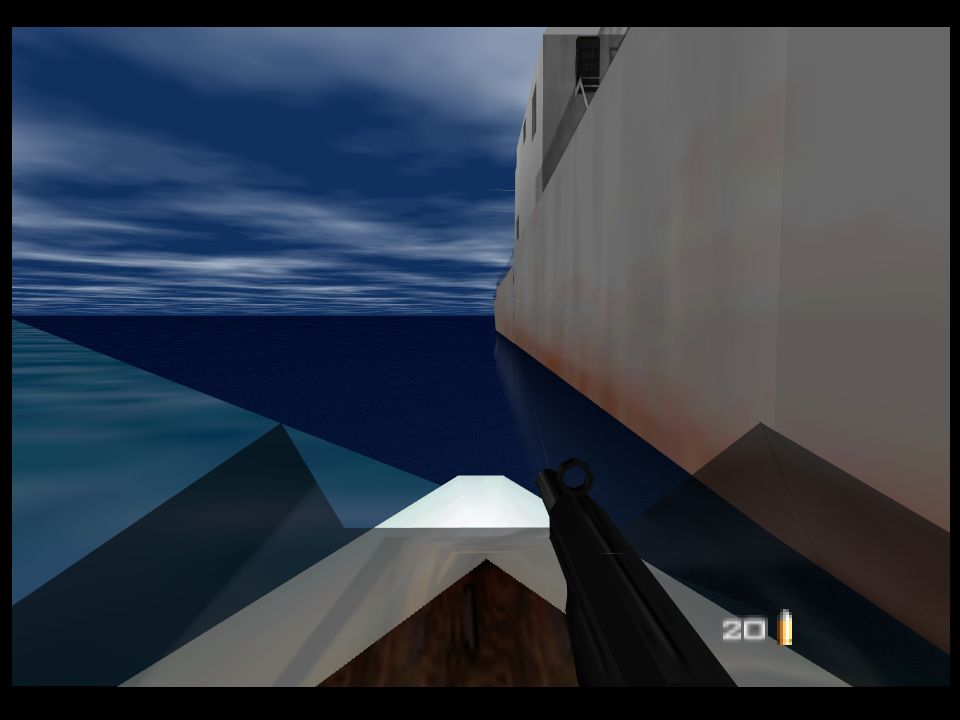
So, the problem is somewhere else. The source of the problem was discovered quite quickly. The sky on the screen-shot above has rendered by one low-level triangle command. As I explained before, low-level triangle commands render not triangles but trapezoids. In this case one triangle command renders the sky rectangle. I noticed that lower vertices of the rectangle have negative W coordinate. Normally, W can not be negative. Polygon with negative W vertex coordinate must be clipped. The microcode running on RSP performs the clipping. However, sky polygons in KI, sky and water polygons in GE and PD are exceptions. Crafty Rare programmers sent raw low-level polygons data directly to RDP bypassing RSP processing. That is why these games need LLE support even in HLE mode. Probably the code, which generates this low-level data is buggy and sometimes produces incorrect result. You may run KI and see that sometimes the sky is correct and few seconds later it is wrong again.
AL RDP plugin has no problems with such polygons. After long debugging I found that it implements an interesting feature: texture coordinates clamp. It is not the standard tile clamp explained in N64 manuals. It is rather a sanity test: if texture coordinate can't be calculated correctly it force clamped to some special value. Negative W is one of the cases, which triggers that clamping. I dumped texture coordinates calculated by AL RDP for KI case. Look at this diagram:
It shows how S coordinate changes from top to bottom of the rectangle. It wraps several times, but at the bottom becomes constant. It is where W coordinate turns negative. The sky polygon alone looks like this (click to see full size):
As you may see, the very bottom part of the polygon is filled with some constant color. This part usually is covered by other geometry, but I hacked the AL RDP sources to get that picture.
AL RDP software plugin emulates work of RDP and renders that polygon line by line. When W becomes negative at some line, RDP clamps texture coordinate to some constant. That constant coordinate points to some texel inside the texture, and this texel is used for all pixels in the line.
Hardware render can't work this way. Color, depth and texture coordinates provided per vertex and interpolated for each pixel inside the polygon. Interpolation is a smooth function. In this case texture coordinates do not behave smoothly and interpolation does not work as it should.
I found a solution. All coordinates work properly while W is positive. If W becomes negative for some vertex (or vertices), the algorithm searches for the Y coordinate, where W changes its sign. Then part of the polygon from the top to that Y is rendered. The part below Y rendered too, but all vertices of that part have the same texture coordinate, so it is filled with some constant color fetched from the texture. The result:
That fix also solved the water texture issue in Golden Eye Frigate level. However I met another issue there: the colors of water and sky were somehow wrong, not as dark as they have to be:
The color combiners for water and sky mix texture color with shading color. Since texturing looks correct, the problem should be in the shading color. I compared color of vertices calculated by GLideN64 with color calculated by AL RDP at the same points. The results were very close. I decided to hack the color combiner for water: remove texturing and draw only the shading color:
This result puzzled me at first. The input data is nearly the same but the output is dramatically different. Color of top vertices is dark and rather blue, so the result should be as on the right screen shot from AL RDP. Then I noticed that value of W is very high for top vertices but is very low at the bottom:
This explains the problem. N64 hardware is not powerful enough to perform perspective correction for colors. It uses plain Gouraud shading, that is simple interpolation of vertex color. GLideN64 powered by OpenGL. Modern OpenGL applies perspective correction to all outputs of vertex shader by default, including shading color of course. Perspective correction makes shading color almost constant in that case, because the differences in vertex color intensity compensated by differences in vertex W. Luckily, OpenGL allows to disable perspective correction for any parameter. I disabled perspective correction for shading color and finally got the correct result:
Thus, the LLE-specific issues in KI, GE and PD have been fixed. GLideN64 LLE rendering still has unsolved issues mentioned in the previous article. This work has WIP status. Alpha builds available to project's patrons on Patreon.com.
Hi!
In the previous article I described how N64 hardware does polygons rasterization and how graphics plugins convert low-level rasterization data into vertices for PC hardware. I also mentioned the problems of the current approach. So, the task is to solve the problems.
When I finally understood how current code for low-level triangles works (yes, I had borrowed it years ago without understanding of its work), I had no good idea why its results are so poor. Everything looked quite reasonable.
When I have problems with understanding how the RDP works, I consult with sources of angrylion's software graphics plugin aka AL RDP. This plugin is very precise emulator of RDP, a digital model of the actual chip. The sources can give you information about RDP work, which you will not find in documentations. Extraction of information this way is not easy but often it is the shortest way. I found how edge walking implemented here and compared it with GLideN64 code. No surprises here - AL RDP code is more complex and precise, it does many more checks and manipulations with input data and output result. So I decided to adapt that code for my needs in hope that it will bring better results. I spend a week or two on experiments but got as bad or even worse results as before. Most likely I did mistakes somewhere. Anyway, my disappointments in results turned into disappointments in the approach itself.
At some moment I got an idea: why should we walk the same way as actual hardware does? We have three edges, we need to find where they are intersecting. This is simpler to do with just solving lines equations! Actually, this idea came to olivieryuyu first. He started to learn that matter earlier and provided me with articles and documents how things work and how low-level data can be used to extract vertices. I did not pay attention on it first, trying to improve the old method, which already works somehow.
So, let's see how can we get vertices without edge walking. We need the line equation for each edge. Equation of a line looks as this: y = mx + y0
where m is the slope and y0 is the y coordinate of its intersection with the y-axis.
Open our diagram for low-level triangles again:
We have inverse slope for each edge, so the equation of a line in our case is x = ky + x0
where k is edge's inverse slope and x0 is the x coordinate of its intersection with the x-axis.
We have intersection point for the major edge H, which is XH. We also have intersection point for the first minor edge M, which is XM. Both intersection points have the same y coordinate, which is coordinate of the previous scan-line. Let's set y-axis to that y coordinate for convenience and denote it as Y0.
Thus, we have two equations: x = DxHDy * y + XH x = DxMDy * y + MH where y = (Y - Y0).
We can easily solve the system of these two equations and get exact coordinates of intersection point of the edges. Good. Let's denote coordinates of that point as (X1,Y1).
How to get parameters values for that point? It is simple: with DpDe. Value of P at (X1,Y1) is P1 = P + DpDe * (Y1 - Y0)
Next vertex is intersection point of minor edges M and L. As you see on the diagram, y coordinate of mid vertex is in range [YM,YM+1]. XL also does not coincide with vertex x coordinate in general case. L edge intersects XL, but where? "XL is calculated where the L edge intersects the next subpixel at or below the mid vertex." The intersection can be at YL or YL+1. Can we calculate it exactly? It looks as we can. Let's calculate XM` for edge M at YM: XM' = DxMDy * YM + MH
If XM` is the same as XL then mid vertex coordinates are (XL,YM).
Otherwise, edge L intersects point (XL,YM+1), so we can build line equation for L using this point, and then find intersection point of M and L edges. Let's denote mid vertex coordinates as (X2,Y2).
Now we know coordinates of the second vertex, but the vertex is not on the major edge. How will we get values of all parameters for that vertex? It is not hard either:
find the point on the major edge at mid vertex Y, that is Y2. Let's name x coordinate of that point as XH', so the point's coordinates are (XH',Y2).
calculate parameters for point (XH',Y2) using DpDe.
We know X2 and XH', so we can calculate the distance X2-XH', and thus we can calculate value of every parameter with DpDx: P2 = P + DpDe * (Y2 - Y0) + DpDx * (X2 - XH')
Since we have line equations for all three edges, we can find intersection point of the major edge H and minor edge L, which is the third vertex of our triangle. This vertex lies on edge H, so its parameters calculated the same way as for the first vertex. Thus, we've got three vertices per low-level triangle. The task completed.
The algorithm looks simple, does not it? I made first-shot implementation pretty quickly, but then I spent weeks trying to make it work at least not worse than the older method, and some more time to make it better. The devil in the details.
Which problems of the old method are solved with the new one:
Performance. New method produces 3 vertices and thus 1 hardware triangle per low-level triangle. When low-level triangle represents trapezoid, it still requires 4 vertices and thus two hardware triangles, but it is a rare case. Thus, the new method produces significantly less data for PC hardware than the old one. I would be happy to say that it led to significant boost in performance, but it is not true. The difference in performance is almost negligible. The bottle-neck of LLE rendering is not in amount of data and number of polygons, it is in number of API calls. Each LLE triangle rendered with separate GL draw call, while in HLE mode the plugin caches triangles when possible. I had no idea how to implement triangles caching for LLE mode, and, truly speaking, did not care much about it. This time I looked at the problem more carefully and found a simple but efficient way to cache LLE triangles. The speed-up after that optimization can be called tremendous. Now GLideN64 is even faster than Z64, which is also well optimized.
Lines support. As I explained before, line is a special case of low-level triangle, and it requires a special support in the code. It was not done for the old method, so lines rendered incorrectly. I've implemented support for special cases for the new method:
It is still not perfect if compare with HLE mode lines, and I hope to improve it.
Sticking out polygons. I see them no more:
Depth compare issues. Some poke-through issues have been fixed:
Issues with shading disappeared:
Depth buffer emulation issues. I adapted my software depth render to work with new LLE triangles. Depth buffer based effects such as coronas now work correct, as you may see on the previous screen shot.
Unsolved problems:
Poke-through issue with decal surfaces. Decal textures worked poorly with old method and still work the same with the new one:
I still don't know where the problem hides.
Gaps between polygons. No positive changes here. I just hope that the new method brings no regressions in compare with the old one.
And the most interesting from the practical view question: does the new method help to fix issues with Golden Eye and Killer Instinct Gold? No, it does not.
Hi!
I'm currently working on improving Low Level Emulation (LLE) support in the plugin. It is hard and interesting topic, full of challenges. I decided to write several technical articles to describe the issues encountered and their possible solutions.
I have already written about differences between High Level Emulation (HLE) and LLE, and about problems which each of the approaches can and cannot solve. You may read this introduction article: https://gliden64.blogspot.com/2014/11/a-word-for-
I'm currently working on improving Low Level Emulation (LLE) support in the plugin. It is hard and interesting topic, full of challenges. I decided to write several technical articles to describe the issues encountered and their possible solutions.
I have already written about differences between High Level Emulation (HLE) and LLE, and about problems which each of the approaches can and cannot solve. You may read this introduction article: https://gliden64.blogspot.com/2014/11/a-word-for-hle.html and this one https://gliden64.blogspot.com/2014/11/lle-is-here.html.
Three years ago, we started to decode remaining microcodes. We successfully completed this task and now GLideN64 can run any N64 game in HLE mode. It is a great result. So, why bother with LLE? Apart from the fact that it is a challenging task and we like challenges, there are practical reasons:
there are few games, such as Golden Eye and Killer Instinct, which directly use low-level RDP triangles from HLE display lists. RDP stands for Reality Display Processor, N64 polygons rasterization unit. That is, some LLE support is required for complete emulation even in HLE mode.
HLE emulation is not guaranteed to be perfect. LLE rendering helps to separate HLE specific errors from RDP ones.
Current implementation of LLE rendering was taken from Z64 - a LLE graphics plugin by ziggy (Vincent Penne). Z64 project started in 2007 and currently discontinued. It is still the best LLE graphics plugin with hardware rendering. It has plenty of issues related to polygons rendering, and GLideN64 inherited them all.
So, let's see why rendering of low-level triangles with PC graphics API is so problematic. First, let's see what low-level triangles are. RDP has 8 triangle commands:
Non-ShadedTriangle
Shade Triangle
Texture Triangle
Shade, Texture Triangle
Non-Shaded, ZBuff Triangle
Shade, ZBuff Triangle
Texture, ZBuff Triangle
Shade, Texture, ZBuff Triangle
The difference between these commands is in the amount of data provided. The first command, Non-ShadedTriangle, is the simplest. It has only constant color. The last one, Shade Texture ZBuff Triangle, is the most complex and general case with shade (that is per-vertex) color, texturing and z buffering. So, in the simplest case render just fills triangle area with a color. Shade commands perform Gouraud shading. Texture commands do texturing with (optional) perspective correction. ZBuff commands perform z compare. The common part for all these commands is the data, which defines triangle's position on screen. This data described in "Nintendo Ultra64 RDP Command Summary" document by Silicon Graphics Computer Systems, Inc. You can find this document in Internet. Let's see (click for full-size picture):
What is strange on this diagram? There are no vertices coordinates. We have inverse slope for major edge and two minor edges. We also have six coordinates XH, YH, XM, YM, XL, YL, none of which correspond to actual triangle's vertex in general case. Actually, it is not strange if we recall that RDP is just a resterizer. Vertices are high-level data. Vertices processed by Reality Signal Processor (RSP). RSP performs vertices transformation, lighting, culling and clipping. RDP restirizes (renders) the data prepared by RSP. RDP resterization process is not unique. It works alike many software single-thread renders. You may find pretty good explanation of that process in this article.
Let's check the diagram again. Each square is a pixel that is a dot on the screen. In order to render polygons with sub-pixel precision, X coordinates are represented by fixed point numbers in format s15.16, meaning a signed 32bit value with 16bit fractional part. It is pretty good precision. It is not so for Y, which is in s11.2 format (signed 16bit value with 2bit fractional part). Indeed each row of pixels corresponds to a scan-line, each of them being divided by 4 horizontal sub-areas, and Y coordinates only correspond somehow to a scan-line sub-area. So, Y precision is not that good as X one.
Here how N64 rendering works:
Start from the top of the scan-line, which holds YH. In the examples above it is YH-2. We have intersection point of major edge with the scan-line: (XH, YH-2). Intersection point of the first minor edge with this scan-line is (XM, YH-2).
Descend down by the edges using given edges inverse slopes. For example, for YH-1, X coordinate for point on major edge is XH`= XH + DxHDy; X coordinate for point on minor edge is XM`= XM + DxMDy. For YH it will be XH`= XH + DxHDy*2, XM`= XM + DxMDy*2 and so on.
Render nothing until XH`-XM` is positive for Left Major Triangle case, or until XH`-XM` is negative in case of Right Major Triangle. These conditions mean that our edge points are not inside the triangle yet. As you may see in the examples above, rendering is not started yet at YH.
Rendering starts, meaning pixel rasterization between calculated edge points. Continue until YM coordinate. At this point we start to slide along the second minor edge. XL is used as the starting point on the minor edge and DxLDy as inverse slope. Continue rasterization process as long as edge points are inside the triangle. As you may see on the diagram, rasterization should continue until YL.
Edge walking process looks like this:
Of course, render can't lit pixels partially. The color of a pixel partially intersecting with the polygon depends on the amount of pixel's area covered by the polygon and the current coverage mode. I made this picture to illustrate how low-level triangle data is used to define the area covered by the triangle. It will help me to explain how this data is used to extract vertices information for hardware rendering. But first let's see how pixels inside the triangle are colored. The picture above demonstrates the simplest case, when the triangle is filled with some constant color. How more complex cases work?
As I mentioned before, the amount of data provided for the triangle being rendered depends on triangle command. It can be shading color, texture coordinates, Z coordinate (depth) and W coordinate for perspective correction. All these kinds of data are given not per-vertex, since we have no vertices. Instead, all the information is given for the major edge. Initial values are calculated for point where the major edge H intersects the previous scan line, (XH, YH-2) in our examples. Besides the initial value, each parameter P provided with DpDe and DpDx values. DpDe is used to calculate change of that parameter along the edge. So, value of every parameter on the major edge can be calculated for each sub scan-line. DpDx is used to calculate the change of the parameter along the scan-line. Thus, it is enough to have an initial value of parameter P with DpDe and DpDx to calculate P for each pixel inside the triangle.
Now let's see how N64 low-level triangle data is used to extract information for PC hardware triangle vertices. I'll describe the method, which is used by Z64, Glide64 and GLideN64. May be there are other approaches, but I know only this one. If you will look at the source code it may appear tangled and complicated for you. Actually, the idea is simple. The algorithm uses the same edge-walking mechanism described above, with some short-cuts for optimization purposes:
Start from the top of the scanline
Descend down by the edges using given edges inverse slopes until distance between points on edges is positive for Left Major Triangle case, or is negative in case of Right Major Triangle.
Take point on the major edge as the first vertex. Calculate color, depth and texture coordinates for that point using DpDe.
If distance between points on major and minor edges is not zero, take point on the minor edge as the second vertex. Calculate color, depth and texture coordinates for that point using DpDx.
Move down until YM coordinate. Repeat steps 3-4.
Move down until YL coordinate. Repeat steps 3-4.
This
algorithm has some flaws:
Performance. In general case the algorithm produces 6 vertices per low-level triangle and thus requires 4 hardware triangles to render it. For instance, the picture below illustrates a real case. What you see as one triangle actually consists of 4 triangles, two of which are so narrow that they look as lines:
In the best case, when the points of intersection of the major edge with minor ones lie on some sub scan-lines, this algorithm produces only two polygons - top and bottom. That is we have at least two hardware triangles per low-level triangle. It obviously is not very good, but performance it is not the main problem of that method.
Lines are not supported:
Line, as well as trapezoid in general case, can be drawn by one low-level triangle command. To do that, inverse slopes of major and minor edges must be the same. In this case the edges will be parallel and form a line with a width equal to distance between XH and XM. It is a special case, which requires special support in the algorithm. It was not done.
Sticking out polygons:
This problem can be related to the previous one. It seems that the problem appears for very narrow polygons in a model.
Depth compare issues:
Depth buffer emulation issues. I failed to apply my software depth render to LLE triangles, so the only way to get depth buffer content in RDRAM is to copy it from video memory, which can be slow.
Shading issues:
Gaps between polygons. It is one of very hard problems, which hardware graphics plugins still can't solve. This problem presents in HLE, but in LLE it is worse:
And particularly annoying issues are related to Golden Eye and Killer Instinct Gold, which need LLE triangle support even in HLE mode:
Hello,
Some last minutes modifications broke Dark Rift, and that bug sneaked into the 4.0 release.It is fixed now. Please download updated binaries from GLideN64 GitHub Releases. Sorry for inconvenience.
Some last minutes modifications broke Dark Rift, and that bug sneaked into the 4.0 release. It is fixed now. Please download updated binaries from GLideN64 GitHub Releases. Sorry for inconvenience.
Hello,
Today is time to set new Release tag to master branch.
Previous Release 3.0 was a revolutionary one because of massive changes in plugin's architecture and new possibilities opened by these changes. This release is rather evolutionary. It continues tendencies started in the previous version. Of course, new features had been developed too. Lets see:
Solution for HLE problems
The main theme of the new release is solution of HLE-related problems. It started with long long awaited HLE im
Today is time to set new Release tag to master branch.
Previous Release 3.0 was a revolutionary one because of massive changes in plugin's architecture and new possibilities opened by these changes. This release is rather evolutionary. It continues tendencies started in the previous version. Of course, new features had been developed too. Lets see:
Solution for HLE problems
The main theme of the new release is solution of HLE-related problems. It started with long long awaited HLE implementation of BOSS ZSort microcode made by Gilles Siberlin.
Next step was to fix issues caused by incomplete or incorrect implementation of some HLE commands, which caused HLE-only glitches. We started with re-implementation of S2DEX microcode, which is designed to draw such 2D objects as sprites and backgrounds. olivieryuyu decoded that huge and tangled microcode and we made new HLE implementation of it, trying to reproduce original algorithms as close as possible. That work took us circa six month.
We also fixed several small HLE issues, where glitch was caused by an issue in some command. Such fixes also required microcode analysis. Thanks to olivieryuyu's efforts we fixed:
The second big topic of this new release is fixing of regressions.
Unfortunately, each big release is brings not only new features and fixes, but also new bugs. Complete testing is very hard and tedious process. Fortunately, users are founding and reporting us about issues. One of my goals for this release was to fix all known regressions. I combed project's bug tracker for such bugs. To my surprise, many reported issues were actually old and very old regressions. I even found regressions, which were made before the very first public release. I fixed all these issues and I hope that this release will not bring many new ones.
New features.
1. As you know, GLideN64 has special mode for precise emulation of N64 depth compare. This mode helps to fix many minor and some major issues with depth compare, but it has some limitations:
serious performance drop in some games
incompatibility with Multi-Sample Anti Aliasing (MSAA)
Logan McNaughton aka loganmc10 found OpenGL extensions, which helped us to weaken the performance issue greatly. Now you can use N64 depth compare freely if your hardware supports required extensions. This mode is still incompatible with MSAA, but now we have a solution. I implemented Fast Approximate Anti Aliasing (FXAA) , which you can enable along with N64 depth compare.
2. Ultimate solution for "remove these darn annoying black boarders" issue: Overscan feature. Now you may crop output image as much as you want.
3. User profiles. You may create profiles with different settings and switch between them. For example, you may create a profile with 2D fixes enabled to play 2D games, or create a profile with N64 depth compare + FXAA enabled.
New supported games
I already mentioned implementation of new microcodes, which finally made it possible to run any game with HLE. However, there are still games, which can't run properly because they do something weird what GLideN64 does not expect and can't emulate yet. Example of such game is Super Bowling 64. The way that game programmed makes it hard to emulate on PC hardware. Finally I founda way how it can be done. That fix then helped me to solve split screen issue in NASCAR 2000. Another example of hard to emulate issue is multiplayer mode in GoldenEye 007 and Perfect Dark with 3 or 4 players. It was fixed too.
Other
It is impossible to list all solved issues. We closed more than 175 issues during this release cycle .
You may read my change-logs on Patreon for details.
Acknowledgements:
Thanks to all backers of "Indiana Jones and the Infernal Machine" crowdfunding campaign on Indiegogo. We hardly would take that task without your support.
Hello,
S2DEX microcode was developed to simplify development of 2D games. It provides macro commands to create sprites and backgrounds. S2DEX2 modification of S2DEX can self-load with F3DEX2 microcode and thus can be used to create 2D sprites and backgrounds in 3D games. Many N64 games use S2DEX, so all modern HLE graphics plugins implement it.
S2DEX implementation in GLideN64 was too high level. Actual microcode commands are very complex. The microcode is documented, but the documentation doe
S2DEX microcode was developed to simplify development of 2D games. It provides macro commands to create sprites and backgrounds. S2DEX2 modification of S2DEX can self-load with F3DEX2 microcode and thus can be used to create 2D sprites and backgrounds in 3D games. Many N64 games use S2DEX, so all modern HLE graphics plugins implement it.
S2DEX implementation in GLideN64 was too high level. Actual microcode commands are very complex. The microcode is documented, but the documentation does not cover some tiny details in internal mechanics. Thus, S2DEX implementation not always worked right. olivieryuyu decided to not rely on documentation and decode the microcode itself. The goal of that new decoding project was to implement commands in HLE as close as possible to LLE and obtain the result, which is as good as with LLE or better.
It was very long and hard project, which took circa six months. We started form relatively simple sprite commands: OBJ_RECTANGLE, OBJ_RECTANGLE_R and OBJ_SPRITE. We fixed calculation of screen and texture coordinates of sprites. There are several revisions of the microcode, and each revision does the calculations in slightly different way. The fix eliminated several minor glitches and a major one, in Parlor! Pro 64:
Then we started decoding and implementation of remaining commands: BG_1CYC and BG_COPY, which are used to draw large 2D objects such as backgrounds. It was very hard task. These functions are very large and tangled. After several months of hard work both background commands were implemented and now they produce exactly the same result as in LLE mode on all games we tested.
One of results of our work - correct background in Neon Genesis Evangelion:
From one side, it is great result because the commands are very large and complicated. From the other side, LLE by itself not always gives perfect result. You may run previous releases of the plugin in LLE mode and find numerous graphics glitches in 2D games. Some of glitches caused by errors in texture loading code. Backgrounds commands do texture loading in quite weird manner, which "normal" game code never uses. I fixed several hard issues in plugin's texturing subsystem during development of that project. However, many glitches remained after these fixes. These glitches can be called "the curse of hardware rendering". There are two main groups of such glitches:
gaps between polygons. Background commands can not draw background by one piece because of limited texture memory. Background image becomes split on narrow strips. Each strip is loaded in texture memory and rendered by separate rectangle. There are no gaps between rectangles, but gaps between images in them may appear when rendering resolution is higher than game's native resolution. It usually happens when size of the image is not exactly the same as size of area where it will be rendered. Texture scaling in higher resolution may cause fetching texels out of texture image bounds, thus cause artifacts, which look as gaps between polygons.
garbage between polygons. Looks like a line of colored garbage between two polygons. Is is seldom kind of glitches, but it does not fixed by switching to native resolution. I did not find yet, how it can be cured.
So, new implementation has issues, but most of them appears only in non-native resolutions. GLideN64 already has tool to eliminate issues with 2D graphics in high resolutions. You may enable "Render 2D elements in native resolution" option to activate it. I adopted that tool to work with new background commands. Result is quite good in general. For example, StarCraft backgrounds have glitches in high-res, but "Render 2D elements in native resolution" eliminates them:
However, the tool is not bug-free by itself and sometimes it is slow. Taking all these issues into account we decided to keep old implementation of background commands and make an option to switch between old "one-piece background" implementation and new "stripped background" one. We recommend to use the new implementation as default one.
According to multiple user requests, GLideN64 now supports Fast Approximate Anti-Aliasing aka FXAA. FXAA is post-processing filter, which eliminates aliasing. Check the image to see how it works with Super Mario 64 (click for full-size image).
As you may notice, traditional Multisample anti-aliasing aka MSAA gives the best result. Result of FXAA is decent, but not as good. So, why use it? As you may know, N64 depth compare is hard to emulate properly on PC hardware. I made shader based emul
According to multiple user requests, GLideN64 now supports Fast Approximate Anti-Aliasing aka FXAA. FXAA is post-processing filter, which eliminates aliasing. Check the image to see how it works with Super Mario 64 (click for full-size image).
As you may notice, traditional Multisample anti-aliasing aka MSAA gives the best result. Result of FXAA is decent, but not as good. So, why use it? As you may know, N64 depth compare is hard to emulate properly on PC hardware. I made shader based emulation of N64 depth compare. Currently it can be enabled without sacrifice in performance, but it is not compatible with MSAA. That is if you enabled N64 depth compare you lost anti-aliasing. Now you may enable FXAA and N64 depth compare and play without major sacrifice in graphics quality. Also, FXAA is less demanding to hardware power than MSAA. Anti-aliasing techniques as FXAA are the only way to get AA on mobile devices with GL ES 2.0. FXAA is currently available in WIP builds and of course it will be included into upcoming public release.
Hello!
One of the most exciting features of the upcoming public release is long awaited
HLE implementation of BOSS ZSort microcode. This microcode is used in two great racing games: World Driver Championship and Stunt Racer. Both games were unsupported by emulators for a long time due to core issues. Several years ago these issues were resolved, and the games became playable with graphics plugins, which support LLE mode. GLideN64 supports LLE mode and it can run the games in LLE, but performanc
One of the most exciting features of the upcoming public release is long awaited
HLE implementation of BOSS ZSort microcode. This microcode is used in two great racing games: World Driver Championship and Stunt Racer. Both games were unsupported by emulators for a long time due to core issues. Several years ago these issues were resolved, and the games became playable with graphics plugins, which support LLE mode. GLideN64 supports LLE mode and it can run the games in LLE, but performance is far from good.
HLE mode is usually much faster and has less glitches. The problem is that BOSS developed custom microcode for these games and no information about this microcode leaked. Thus, it had to be decoded from asm code. This work requires skills and patience. GLideN64 obtained the first results in microcode decoding yet in 2016, when Gilles Siberlin aka Gillou68310 decoded microcode for Kuiki Uhabi Suigo. Then me and olivieryuyu completed several decoding projects. Gilles started to work on decoding of BOSS ZSort microcode at the end of 2017.
This microcode is deep modification of ZSort microcode released by Nintendo in 1999. ZSort intended to solve problem with N64 low fill-rate. While N64 supports Hi-Res graphics, not so many games could use hi resolutions without sacrifices in speed or quality because of bottlenecks in the RDP. ZSort sorts objects by depth value before rendering and draws them in order from far to near thus eliminating the use of depth buffer. It not only saves memory but also frees RDP from rendering the depth buffer, which almost doubles the fill-rate for color buffer.
Unfortunately, ZSort was released too late in the system's life and was used only in the engine for series of soccer games, for example Mia Hamm Soccer 64. ZSort is very specific microcode; it has almost nothing in common with F3D/F3DEX series of microcodes which are used in most of N64 games. I had documentation for it and sources of two demos which use it, but nevertheless I spend weeks to implement and debug it.
It seems that ZSort also had some performance flaws, so when BOSS decided to use it for new games, BOSS programmers re-worked it a lot. The resulted ucode differs from original ZSort so much that it was clear - it must be decoded from asm to be HLEed. So, Gilles Siberlin took that task and successfully completed it. Since I did not participate in this task, I don't know all the details. Cite from Gilles: "Wow this is one hell of an optimized ucode!!! The ucode is doing both audio and graphic processing, plus everything fits in less then 1024 instructions so no overlay needed." It is unique case when ucode processes both audio and graphic, no other ucode does it. So, now GLideN64 has a bit of audio processing code. Emulation of this microcode requires modification of N64 SP_STATUS register. That is not allowed by original zilmar's specs for graphics plugin. mupen64plus implemented necessary changes in core to fix that issue and now both World Driver Championship and Stunt Racer work fine with mupen64plus. Work with Project64 is not guaranteed.
Hello,
As you know, right now 2018 FIFA World Cup is held in Russia. 20 years ago 1998 FIFA World Cup was hosted in France. Of course, such event was reflected in numerous video games on all actual platforms of that time, including N64.
One of such games is International Superstar Soccer 98. Unfortunately, GLideN64 had problems with emulation of PAL version of the game. Why PAL version is important? Because PAL version has World Cup France 98 national teams squads updated and licensed, while t
As you know, right now 2018 FIFA World Cup is held in Russia. 20 years ago 1998 FIFA World Cup was hosted in France. Of course, such event was reflected in numerous video games on all actual platforms of that time, including N64.
One of such games is International Superstar Soccer 98. Unfortunately, GLideN64 had problems with emulation of PAL version of the game. Why PAL version is important? Because PAL version has World Cup France 98 national teams squads updated and licensed, while the NTSC version only has the kits, but not the names of the players. So, if you want to refresh in mind who participated in the World Cup 20 years ago, you will definitely like to run PAL version of ISS 98. The issue with emulation of this game is already fixed, so you may run it with latest WIP build.
The problem with this game is quite interesting. It is related to Video Interface emulation.
Video Interface (VI) takes frame buffer rendered by RDP and maps it to TV screen. VI can skip some lines of the buffer from top and bottom, but in almost all cases it reads each line in the buffer from the beginning. I knew only one exception: Bottom of the 9th, baseball game. Title screen has vertical black bars from left and right on TV screen. Rendered frame buffer has only one wide vertical black bar on the right. That is image was centered on screen by VI. To do that, VI set read address that it points to the middle of the black area on the right. VI reads data from frame buffer line by line using specified buffer width. Since VI set start of the line at the middle of black area, it first reads half of black part of the line and then part of the next line until the middle of its black area, see the screen shot:
That way output will have black boarders from left and from right. OpenGL does not read data from buffer line by line. Thus, I added special code to emulate that effect:
PAL version of ISS 98 is another game, which starts to read lines from frame buffer with some offset. This time I don't understand the purpose of it. Look: VI starts to read buffer's line with some offset from the left and stops to read it before the line ended:
Thus, only part of the line appears on TV screen. I don't know, why developers made it that way. My code for Bottom of the 9th detected that VI reads frame buffer with offset and shifted image out of screen. I modified the code to take this situation into account too. Since VI reads only part of each line in the frame buffer, the resulted image on screen becomes cut from left and right:
Hello!
The long-awaited implementation of Factor5 microcodes for "Indiana Jones & the Infernal Machine" and "Star Wars Episode I - Battle for Naboo" completed. It was a long road. We started that work last December and finished it only now. It was incredibly hard task. Until December the hardest task we completed was our previous work, microcode for Star Wars - Rogue Squadron. We worked several months on Rogue Squadron. It is very large and very complex microcode. Resulted source code has c
The long-awaited implementation of Factor5 microcodes for "Indiana Jones & the Infernal Machine" and "Star Wars Episode I - Battle for Naboo" completed. It was a long road. We started that work last December and finished it only now. It was incredibly hard task. Until December the hardest task we completed was our previous work, microcode for Star Wars - Rogue Squadron. We worked several months on Rogue Squadron. It is very large and very complex microcode. Resulted source code has circa 1300 lines, much larger than implementation of any other microcode. Microcodes for Indiana and Naboo are almost as large as the one for Rogue Squadron, and much more harder to decipher. Factor5 programmers really pushed RSP chip to its limits. We spent six months on decoding and implementation. The microcode has very tangled code flow. Debugging was very long and painful process. Many times I wished to stop that work and never return to it. It was huge relief when we finally squashed the last bug and completed reverse engineering stage. The result is circa 2300 (sic!) lines of source code after all cleanups. Hardest part of work - microcode deciphering - done entirely by olivieryuyu. He wrote tons of excel sheets with explanations how things work. I wrote the code.
I recommend to read interviews with Factor5 developers on IGN for technical details: Bringing Indy to N64 and Battling the Naboo. Cite: "Our new microcode allows almost unlimited real-time lights and a much higher polygon count than the original". It is true. Real time lighting system is amazing. Particles system, which can output thousands particles per frame is very impressive. Microcode for Indiana is true masterpiece. Microcode for Naboo is an extension of the one for Indiana. It extends original microcode with command for explosions (very similar to the one for Rogue Squadron) and with commands for terrain polygons. Landscape generation code has almost nothing in common with landscape code in Rogue Squadron. The result is very impressive. Open air levels have very large draw distance with no need to hide horizon in fog.
I recorded few videos during that long work. You may watch them to see how the project progressed:
I have many request from users to "remove these darn annoying black boarders". They refer to black boarder around image, which many N64 games add to compensate overscan. Games for old consoles designed to have black boarders and since GLideN64 does its best to produce as accurate picture as possible, it shows black boarders too.
Black boarders, which can be cropped.
However, GLideN64 does its best to be user-friendly. Thus, Public Release 2.0 introduced Crop feature designed to crop black boa
I have many request from users to "remove these darn annoying black boarders". They refer to black boarder around image, which many N64 games add to compensate overscan. Games for old consoles designed to have black boarders and since GLideN64 does its best to produce as accurate picture as possible, it shows black boarders too.
Black boarders, which can be cropped.
However, GLideN64 does its best to be user-friendly. Thus, Public Release 2.0 introduced Crop feature designed to crop black boarders from the image. Crop efficiently eliminates black boarders, presented in rendered frame buffer.
Crop. Black line at the bottom added by VI.
However, it does not fix the problem entirely. Many games render image without boarders, but when Video Interface put that image on TV screen, it can do it with offsets from edges of visible area, thus adding black boarders to output by itself. Crop feature can't do anything with such cases. Besides, Video Interface almost always skips one-two scan-lines on top and bottom. These black lines are visible even with Crop enabled. Especially sad story is with PAL games. NTSC standard uses 480 scan-lines. Games programmed to look crisp on TV with 480 scan-lines. PAL uses 576 scan-lines. When NTSC game ported to PAL, it becomes the problem. Game needs larger rendering buffer to utilize 576 scan-lines without loss in quality. These requires massive changes in program code with debugging and testing. Thus, most often porting done in lazy way: ignore extra scan-lines and just center our 640x480 image on PAL TV screen with Video Interface. Result is very large vertical boarders on top and bottom, which GLideN64 of course emulated:
PAL version. Crop can't do anything with black horizontal boarders.
I understand that users are not happy about it, but accuracy first.
I was remembering about that not-critical but annoying problem. Crop of rendered buffer was quite easy and fast to implement. Removal of black boarders added by VI is harder. Recently I got one spare day and decided to make ultimate solution for that problem. The idea has direct analogue in real life. If whole TV picture looks like this:
TV could be tuned to enlarge the picture and move its edges out of visible area:
I made Overscan feature, which, when enabled, redirects output of Video Interface from screen to auxiliary render buffer. Part of that buffer then mapped to screen. In fact, it is Crop, but moved to the final stage of image processing. Offsets from each edge are user defined:
As for Crop, Overscan defines offsets in native resolution. Thus, the same settings work for any user resolution. Our PAL example looks like this with Overscan enabled:
Of course, Overscan is compatible with widescreen hack:
PAL game in FullHD + Overscan
Offsets also can be negative. In that case image becomes shrunk instead of enlarged and we get even bigger black boarders:
Why do that? I don't know. Just an option.
The only problem I see with Overscan feature is that I don't know how to make it automatically pick necessary offsets. User have to do it manually. Overscan settings can be added to ini file with custom game settings. That is, user may pick offsets for a game, save them as custom game settings and never return to that procedure. Custom settings use internal rom name, which is usually the same for PAL and NTSC versions. Since PAL and NTSC versions usually need different Overscan offsets, Overscan has two set of settings.
File with custom settings has plain text format. It can be modified in any text editor and until now it was the only way to update the custom settings file. I implemented save of current settings to custom ini from GUI to simplify that task for end users. If option "Use per-game settings" is enabled, GUI will suggest user to save current settings to custom section. Settings with non-default values will be added to custom section. Run a game, enable Overscan, pick offsets and when everything is Ok save settings to custom ini.
Since image is cropped and then mapped to screen, I recommend to use "Multiple of native resolution" option and set large multiple to get image in high resolution. That way you will avoid quality loss with Overscan. And the last note: proportions of rendered objects are changed when Overscan is used.
Hello,
After successful completion of crowdfunding campaign for "Star Wars - Rogue Squadron" people asked us: what about "Indiana Jones" and "Battle for Naboo"? The answer was: these games are in our to-do list. These games also developed by Factor 5, two years after Rogue Squadron. Developers created unique and very complex microcodes, which push N64 hardware to its limits. Decoding and implementation of these microcodes pushes our skills to limits. At the end of November oliveryuyu and me dec
After successful completion of crowdfunding campaign for "Star Wars - Rogue Squadron" people asked us: what about "Indiana Jones" and "Battle for Naboo"? The answer was: these games are in our to-do list. These games also developed by Factor 5, two years after Rogue Squadron. Developers created unique and very complex microcodes, which push N64 hardware to its limits. Decoding and implementation of these microcodes pushes our skills to limits. At the end of November oliveryuyu and me decided to start that work while oliveryuyu's decoding skills are not faded. We worked hard and implemented part of microcode for Indi to the end of last year. This part contains code necessary to run Indiana's intro and menus. It is a proof that we can do that task. However the task is really hard, so we ask for your support again. We started new crowdfunding campaign in Idiegogo:
We want make Indi to run fast and look better than it currently looks in LLE mode. We will do our best to implement microcode for "Battle for Naboo" as well.
I have a request for GLideN64 users: I don't have accounts in social networks. Please help me to spread information about this campaign.
Update: The result after three weeks of the campaign: 14 backers, 60% of the goal. I did not expect that this long expecting work will get so low support. This campaign has fixed goal, which means "all or nothing". If campaign will fail, we will get nothing. It is kinda discouraging.
Anyway, yesterday we got another prove that the task can be completed. Here WIP screen shots from in-game:
Hello,
Today is time to set new Release tag to master branch. Previous Public Release made year ago. Time to set the new milestone. Some statistics: since previous public release
* over 600 commits to master
* closed over 250 various issues
During the year I tried to describe main project's achievements. Lets make a brief retrospective:
The year started from a massive code refactoring. The source code changed drastically. Direct calls to graphics API totally removed from main code. Main code
Today is time to set new Release tag to master branch. Previous Public Release made year ago. Time to set the new milestone. Some statistics: since previous public release
* over 600 commits to master
* closed over 250 various issues
During the year I tried to describe main project's achievements. Lets make a brief retrospective:
The year started from a massive code refactoring. The source code changed drastically. Direct calls to graphics API totally removed from main code. Main code works with graphics via proxy class, which passes graphics call to a graphics back-end. Currently there is one back-end, which uses OpenGL. The refactoring allowed me and other developers to make OpenGL back-end dynamically adoptable for abilities of user's GPU. Thus, the same code works without recompilation for GL ES 2.0, GL ES 3.X, OpenGL 3.X, OpenGL 4.X. The more your GPU can do, the better and faster result you will get. With VAO/VBO support it became possible to use OpenGL core profile and finally port GLideN64 to MacOsX.
After the code refactoring I made major modification of frame buffer and video interface emulation. It was very large and complex work, but the results were rewarding. Fixed lots of old issues, the frame buffer emulation code became simpler.
Long awaited support for Resident Evil 2. The way this game programmed makes it hard to emulate on PC hardware. Many special code required to emulate it properly.
HLE fixes. Most users prefer to use GLideN64 in High Level Emulation mode (HLE), which not only runs much faster than Low Level Emulation (LLE) but also allows them to use widescreen mode and per-pixel lighting. HLE mode has its own issues caused by incomplete or missing implementation of game's microcode. Most of Nintendo microcodes are documented and their implementations work without issues. However, there are many custom microcodes, created by other developers. Documentation for these microcodes is not available for emu devs. To support custom microcode, its assembler code must be reverse-engineered. This work requires skills and patience. The first results in microcode decoding obtained in 2016, when Gilles Siberlin decoded microcode for Kuiki Uhabi Suigo. This year olivieryuyu, the main beta tester of GLideN64, decided to take microcode decoding task and step by step he achieved outstanding results:
T3DUX microcode decoded. Last Legion UX, Shin Nihon Pro Wrestling Toukon Road - Brave Spirits and Shin Nihon Pro Wrestling Toukon Road 2 - The Next Generation now playable with HLE.
F3DAM microcode decoded. This is custom microcode, which only one game uses: Hey You, Pikachu! Now this game is fully playable with HLE without major graphics issues.
F3DFLX microcode decoded. This custom microcode is used to draw vehicles in F-Zero. With implementation of this microcode, the vehicles got reflection effect in HLE mode.
Zelda Majora's Mask point-lighting. This game uses custom lighting method, which graphics plugins developers could not properly implement for many years. Finally, olivieryuyu decided to decode it and he succeeded.
Star Wars - Rogue Squadron. This game was co-developed by Factor 5 and LucasArts. Factor 5 created very complex and very large microcode to port this game on N64. HLE implementation of the game was near impossible because of amount of work necessary to decode and implement that microcode. This summer me and olivieryuyu decided to take it. We achieved first very modest results and started crowdfunding campaign on Indiegogo to support our hard work. Luckily, the campaign was supported and this support encouraged us in our efforts. The game became fully playable in HLEto the end of summer.
Also, Gilles Siberlin has very promising results with HLE implementation of BOSS ZSort microcode for World Driver Championship and Stunt Racer. It should be ready to next release.
Of course, the number of changes is much larger than I could highlight in this blog. Among the most noticeable changes are:
Fixes in software depth buffer render made Body Harvest fully playable. The game suffered from problems with collisions detection.
Emulation of YUV-to-RGB color space conversion allowed to work with YUV textures without hacks and finally fix problems with Projectile Effects in Killer Instinct Gold.
Both Vigilante 8 games became playable after fixes with frame buffer emulation. There are still many glitches in menus, but at least menus are rendered. Game play looks ok.
Gauntlet legendsnow can boot in HLE mode and works without flickering. This result requires changes not only in graphics plugin, but also in core and RSP, and currently available only with mupen64plus. Thanks LegendOfDragoon for support of this game in GLideN64.
Many fixes made in GLideNHQ library, which responsible for texture enhancement and hires texture packs support.
Acknowledgements:
Thanks to all backers of "Star Wars - Rogue Squadron" campaign on Indiegogo. You made this project possible.
Hello,
Problems with emulation of lighting in Zelda MM are almost as old as N64 emulation itself. Many developers (including myself) tried to fix it, but there is no solution, which works 100% correct. Finally olivieryuyu decided to decode it. The task is hard (otherwise it would be already done), but after successful decoding of Star Wars - Rogue Squadron microcode nothing is impossible. olivieryuyu decoded lighting method of Zelda MM. The lighting method is really complex. Not as insanely com
Problems with emulation of lighting in Zelda MM are almost as old as N64 emulation itself. Many developers (including myself) tried to fix it, but there is no solution, which works 100% correct. Finally olivieryuyu decided to decode it. The task is hard (otherwise it would be already done), but after successful decoding of Star Wars - Rogue Squadron microcode nothing is impossible. olivieryuyu decoded lighting method of Zelda MM. The lighting method is really complex. Not as insanely complex as lighting in Conker's Bad Fur Day, but definitely the second place. I started to implement it. WIP screenshot:
Math behind point lighting can be found in many places. Algorithm of point lighting in Zelda MM is close to one, described in this tutorial. Existing implementations of Zelda MM point lighting are close to the truth, but it has subtle and not obvious nuances, which hardly can be guessed without close examination of ucode's asm code.
To be short: olivieryuyu decoded Zelda MM point lighting code completely. It was a hard piece of work due to lots of math. I implemented it. The sources added to master in October. If you want to test it, download latest WIP build from GitHub.
Hello,
I was on vacation after successful implementation of microcode for Star Wars - Rogue Squadron. Now olivieryuyu and me continue to work on HLE issues. I just finished to work on issues in F-Zero. This game is playable, but two features were not emulated. They are:
reflection on vehicles during a race:
and red boarder around your vehicle in attack mode:
Reflections are missing only in HLE. F-Zero uses non-standard ucode F3DFLX to render vehicles. olivieryuyu discovered that this
I was on vacation after successful implementation of microcode for Star Wars - Rogue Squadron. Now olivieryuyu and me continue to work on HLE issues. I just finished to work on issues in F-Zero. This game is playable, but two features were not emulated. They are:
reflection on vehicles during a race:
and red boarder around your vehicle in attack mode:
Reflections are missing only in HLE. F-Zero uses non-standard ucode F3DFLX to render vehicles. olivieryuyu discovered that this ucode has custom lighting routine. He spent a lot of time and efforts to decode it and finally found how it works. It is interesting and unique technique worth to describe it in details.
First, a short introduction to how N64 does reflections. Of course, N64 can't calculate true reflections on surfaces in real time. However, it is powerful enough to create pretty realistic effect of shiny metal surface, like this
This effect requires special texture and special mode, in which texture coordinates for vertices calculated dynamically. Reflection texture is black picture with bright spot at its center, like this:
Special LookAt structure is used to calculate texture coordinates. LookAt structure consists of two Light structures, which contain only coordinates of 3D vector. This vector multiplied by transposed model matrix. Dot product of resulted vector with normal vector of vertex defines one texture coordinate. 2D texture has two coordinates. Thus, texture coordinates calculation requires, at first, two vertex-matrix multiplications and then two dot product calculations for each vertex. It is quite expensive set of calculations. Normally, if scene is complex, only few objects have reflection effect. In racing games, usually only player's car looks cool and shiny while other cars look more modestly.
In F-Zero all vehicles have reflections. While you can see one-two dozens of vehicles on screen at the same time, F-Zero is very fast game. Yes, vehicles models are very simple, but reflection calculation even for simple model is expensive. Normal reflection method could not work fast enough. Thus, F-Zero developers created custom reflection method, which works much faster than normal reflection.
We need calculate two texture coordinates to apply color from reflection texture. However, if we will use 1D texture, number of calculations reduced by half! N64 does not support 1D textures, but that can't stop crafty programmers. Since vehicles models are simple, we can do another optimization and does not use texturing for reflections at all. Instead of fetching texture color for each pixel we can set reflection color per vertex and use standard Gouraud shading. Texture mapping can be used for main vehicle's texture. That way we can apply both vehicle's texture and reflection in one step!
We calculated one texture coordinate in RSP, thus we can fetch reflection color from texture right on vertex loading. How it works: special command loads texture data into DMEM, memory space where microcode running. Microcode calculates texture coordinate and uses it as index to fetch texel from texture in DMEM. But the problem is not solved yet. DMEM size is limited by 4kb, so it is expensive to keep color information in it. Besides, vertex already has color. Blending vertex color with texture color is not right kind of task for RSP, it is RDP task. We can't pass another set of colors with each vertex to RDP. But we have vertex alpha still unused. N64 usually uses vertex alpha as place for fog factor for opaque surfaces. Fog factor calculation depends on vertex Z and enabled by special flag in microcode. N64 blender mixes fog color with output of color combiner using vertex alpha as fog factor. This is exactly what is needed: lets texels of 1D reflection texture be factors for fog color, so they can be assigned to vertex alpha; then enable fog color in blender. Fog factor calculation flag must be disabled for this to work and the microcode disables it. In fact reflections on vehicles in F-Zero are not reflections but fog!
Red boarder problem is not related to microcode - it presents in LLE mode too. I tried to find, what is the source of that color. No components of color combiner equation have such color. I looked at blender and yes - blender uses blend color, which is set to bright red. However, force_blend flag set off. I supposed that when force_blend flag is off, blender is bypassed. I was wrong. force_blend off means that blender equation is not calculated, but first argument of blending equation is taken as result of blending. Usually the first argument of blender equation is color combiner output, so taking the first argument is equivalent to blender bypass. In case of boarder the first argument of blending equation is blend_color. That is blender ignores result of color combiner and outputs just bright red blend_color. I slightly corrected blender shader to support it.
Patreon
Donations are not necessary for project development but always welcome. I set project page on Patreon service to simplify donations process. If you like my work and don't mind to help the project, you may do it on regular basis now. Any sum is welcome. Small dollar is better than big thanks. As a reward you may choose early access to beta builds of the plugin with new features. Beta build with F-Zero fixes is available for patrons right now. Patreon page: https://www.patreon.com/Gliden64
Promotion in social networks is welcome too.
Hello,
crowdfunding campaign on Indiegogo finished:
https://igg.me/at/swrs
Since the campaign reached the goal soon after start, the works started immediately. Now the task is completed: Star Wars - Rogue Squadron is fully playable in HLE mode.Progress story:
Final demo video:
As usual, you may download WIP build from GitHub.
If you want to support my work:
PayPal: https://www.paypal.me/SergeyLipskiy
Yandex money: banner atop.
Since the campaign reached the goal soon after start, the works started immediately. Now the task is completed: Star Wars - Rogue Squadron is fully playable in HLE mode.
Hello,
"Hey You, Pikachu!" is a funny game in 'virtual pet' genre. It can run with emulators, but you need to have original N64 hardware, which comes with that game: Voice Recognition Unit (VRU) and microphone. Also you need an adapter to attach that device to PC. You can't control your pet without that device. However, you can load the game with emulator without VRU attached. When you run the game with GLideN64 in HLE mode, you noticed various graphics glitches:
olivieryuyu has analyzed
"Hey You, Pikachu!" is a funny game in 'virtual pet' genre. It can run with emulators, but you need to have original N64 hardware, which comes with that game: Voice Recognition Unit (VRU) and microphone. Also you need an adapterto attach that device to PC. You can't control your pet without that device. However, you can load the game with emulator without VRU attached. When you run the game with GLideN64 in HLE mode, you noticed various graphics glitches:
olivieryuyu has analyzed microcode for this game and found, that it is custom microcode named F3DAM. It is modification of standard F3DEX2 microcode. Besides voice-recognition specific code, it has modifications related to texture coordinates calculation and fog calculation. These differences causes the issues you can see on screen shots above. olivieryuyu decoded these modifications, I implemented them. All microcode-specific problems gone:
Hello,
Today top news is start of "Star Wars - Rogue Squadron" crowdfunding campaign on Indiegogo:
https://igg.me/at/swrs
Few months ago olivieryuyu and me started to work on decoding and HLE implementation of this game ucode. We spent many time and we got several good results. The task is really hard. I need your support and encouragement to complete it. This demo video shows current state of the project:
We want it to run fast and look as good as in LLE mode or better.
I have a request
Few months ago olivieryuyu and me started to work on decoding and HLE implementation of this game ucode. We spent many time and we got several good results. The task is really hard. I need your support and encouragement to complete it. This demo video shows current state of the project:
We want it to run fast and look as good as in LLE mode or better.
I have a request for GLideN64 users: I don't have accounts in social networks. Please help me to spread information about this campaign.
Update: The campaign reached the goal. Currently $625 USD raised by 25 backers. Thanks to all backers for the support! Alpha-build of the project is sent to all backers. Since the campaign is already successful, I'm continuing to work on the task. I hope, next alpha will show much more graphics.
Update 2: We just finished implementation of microcode command, which generates all terrain polygons in that game. Alpha build is sent to backers. Demo video:
There are four N64 games, which have the same issue in HLE mode: highlighting of some objects or areas is completely missing. Some area should be highlighted as result of explosion or shot from energy weapon, but nothing happens:
The effect works ok in LLE
The games are: Armorines - Project S.W.A.R.M., South Park, Turok 2 - Seeds of Evil, Turok 3 - Shadow of Oblivion. All these games were released by Acclaim Entertainment Inc. This is suspicious coincidence. We found that all four game
There are four N64 games, which have the same issue in HLE mode: highlighting of some objects or areas is completely missing. Some area should be highlighted as result of explosion or shot from energy weapon, but nothing happens:
The effect works ok in LLE
The games are: Armorines - Project S.W.A.R.M., South Park, Turok 2 - Seeds of Evil, Turok 3 - Shadow of Oblivion. All these games were released by Acclaim Entertainment Inc. This is suspicious coincidence. We found that all four games use the same ucode. String id of the ucode claimed that it is standard modification of F3DEX2. Analysis of lighting related commands showed that lighting method used by this ucode is not standard at all, but we did not find any documents, which could explain how it works.
The only way in this case is reverse engineering of ucode's assembler code. olivieryuyu, after success with decoding T3DUX ucode, decided to solve that mystery. He found, that the lighting part of the ucode has custom code indeed. That custom code activated only in special places in games, exactly where highlighting effect is missing.
Standard N64 lighting uses directional and ambient lights. Directional light has direction (vector with 8bit coordinates) and color. Ambient light has only color. Vertex color calculated as sum of colors of directional lights multiplied by light intensity plus color of ambient light. Light intensity depends on angle between light direction and normal to surface, which is kept in vertex.
Custom lighting method, which I called Acclaim lighting, works absolutely differently. Light structure contains position of light source in space (three 16bit coordinates), tree additional 16bit parameters and light's color. 16 bytes in total. Standard light structure has 12 bytes. Eight 16-bytes light structures loaded once at the beginning of display list, when highlight effect used. At first sight these structures have no relation to further rendering process. Game objects use the same vertices, which have the same colors. Lighting bit in geometry mode is switched off. Standard vertex processing method works as if no lighting is used, thus no highlighting effect.
olivieryuyu found geometry mode bit, which activates Acclaim lighting and decoded calculations used by this method. How it works:
For each light source calculate vector from light source position to vertex.
Calculate sum of absolute values of vector's x y and z coordinates.
If this sum is greater than some parameter (say A) in the light source structure, this light is ignored.
Light intensity is calculated as abs(sum - A) * B, where B is another parameter in the light source structure.
Light color is multiplied by light intensity and added to vertex color.
Final result is clamped to 1.
Thus, vertex color brightness can be increased, depending on vertex position. The algorithm looks like an approximation of point lighting. Standard point lighting uses length of vector from vertex to light source to calculate light intensity. Vector length is square root of sum of squares of vector coordinates. This method uses plain sum of vector coordinates.
I implemented Acclaim lighting in GLideN64. The problem is finally solved.
Hello,
As you know, there are several games, which does not work in HLE mode. Some games have major glitches, some does not work at all. These games use custom microcodes. We have no information about these microcodes and it is very unlikely that such information will appear someday. We still can run any game in LLE, but HLE is obviously faster. Thus, attempts to decode custom microcodes and improve quality of HLE emulation continue. The only way to do it is to analyse assembler code and try to
As you know, there are several games, which does not work in HLE mode. Some games have major glitches, some does not work at all. These games use custom microcodes. We have no information about these microcodes and it is very unlikely that such information will appear someday. We still can run any game in LLE, but HLE is obviously faster. Thus, attempts to decode custom microcodes and improve quality of HLE emulation continue. The only way to do it is to analyse assembler code and try to understand what it does. It is very hard task, which only few people in the world can do (not me), so progress is slow.
olivieryuyu, the main beta tester of Glide64 and GLideN64, decided to take decoding task and already achieved great results. Recently he decoded microcode, which is used by Toukon Road 1 & 2 and Last Legion UX games. You can read details about it on wiki page:
Cite: "Last Legion UX, Shin Nihon Pro Wrestling Toukon Road - Brave Spirits and Shin Nihon Pro Wrestling Toukon Road 2 - The Next Generation uses a undocumented Nintendo ucode called T3DUX.
Shin Nihon Pro Wrestling Toukon Road - Brave Spirits uses the version 0.83 and the two other games 0.85.
It is an evolution of the turbo3d microcode which is used only by one game in its original format, Dark Rift.
The major change in T3DUX compared to turbo3d is what we can called a colors & texture coordinates state."
From my side, I wrote HLE implementation of that ucode. Screen shots:
Resident Evil 2 for Nintendo 64 is hard to emulate game. While the game uses standard ucode (or slight modification of standard one), it uses few non-standard tricks, which are hard to reproduce on PC hardware. I spent lots of time on this game when I worked on Glide64 plugin. Abilities of 3dfx graphics card allowed me to obtain pretty good result: the game was fully playable on Voodoo4/5 with some minor glitches. Later necessary functionality was added to glide wrapper, so you can run the game
Resident Evil 2 for Nintendo 64 is hard to emulate game. While the game uses standard ucode (or slight modification of standard one), it uses few non-standard tricks, which are hard to reproduce on PC hardware. I spent lots of time on this game when I worked on Glide64 plugin. Abilities of 3dfx graphics card allowed me to obtain pretty good result: the game was fully playable on Voodoo4/5 with some minor glitches. Later necessary functionality was added to glide wrapper, so you can run the game on any modern PC card.
What makes the game hard to emulate? As you know, the game consists of static 2D backgrounds with 3D models moving over. Background size may vary from place to place: someplace it is 436x384, someplace 448x328 and so on. Frame buffer size corresponds to background size. Video interface stretches image to TV resolution 640x480.
The first problem, which hardware plugin faces in this game is the way how background loaded to frame buffer. To optimize background load and rendering on N64 hardware, background loaded as image with width 512. That is 448x328 image is loaded as 512x287. The game allocates color buffer with width 512 and renders background with BgCopy command into it. In fact BgCopy works as memcpy to copy background content from one address in RDRAM to another. When buffer copy completed, the game allocates buffer with the same origin, but with width 448. Now buffer has correct proportions, and 3D models can be rendered over.
Why it is a problem for hardware graphics plugin? The plugin executes BgCopy command, which loads 512x287 image. It is no problem to create 512x287 texture and render it to frame buffer. The result will look like this:
If the background rendered right to frame buffer, that result can't be fixed. If frame buffer object is used for rendering, you may try to change size of buffer texture the same way as N64 changes size of color buffer. I did not find a way to change size of existing texture without loosing its content with OpenGL. glTexImage2D can change the size/format for existing texture object, but it removes all previous pixel data. Of course, it is possible to copy texture data to conventional memory, resize texture and write the data back, but it will be slow. If you know better method, please share.
There is fast solution of the problem: a hack. Value of video interface register VI_WIDTH is the same as actual width of background image. Thus, we can recalculate background image dimensions and load it properly:
I used that hack in Glide64 and I still don't know better solution. Unfortunately, it works only for HLE, because BgCopy is high-level command. For LLE we still need somehow resize buffer texture.
The next problem is depth compare. I already described the problem hereand here, so I cite myself:
"Few games use scenes consisting of 3D models moving over 2D background. Some of objects on the background can be visually "closer" to user than 3D model, that is part of the 3D model is "behind" that object and that part must not be drawn. For fully 3D scene problem "object behind other object" is usually solved by depth buffer. 2D background has no depth, and depth buffer by itself can't help. Zelda OOT solves that problem by rendering auxiliary 3D scene with plain shaded polygonal objects, corresponding to the objects on the background. Thus, the scene gets correct depth buffer. Then the background covers this scene and 3D models rendered over the background are cut by depth buffer when the models are behind the original polygonal objects.
In Resident Evil 2 all screens are 3D models over 2D backgrounds. But the game does not render auxiliary 3D geometry to make depth buffer. Instead, the game ROM contains pre-rendered depth buffer data for each background. That depth buffer data is copied into RDRAM and each frame it is rendered as 16bit texture into a color buffer which then is used as the depth buffer. To emulate it on PC hardware the depth buffer data must be converted into format of PC depth buffer and copied into PC card depth buffer."
Glide64 was the first plugin, where the problem was solved. Copy values to depth buffer was relatively easy with glide3x API: glide3x depth buffer format is 16bit integer, as for N64. I could load depth image as 16bit RGB texture, render it to a texture buffer and then use that buffer as depth buffer, exactly as N64 does. OpenGL could not do it, but glide wrapper authors also manged to solve that problem. It was kinda hackish, but it works.
GLideN64 uses another solution. I invented it for NFL Quarterback Club 98 TV monitor effect. It is described in details in my Depth buffer emulation II article. Depth image is loaded as texture with one component RED and texel format of GL_UNSIGNED_SHORT. When the texture is rendered, fragment shader stores fetched texel as its depth value. Depth value from fragment shader passed to depth buffer, exactly as we need.
So, we have color background and depth buffer correctly rendered. Victory? Not yet. Depth buffer compare works, but not always. Here it works ok:
but if I step behind it looks like this:
Where is the problem? The problem is in the way N64 depth buffer works. N64 vertex uses 18bit fixed point depth value. N64 depth buffer stores 16 bit elements. N64 uses non-linear transformation of 18bit vertex depth value to 16bit value, which will be used for depth compare and then kept in the depth buffer. OpenGL uses floats for vertex depth and for depth buffer, but it is incorrect to directly compare GL depth component with value from N64 depth image. First, the same transformation must be applied to vertex depth. Fortunately, necessary shader code was already written for depth based fog, which Beetle Adventure Racing uses. I reused that code and finally got perfect result:
I already wrote about N64 Video Interface emulation in GLideN64. It was my first attempt to make things right. Three years passed. Many elements of frame buffer emulation mechanism have been modified since that time. However, one major problem remained. This problem is as old as N64 emulation itself. This is "frame buffer height" problem.
To render anything you first need to allocate rectangular buffer, which will hold your graphics. You need to know width and height to allocate the buffer. The
I already wrote about N64 Video Interface emulation in GLideN64. It was my first attempt to make things right. Three years passed. Many elements of frame buffer emulation mechanism have been modified since that time. However, one major problem remained. This problem is as old as N64 emulation itself. This is "frame buffer height" problem.
To render anything you first need to allocate rectangular buffer, which will hold your graphics. You need to know width and height to allocate the buffer. The problem is that RDP command SetColorImage set only width of color buffer. Height is not set. RDP does not need to know buffer height. SetColorImage provides buffer origin, number of pixels per line and size of each pixel in bytes. This is enough to calculate position of vertex with given X and Y coordinates within the buffer. Scissor command prevents out of buffer writes. Software graphics plugin works exactly as RDP and also does not need to know buffer height. Hardware plugin is in trouble. Suppose, we selected 960x720 resolution with 4:3 aspect ratio and created 960x720 render buffer in video memory. N64 game allocates buffer with width 320. Which scale should we apply to original N64 coordinates to get correct picture in our render buffer? Since 960 = 3 x 320, it seems that correct scale is 3x. That is we scale original N64 X and Y coordinates by 3 and get picture in our buffer. Will this picture be correct? Only if original buffer also has 4:3 aspect, that is has size 320x240. In reality, it also can be 320x220, 320x256 or even 320x480. In all these case 3x scale for Y will give us wrong result. To get correct Y scale we need to know height of original buffer, but it is not available.
Height of N64 render buffer can be estimated from parameters of Video Interface, which defines how color buffer will be mapped to TV screen. All hardware plugins, which I know from inside use this possibility. Thus, frame buffer allocation becomes dependent on VI registers. This dependency does not exist in N64 itself. The height estimation does not guarantee to be always correct, and in fact it is often incorrect. The estimation code is complex and full of heuristics, to reduce numbers of errors. Nevertheless, this tie still induce many issues, in particular with PAL games and with games, which use interlaced TV modes.
Besides main color buffers, whose content is displayed on TV, N64 games often use auxiliary color buffers. These buffers are used for variety of purposes: dynamic shadows, reflections, TV monitors and so on. Auxiliary color buffer can be of any size. Thus, estimation of auxiliary buffer height is complex and fully heuristic algorithm, which also not always works right. Wrong height lead to visual glitches.
At the end of 2016 I finally invented the way to get rid of necessity to know exact height of N64 color buffers. The idea is actually very simple. Why RDP does not care about buffer height? It knows that the height is large enough and just fills the buffer with primitives. Video Interface takes necessary part of the buffer and maps it on TV screen. Auxiliary buffers are used as textures: game's program code knows buffer's bounds and maps texture coordinates to its content.
My frame buffer mechanism creates separate frame buffer object in video memory for each buffer allocated by RDP. I used estimated height to create the buffer render target. It caused aforementioned issues when estimation heuristics failed and produced wrong result. So, the idea is to not use estimated buffer height and always use large enough height instead. 'Large enough' should be taken literally. It is some value, which is surely greater or equal to any possible height of N64 buffer. There are some natural limitations: maximal buffer size for NTSC is 640x480 and 640x576 for PAL. Since I know width of rendering resolution selected by user and I know width of N64 rendering buffer - I know how to scale original coordinates of N64 vertices. This scale can be applied for X and Y coordinate, no matter has the N64 buffer the same aspect as user selected screen resolution or not. Video Interface emulation will map my frame buffer object to screen the same way as N64 Video Interface maps N64 buffer in RDRAM to TV screen.
Pros:
No more buffer height estimation heuristics.
No more glitches caused by wrong height estimation
Emulation of effects, not working before
Cons:
More video memory needed. Memory overhead is not large for main buffers, because actual buffer height is usually close to natural limit used as Large Enough Height. Memory allocated for auxiliary can be 10 times more than actually used.
While the idea is simple, its implementation was not. It was obvious, that lots of things need to be changed. The first step was code refactoring, mentioned in the previous article. After that step I got more clear and easy to modify code. It was not enough though. Some preliminary steps had to be done first.
There is one OpenGL specific problem with emulation of N64 graphics. N64 uses coordinate system with origin in upper left corner. Glide3X API allowed to set origin to either upper left or to lower left. So, when I worked on Glide64, I set origin to upper left and had no inconveniences. OpenGL has origin nailed to lower left corner. If you will use N64 coordinates, you will get image upside down. Thus, Y coordinate must be inverted. (0,0) coordinate translated to (0, maxY), where maxY is buffer's height.
It is simple trick, but you need to apply it everywhere: modify vertex Y, viewport Y, scissor Y. Read from frame buffer to RDRAM have to be done in reverse order. Things could get even more complicated with new frame buffer technique. Thus, I decided to remove Y inversion. Of course, image will be upside down in that case.
However, the image is in frame buffer texture, which I can map to screen as I need. So, it is not a problem. The problem arises when you do not use frame buffer object and do rendering right to back buffer. GLideN64 renders right to screen when frame buffer emulation disabled. I did not want to keep Y inversion code to support "no frame buffer emulation" mode. My goal was to simplify things, not to make them more complex and intricate. Thus, I decided to slightly modify "no frame buffer emulation" mode: use one frame buffer object for rendering instead of direct render to back buffer. It also mentioned in previous article: "Anti aliasing without frame buffer emulation". After that modification I could safely remove Y inversion code.
After preliminary work completed, real challenge started. Implementation of my idea was a very hard task. Frame buffer emulation was twisted tight with VI emulation, and I spent many time untangling multiple knots and fixing weirdest glitches. At the end I was totally rewarded. Issues with cut image in PAL games gone. Issues with screen shakes in interlaced mode gone. Many crashes with buffer copy to RDRAM gone. VI effects started to work more smooth. Screen shrink VI effect in Mia Hamm Soccer finally start to work properly.
Hello,
Three month passed since the latest Public Release. Time to report about most noticeable changes.
Massive code refactoring
GLideN64 currently supports the following graphics API: OpenGL, GLES2, GLES3, GLES3.1
OpenGL support also divided on GL 3.3 and GL 4.3+. API functions called directly from any place in code. It causes the following problems:
The code contains lots of GL version - specific code, separated by #ifdef (or if() for OpenGL versions)
Android emulator distributes 4 GLid
Three month passed since the latest Public Release. Time to report about most noticeable changes.
Massive code refactoring
GLideN64 currently supports the following graphics API: OpenGL, GLES2, GLES3, GLES3.1
OpenGL support also divided on GL 3.3 and GL 4.3+. API functions called directly from any place in code. It causes the following problems:
The code contains lots of GL version - specific code, separated by #ifdef (or if() for OpenGL versions)
Android emulator distributes 4 GLideN64 binaries for each supported CPU family.
I refactored GLideN64 code to totally remove direct calls to graphics API from main code. All core GLideN64 classes use special proxy class graphics::Context to manipulate with textures , shaders, buffers and so on, and to draw objects. Context passes calls to back-end class. Currently there is one back-end, which uses OpenGL. If somebody wants to add Vulkan API or DirectX API support, it can be made much easier now: just write new back-end.
OpenGL backend designed as dynamically adoptable for available GL version. It may use different functions for the same task. For example, if available GL supports glTexStorage2D the new texture will be initialized with glTexStorage2D and with glTexImage2D otherwise.
Another example is polygons drawing. Core OpenGL 3.3 requires to pass vertex data from application to GL via Vertex Buffer Object (VBO). GLideN64 used immediate mode rendering with data stored in client side arrays. Thus, it could not use core profile. New back-end implements primitives drawer, which uses VBO and supports core profile. However, we found that many Android devices work better with old immediate mode rendering. So, the back-end also has primitives drawer, which uses immediate mode. Back-end decides which drawer to use in run-time and does it transparently to main code.
The amount of code changes was huge. I totally rewrote many parts of code. As the result, the code is much more clean now. Logan McNaughton and Francisco Zurita helped me to tune the back-end and select most effective GL functions for each GL version. In most cases refactored code works as fast or better than before refactoring. Android port now uses only one binary for all versions of GL ES.
VSync support
GLideN64 version for Zilmar-spec emulators does not support vertical sync. I thought that necessity in that option gone with analog monitors. However, users asked me to add it, because they experienced tearing on their monitors without it. VSync is not part of OpenGL specifications. Use of WGL extensions required to enable it on Windows. I haven't time for it until recently. The code refactoring made it possible to use OpenGL core profile on Windows. Core profile also requires use of WGL extensions. I made necessary changes. Adding VSync support was a matter of few lines after that. Ryan Rosser added new control to the GUI.
MacOsX port
While GLideN64 successfully works on Linux and Android, Mac port was impossible until now. Mac OpenGL driver requires from application to use core GL profile if it needs to work with OpenGL 3.3 or above. That implies VBO support. GLideN64 did not support VBO until the refactoring. I made new attempt to port the code to MacOsX after refactoring completed. This attempt was successful:
I don't know how well the port works: I have no Mac. I got remote access to Mac mini via command line and just made code compilable. The video provided by Brent Woodruff, who built plugin from sources and run on his Mac.
Anti aliasing without frame buffer emulation
Frame buffer emulation is enabled by default. It can be disabled, but it also disables many features, including anti aliasing and gamma correction. This is because anti aliasing and gamma correction requires rendering with Frame Buffer Objects (FBO), which is enabled only with frame buffer emulation. I changed it: now plugin always uses FBO for rendering. This made possible to use anti aliasing and gamma correction even when frame buffer emulation disabled. This was done as preliminary step for another large code refactoring, which I will describe next time.
Donations
Donations are welcome. Two options are available: Yandex Money (the form above) and PayPal: https://www.paypal.me/SergeyLipskiy. Both methods work well, my thanks to people, who used them. Also, does anybody know how to place my paypal.me link as widget/gadget on blog layout? I'm helpless in web design. Another side note: it seems that my mail server has problems with sending mails to AOL mailboxes. I tried to say thanks by email, but it probably was not delivered.
Hello,
Time is come to set new Release tag to master branch. 20 months passed since the first major public release. List of improvements made since that time is huge. Thus this new release gets new major version. Some statistics: since previous public release
* 690 commits to master
* closed over 450 various issues
Fixes in combiner, blender, texture loading, frame buffer emulation eliminated graphics issues, which plagued N64 emulation since the beginning and until recently required use of so
Time is come to set new Release tag to master branch. 20 months passed since the first major public release. List of improvements made since that time is huge. Thus this new release gets new major version. Some statistics: since previous public release
* 690 commits to master
* closedover 450 various issues
Fixes in combiner, blender, texture loading, frame buffer emulation eliminated graphics issues, which plagued N64 emulation since the beginning and until recently required use of software rendering for correct emulation. Of course, hundreds of GLideN64 own bugs was squashed on the way. Detailed information about new features of this release can be found in my New Public Release articles.
Public release 1.0 took 8 month of my hard full-time work. It became possible as result of successful crowd-funding campaign on Indiegogo.
Now I 'm working on the project as on my hobby, in my spare time. New major release took 20 months. It could take much more, but now I am not working alone. The project currently has 28 contributors.
My special thanks to:
purplemarshmallow: frame buffer emulation improvments, general fixes
Francisco Zurita aka fzurita: support of Android port, GLES fixes, general fixes
Logan McNaughton aka loganmc10: support of Raspberry Pi port, general fixes
Ryan Rosser aka Aquatakat: GUI design
matthewharvey: code cleanup and optimization
Gilles Siberlin aka Gillou68310: ucode decoding, general fixes
AmbientMalice: ini cleanup
Very special thanks to Sergey Povalihin aka angrylion for explanations of various aspects of RDP work. His advices helped me to fix many tricky issues.
Also, my thanks to all users ofhttps://github.com/gonetz/GLideN64. Your bug reports and feedback greatly help us to improve quality of the program.
Speaking of quality: we still have over 200open issues. Not all of them are bug reports. Feature requests and suggestions are in that list too. Nevertheless, list of known issues is still large. There are games, which are not supported at all. The work will continue.
Internalization: at this moment only two translations are up to date:
Spanish, thanks to Víctor "IlDucci"
French, thanks to baptiste0602
Other translation files built from translations for previous release, so lots of text left untranslated.
However, there is a problem. I'm living in Russia and has Russian PayPal account. This account is very limited. I can pay with it, but I can not get money transfers or donations. I did not find another convenient and legal way for donations in foreign currency.
Update: Russian user told me that PayPal is actually a valid option for international donations. Test money transfer proved that it works. I created paypal.me page for convenient transfer: https://www.paypal.me/SergeyLipskiy
Also, I have Yandex Money account for transfers in Rubles, see the form on the top.