LILYGO T-Encoder-Pro is a rotary encoder based on Espressif Systems ESP32-S3 WiFi and Bluetooth SoC, equipped with a 1.2-inch AMOLED with touchscreen support, and two Qwiic connectors for expansion.
LILIGO T-Encoder was introduced in 2022 with ESP32 WiFi and Bluetooth SoC and a few GPIOs that enabled it to be fitted on a 2-key keypad shield. The LILYGO T-Encoder Pro has a completely different design with a more advanced ESP32-S3 SoC, an integrated touchscreen display, and GPIOs are now exposed t
LILYGO T-Encoder-Pro is a rotary encoder based on Espressif Systems ESP32-S3 WiFi and Bluetooth SoC, equipped with a 1.2-inch AMOLED with touchscreen support, and two Qwiic connectors for expansion.
LILIGO T-Encoder was introduced in 2022 with ESP32 WiFi and Bluetooth SoC and a few GPIOs that enabled it to be fitted on a 2-key keypad shield. The LILYGO T-Encoder Pro has a completely different design with a more advanced ESP32-S3 SoC, an integrated touchscreen display, and GPIOs are now exposed through Qwiic connectors instead of headers.
Misc – Buzzer (connected to IO17), user button (IO0), 3x mounting threads
Power Supply – 5V/500mA via USB-C port
Dimensions – 43.5 x 43.5 x 27.5mm
The T-Encoder Pro supports PlatformIO/Arduino programming using the Arduino_GFX library for the AMOLED driver, SensorLib for the CHSC5816 touchscreen controller, and the LVGL library for UI design. You’ll find PDF schematics, datasheet, basic instructions to get started, and Arduino sketches for the main features (touchscreen, display, encoder, and LVGL-based test program) on GitHub.
The Maker Go ESP32-C6-EVB is an open-source development board built upon the ESP32-C6 module. It integrates four relays and four opto-isolated inputs and supports multiple wireless technologies including Wi-Fi 6, Bluetooth Low Energy 5.0, and Thread/Zigbee.
The Espressif ESP32-C6 on the development board is a single, RISC-V system-on-chip with 2.4GHz Wi-Fi 6 (802.11ax), Bluetooth 5 (LE), and Thread/Zigbee (802.15.4). It is integrated into the ESP32-C6-WROOM-1-N4 module with an onboard PCB anten
The Maker Go ESP32-C6-EVB is an open-source development board built upon the ESP32-C6 module. It integrates four relays and four opto-isolated inputs and supports multiple wireless technologies including Wi-Fi 6, Bluetooth Low Energy 5.0, and Thread/Zigbee.
The Espressif ESP32-C6 on the development board is a single, RISC-V system-on-chip with 2.4GHz Wi-Fi 6 (802.11ax), Bluetooth 5 (LE), and Thread/Zigbee (802.15.4). It is integrated into the ESP32-C6-WROOM-1-N4 module with an onboard PCB antenna, 4MB of SPI flash, and 23 GPIOs.
Espressif Systems ESP32-C6 single core 32-bit RISC-V processor @ 160 MHz with 2.4 GHz WiFi 6 1T1R with Target Wake Time (TWT) support, Bluetooth LE 5.0, and 802.15.4 radio for Zigbee, Thread, Matter, 2.4GHz proprietary
Storage – 4MB SPI flash
PCB antenna
USB – 1x USB Type-C port for programming and JTAG debugging
I/Os and expansion
4x relays (10A/240VAC)
4x optoisolated inputs for DC voltage up to 30VDC
2x UEXT connectors
Extension GPIO connector
Programming connector suitable for ESP-PROG
Misc – Reset and user buttons
Power Supply – 8-50V DC wide range supply voltage via DC jack
Dimensions
Board – 122 mm x 82 mm (Four mount holes)
Shell – 145 mm x 90 mm
The Maker Go relay board is very similar to the open-source Olimex ESP32-C6-EVB dev board released last year. However, it is slightly cheaper at about $13 and uses a different interface and connector layout. EasyEDA schematics, Tasmota firmware, and a sample program can be downloaded from the company’s website. Our best guess is that Maker Go based their dev board on the Olimex ESP32-C6-EVB (same name and everything), but they didn’t credit Olimex anywhere on the Tindie page or their website. Some tools allow people to import KiCAD to EasyEDA so maybe that’s what they used and made some modifications after that.
The Maker Go ESP32-C6-EVB relay board can be pruchased for $13.41 on Tindie, and it may soon become available on Aliexpress along with other relay boards from the company. You can also get a plastic shell for the development board that leaves the essential interfaces exposed – optocoupler inputs, relays, USB-C programming, and power jack – for $6.
Waveshare MAX9296A GMSL camera board allows two cameras to be connected to the Jetson Orin Nano / NX developer boards. The board is built around a MAX9296A Deserializer IC and supports GMSL1 and GMSL2 protocols and ensures fast, low-latency video transmission. The board uses a high-speed interface for transmitting video data, making it ideal for applications like self-driving cars, machine vision, and security systems.
Previously we have seen GMSL used in products like AAEON BOXER-8645AI, Neousy
Waveshare MAX9296A GMSL camera board allows two cameras to be connected to the Jetson Orin Nano / NX developer boards. The board is built around a MAX9296A Deserializer IC and supports GMSL1 and GMSL2 protocols and ensures fast, low-latency video transmission. The board uses a high-speed interface for transmitting video data, making it ideal for applications like self-driving cars, machine vision, and security systems.
Previously we have seen GMSL used in products like AAEON BOXER-8645AI, Neousys Technology NRU-110V, and others. We have also written about NileCAM21 which can work with a 15-meter-long cable attached to it feel free to check those out if you are interested in those products.
Waveshare MAX9296A GMSL camera board specifications
Serializer model support – MAX9295, MAX96717, MAX96705, etc.
GMSL input – 2-ch GMSL2 (compatible with GMSL1)
Trigger input – Internal GPIO or external signals
Input interface – 2x MATE-AX FAKRA connectors
Output interface – 2x 22-Pin CSI interfaces
GMSL camera support – IMX390, IMX490, ISX031, OX03C, AR0820, etc.
Power supply: 12V ~ 20V DC input
Operating temperature: -20°C ~ 65°C
Dimensions – 80 x 53 mm
GMSL (Gigabit Multimedia Serial Link) is a high-speed serial transmission technology designed for high-bandwidth multimedia data transmission, with the advantages of long distances, low latency, high anti-interference, and simple wiring. It is mainly used in automotive electronics and industrial applications and is capable of transmitting high-definition video, audio, and data signals over one cable. By using coaxial or twisted-pair cables, GMSL can achieve long-distance signal transmission.
The company mentions that the board uses the MAX9296A deserializer chip to connect up to two GMSL cameras simultaneously to the Jetson Orin, making it suitable for applications like machine vision, autonomous driving, intelligent surveillance systems, and much more.
For those interested in the hardware details, Waveshare also provides a specification diagram of the board although more detailed information along with hardware connection, user guide, driver files, and other information can be found on the Waveshare wiki page.
The MAX9296A GMSL camera board for NVIDIA Jetson Orin devkits can be purchased from Aliexpress for $116.93 and on Amazon for $143.99. You can also buy the board from Waveshare official store where it will cost you $119.99 but the price is without shipping. Waveshare also offers the ISX031 3MP GMSL camera module compatible with their MAX9296A board on Aliexpress for $583.99 and on its own website for $499.99 excluding shipping.
M5Stack M5PoECAM-W V1.1 is a PoE camera module built around the Espressif ESP32 MCU and WIZnet W5500 Hardwired TCP/IP embedded Ethernet controller. The W5500 along with a PoE controller takes care of ethernet and PoE power whereas the 3MP OV3660 sensor is responsible for video and photos. The camera features a wide 65° field of view which makes it suitable for applications like image monitoring and remote data acquisition.
Previously we have covered similar camera modules like the LILYGO T-Camer
M5Stack M5PoECAM-W V1.1 is a PoE camera module built around the Espressif ESP32 MCU and WIZnet W5500 Hardwired TCP/IP embedded Ethernet controller. The W5500 along with a PoE controller takes care of ethernet and PoE power whereas the 3MP OV3660 sensor is responsible for video and photos. The camera features a wide 65° field of view which makes it suitable for applications like image monitoring and remote data acquisition.
Expansion – 4-pin Grove connector; 2x 3-pin GPIO headers
Misc – Reset and user buttons; LED indicator light
Power Supply – PoE IEEE802.3AF (Max power 6W)
Dimensions – 64 x 24 x 18 mm
Weight – 38 grams
The OV3660 is a 3-megapixel CMOS image sensor with 720p HD video capability and improved sensitivity. It features OmniBSI technology for enhanced sensitivity and a rolling shutter for fast-moving scene capture. The module supports JPEG and RAW formats and offers exposure control, white balance, and 70 dB of dynamic range. It also supports up to 120fps recoding at QVGA resolution.
The module features various interfaces like the G37 button, LED indicator light, a Grove interface, and expansion pins. Additionally, it comes with a camera clip and a stand for added compatibility. However, more information about the product can be found on M5Stack’s wiki page where you will also find a schematic for the camera and datasheet for the ESP32, OV3660 camera, and W5500 Ethernet controller.
In terms of software, the camera module is compatible with Arduino and ESP-IDF which makes it easy to get started with. With these features and a developer-friendly environment, this camera is useful for applications like warehouse monitoring, timed photography, computer vision, smart home monitoring, and many others.
After checking out Radxa Fogwise Airbox hardware in the first part of the review last month, I’ve now had time to test the SOPHGO SG2300x-powered AI box with an Ubuntu 20.04 Server image preloaded with CasaOS as well as Stable Diffusion and Llama3 containers.
I’ll start the second part of the review by checking out the pre-installed Stable Diffusion text-to-image generator and Llama3 AI chatbot, then manually install imgSearch AI-powered image search engine in CasaOS web dashboard, test the Pyth
After checking out Radxa Fogwise Airbox hardware in the first part of the review last month, I’ve now had time to test the SOPHGO SG2300x-powered AI box with an Ubuntu 20.04 Server image preloaded with CasaOS as well as Stable Diffusion and Llama3 containers.
I’ll start the second part of the review by checking out the pre-installed Stable Diffusion text-to-image generator and Llama3 AI chatbot, then manually install imgSearch AI-powered image search engine in CasaOS web dashboard, test the Python SDK in the command line, and run some AI vision models, namely Resnet50 and YOLOv8.
Radxa Fogwise Airbox OS installation
Radxa only provided an Ubuntu Server 20.04 image last month with only the basics pre-installated. The company has now improved the documentation and also made two images available for the Radxa Fogwise Airbox:
Base image (1.2GB) – Based on Ubuntu Server 20.04; contains only Sophon base SDK and backend.
Full image (9.5GB) – Same as above, but adding the Radxa LLM frontend, CasaOS, and demos for common LLMs.
Beginners should go with the second even if it takes longer to download, as it will make everything much easier to test out of the box. So that is the image I went with (Radxa Airbox B5 0606), and I used USBImager to flash it in a 32GB microSD card, before inserting the microSD card into the Fogwise Airbox and monitoring the installation with the serial console as I did in the first part of the review.
After installation is complete, we can see airbox.local’s TCP port 81 is open and we can access the CasaOS dashboard using radxa and radxa as login credentials.
jaufranc@CNX-LAPTOP-5:~/edev/twentyseventeen-child$ nmap -F Airbox.local
Starting Nmap 7.80 ( https://nmap.org ) at 2024-06-16 16:11 +07
Nmap scan report for Airbox.local (192.168.31.71)
Host is up (0.0012s latency).
rDNS record for 192.168.31.71: Airbox
Not shown: 94 closed ports
PORT     STATE SERVICE
22/tcp   open  ssh
80/tcp   open  http
81/tcp   open  hosts2-ns
139/tcp  open  netbios-ssn
445/tcp  open  microsoft-ds
8888/tcp open  sun-answerbook
Using Radxa Fogwise Airbox with CasaOS
It will show some system information (I also connected a USB hard drive), but the most important is that Stable Diffusion and Lllama3 are already installed. You may consider changing CasaOS’s username and password, and accessing the Linux terminal through SSH with username (linaro) and password (linaro) to change the password there as well…
Here is some extra information about the system from inxi.
Only 2.99GB RAM is available to the system, although I have a machine with 16GB of RAM. That’s because the RAM is shared between the NPU (Neural Processing Unit), VPU (Video Processing Unit), and VPP (Graphics Acceleration Unit). We can check the settings with the memory_edit utility as follows:
linaro@Airbox:~$ memory_edit.sh -p bm1684x_sm7m_v1.2.dtb
Info: use dts file /opt/sophon/memory_edit/output/bm1684x_sm7m_v1.2.dts
Info: chip is bm1684x
Info: =======================================================================
Info: get ddr information ...
Info: ddr12_size 8589934592 Byte [8192 MiB]
Info: ddr3_size 4294967296 Byte [4096 MiB]
Info: ddr4_size 4294967296 Byte [4096 MiB]
Info: ddr_size 16384 MiB
Info: =======================================================================
Info: get max memory size ...
Info: max npu size: 0x1dbf00000 [7615 MiB]
Info: max vpu size: 0xb8000000 [2944 MiB]
Info: max vpp size: 0x100000000 [4096 MiB]
Info: =======================================================================
Info: get now memory size ...
Info: now npu size: 0x1c0000000 [7168 MiB]
Info: now vpu size: 0x80000000 [2048 MiB]
Info: now vpp size: 0xc0000000 [3072 MiB]
That means we are left with 4096 MB for the system with this device tree file. If needed, it can be changed with the script as follows:
I have not changed it before the current memory configuration works fine for the AI models used.
Stable diffusion test
Let’s now click on the Stable Diffusion icon in CasaOS dashboard to start and open it. The first time I tried it looked like it would not work and Firefox was unable to connect. That’s simply because it takes time for the container to start, so you’ll want to wait a minute or two before trying again.
The web interface for Stable Diffusion is built with Gradio which explains why the window is called “Gradio”. The first step is to select the Model and Controlnet and click on the Load Model button although there’s not much of a choice here because each dropdown menu only has a single choice. It will take a little while to load the model (around 1 minute), and then we can try the text-to-image generator. I started with one of the examples provided at the bottom with both a prompt:
1girl, ponytail ,white hair, purple eyes, medium breasts, collarbone, flowers and petals, landscape, background, rose, abstract
It took about 7 seconds to create the image. I then tried my own text prompt creating an image with a penguin surfing at a beach with some palm trees.
It also took 5 to 7 seconds to create the image. Adding an input image may be quite fun and it allows us to better understand the denoising strength and CFG scale parameters. All processing is done locally, you don’t have to worry about sharing personal photos online. I used a stock photo with older people as a test.
I set the denoising strength to the minimum to keep most of the original image, and the CFG scale to 0 to give it some flexibility. The resulting image is very close to the original.
If I boost the denoising strength and play around with the CFG scale to get an acceptable result… Stable Diffusion still takes the input as a guide, but it has much more flexibility when creating a photo.
I’ve noticed that when human subjects are small in a photo the results don’t look that good. Let’s try another photo.
That’s better. Adjusting the denoising strength will create images further and further from the original. The GFC scale can create “monsters” with funny fingers and physical attributes. All tests I did completed in 5 to 10 seconds.
Llama3 on Fogwise Airbox
Time to shut down the Stable Diffusion container, and start Llama3. We’ve presented with a text prompt and a submit button at the bottom of the page. So I asked whether Llama3 knew anything about CNX Software.
Most of it gives a pretty good summary of what CNX Software does, although the starting year is wrong. But I was told (on X), that I should not expect Llama3 to spew accurate information. I guess it’s some art project then
We don’t have performance metrics in the web interface, so I shot a screencast in Ubuntu to show the rendering speeds.
I then asked Llama3 to translate a relatively short text into English but this stopped in the middle of the answer with a warning reading “reach the maximal length, Llama3 would clear all history record”.
So stopped the container, changed the memory limits from 256 to 2048, and restarted Llama3.
But I got the same issue. Radxa told me it’s possible to change that:
Our Llama3 is fixed length input due with TPU design, for now is 512 length, if the total input + output > 512 the model would clear all of history information, if you want to increase the length of model, you can compile it to 1024 or more follow this link: https://github.com/sophgo/LLM-TPU/tree/main/models/Llama3 (chinese), but it would cost more inference time, or you can set –enable_history to False to ignore the history
I don’t think I can do that in CasaOS, but I’ll try again later in the command line.
Installing and running imgSearch in CasaOS
We’ve only used some preinstalled apps so far. But we can install extra apps manually including “Radxa whisper”, “Radxa ImageSearch”, and “Radxa chatdoc”. I’ll go with the imgSearch image search implementation
The first step is to click on the + icon and select “Install a customized app”
Then we need to add the parameters for the docker image:
Web UI port – 9007 (you can select any unused TCP port)
Host Port – 9007
Container Port – 8501
Host Devices – /dev
Container Devices – /dev
CPU Shares – Medium
Now click on the “Install” button to start the installation process which only takes several seconds.
We now have a new app called “Image_Search”.
We can click on the app to start it, however the first time I tried, it would get stuck forever in a loop showing “Running”
If I check the log in Ubuntu 20.04 we can see a few out-of-memory errors:
[65184.192877] [6] :oom-kill:constraint=CONSTRAINT_MEMCG,nodemask=(null),cpuset=d696d17bd12939256402639cbda19d9f55995ad0fa2e65f9f39a1f98e716cc58,mems_allowed=0,oom_memcg=/docker/d696d17bd12939256402639cbda19d9f55995ad0fa2e65f9f39a1f98e716cc58,task_memcg=/docker/d696d17bd12939256402639cbda19d9f55995ad0fa2e65f9f39a1f98e716cc58,task=streamlit,pid=171794,uid=0
[65184.192913] [6] :Memory cgroup out of memory: Killed process 171794 (streamlit) total-vm:1573764kB, anon-rss:254604kB, file-rss:17656kB, shmem-rss:0kB, UID:0 pgtables:1176kB oom_score_adj:0
[65184.395643] [1] :docker0: port 1(vethe3b63bc) entered disabled state
[65184.395762] [1] :veth298a23d: renamed from eth0
[65184.472287] [1] :docker0: port 1(vethe3b63bc) entered disabled state
[65184.474744] [1] :device vethe3b63bc left promiscuous mode
[65184.474753] [1] :docker0: port 1(vethe3b63bc) entered disabled state
[65184.541368] [1] :overlayfs: NFS export requires "index=on", falling back to nfs_export=off.
We can also check the log in CasaOS and the program is continuously being killed and restarted.
The trick is to change the memory limit in the app settings. I changed it to 2048.
We can click on Save which will reinstall the docker container with the new parameters, and this time around it can run:
My first idea was to select a directory on the hard drive attached to the Radxa Fogwise Airbox AI Box, but it’s not implemented that way, as instead, we need to manually upload a list of files. I was told the Steamlit Python framework used for this demo does not have a widget to load files from a directory. Nevertheless, I created a “Test 1” gallery with around 3 photos to get started. It could process the photos within a few seconds.
However, I was unable to run the test due to an error that reads “could not open ./results/EN/Test 1/index.faiss for reading: No such file or directory“.
If I go to the results/EN directory in the Terminal for the container, there’s a “Test 1” folder, but it’s empty.
Then I thought maybe, it’s not liking the space in the gallery name. So I changed that to “test2” and it worked after uploading a few recent pictures.
Then I created a “CNXSoftware” gallery trying to add all images from 2023 (about 4,000 of those), but it was stuck and nothing seemed to happen. So I just uploaded a few hundred from the directory, and I was able to search for “block diagram” from the list of photos and got relevant results.
Checking out the Python Virtual environment on Fogwise Airbox
Time to shut down all containers running in CasaOS, and try the Python Virtual environment that should give the user more flexibility. I’ll be following the instructions for Llama3 since I have some unfinished business.
At first, I did this in the root partition (/), but I quickly ran out of space.
So I switched to the 25GB “data” partition instead. Adding an M.2 2230 NVMe SSD to the Fogwise Airbox might be a good idea since AI models are large, and you may not want to delete or move the files around all of the time…
Let’s get the Llama3 Python demo:
mkdir -p /data/temp
cd /data/temp/
git clone https://github.com/zifeng-radxa/LLM-TPU.git
cd LLM-TPU/models/Llama3/python_demo
The Llama3 8B model can be downloaded as follows:
wget https://github.com/radxa-edge/TPU-Edge-AI/releases/download/llama3/tar_downloader.sh
bash tar_downloader.sh
tar -xvf llama3-8b_int4_1dev_512.tar.gz
Let’s now setup the environment and install dependencies:
cd ..
pip3 install --upgrade pip
pip3 install -r requirements.txt
cd python_demo
export LD_LIBRARY_PATH=/data/temp/LLM-TPU/support/lib_soc:$LD_LIBRARY_PATH
cp llama3-8b_int4_1dev_512/*.so .
We can now start the Llama3 demo in the terminal (Note: it will take a while before we get to the prompt, so be patient):
(.venv) linaro@Airbox:/data/temp/LLM-TPU/models/Llama3/python_demo$ python3 pipeline.py -m ./llama3-8b_int4_1dev_512/llama3-8b_int4_1dev_512.bmodel -t ../token_config/
None of PyTorch, TensorFlow >= 2.0, or Flax have been found. Models won't be available and only tokenizers, configuration and file/data utilities can be used.
Load ../token_config/ ...
Special tokens have been added in the vocabulary, make sure the associated word embeddings are fine-tuned or trained.
Device [ 0 ] loading ....
[BMRT][bmcpu_setup:498] INFO:cpu_lib 'libcpuop.so' is loaded.
[BMRT][bmcpu_setup:521] INFO:Not able to open libcustomcpuop.so
bmcpu init: skip cpu_user_defined
open usercpu.so, init user_cpu_init
[BMRT][BMProfileDeviceBase:190] INFO:gdma=0, tiu=0, mcu=0
Model[./llama3-8b_int4_1dev_512/llama3-8b_int4_1dev_512.bmodel] loading ....
[BMRT][load_bmodel:1939] INFO:Loading bmodel from [./llama3-8b_int4_1dev_512/llama3-8b_int4_1dev_512.bmodel]. Thanks for your patience...
[BMRT][load_bmodel:1704] INFO:Bmodel loaded, version 2.2+v1.7-20240419
[BMRT][load_bmodel:1706] INFO:pre net num: 0, load net num: 69
[BMRT][load_tpu_module:1802] INFO:loading firmare in bmodel
[BMRT][preload_funcs:2121] INFO: core_id=0, multi_fullnet_func_id=30
[BMRT][preload_funcs:2124] INFO: core_id=0, dynamic_fullnet_func_id=31

Done!

=================================================================
1. If you want to quit, please enter one of [q, quit, exit]
2. To create a new chat session, please enter one of [clear, new]
=================================================================

Question:
Answer: Hello! I'm Llama3, a helpful AI assistant. I'm here to assist you with any questions or tasks you may have. What's on your mind? Do you need help with something specific or just want to chat? I'm all ears (or rather, all text)!
FTL: 0.798 s
TPS: 9.565 token/s
Let’s ask the same question as before:
Question: What do you know about CNX Software?

Answer: CNX Software is a popular online publication that focuses on embedded systems, IoT, and related technologies. They provide news, articles, tutorials, and reviews on various topics such as:

1. Embedded systems: Microcontrollers, single-board computers, and other embedded devices.
2. IoT (Internet of Things): Connected devices, sensors, and applications.
3. Robotics: Robotics platforms, programming, and automation.
4. Artificial intelligence (AI) and machine learning (ML): Applications and implementations in embedded systems.
5. Linux and open-source operating systems: Tutorials, reviews, and news on Linux and other open-source OSes.

CNX Software is known for its in-depth articles, tutorials, and reviews, which cater to a wide range of audiences, from beginners to experienced professionals. They also feature interviews with industry experts and provide resources for learning and development.

The website is a valuable resource for anyone interested in embedded systems, IoT, and related technologies. It's a great place to stay updated on the latest developments, learn new skills, and explore new projects.

Would you like to know more about a specific topic or aspect of CNX Software?
FTL: 0.722 s
TPS: 9.566 token/s
The AI box generates 9.566 token/s. if you want to reproduce the Gradio demo as in CasaOS, we can start the web_demo.py Python script instead:
(.venv) linaro@Airbox:/data/temp/LLM-TPU/models/Llama3/python_demo$ python3 web_demo.py -m ./llama3-8b_int4_1dev_512/llama3-8b_int4_1dev_512.bmodel -t ../token_config/
/data/temp/LLM-TPU/models/Llama3/python_demo/.venv/lib/python3.8/site-packages/gradio_client/documentation.py:104: UserWarning: Could not get documentation group for <class 'gradio.mix.Parallel'>: No known documentation group for module 'gradio.mix'
  warnings.warn(f"Could not get documentation group for {cls}: {exc}")
/data/temp/LLM-TPU/models/Llama3/python_demo/.venv/lib/python3.8/site-packages/gradio_client/documentation.py:104: UserWarning: Could not get documentation group for <class 'gradio.mix.Series'>: No known documentation group for module 'gradio.mix'
  warnings.warn(f"Could not get documentation group for {cls}: {exc}")
None of PyTorch, TensorFlow >= 2.0, or Flax have been found. Models won't be available and only tokenizers, configuration and file/data utilities can be used.
Load ../token_config/ ...
Special tokens have been added in the vocabulary, make sure the associated word embeddings are fine-tuned or trained.
Device [ 0 ] loading ....
[BMRT][bmcpu_setup:498] INFO:cpu_lib 'libcpuop.so' is loaded.
[BMRT][bmcpu_setup:521] INFO:Not able to open libcustomcpuop.so
bmcpu init: skip cpu_user_defined
open usercpu.so, init user_cpu_init
[BMRT][BMProfileDeviceBase:190] INFO:gdma=0, tiu=0, mcu=0
Model[./llama3-8b_int4_1dev_512/llama3-8b_int4_1dev_512.bmodel] loading ....
[BMRT][load_bmodel:1939] INFO:Loading bmodel from [./llama3-8b_int4_1dev_512/llama3-8b_int4_1dev_512.bmodel]. Thanks for your patience...
[BMRT][load_bmodel:1704] INFO:Bmodel loaded, version 2.2+v1.7-20240419
[BMRT][load_bmodel:1706] INFO:pre net num: 0, load net num: 69
[BMRT][load_tpu_module:1802] INFO:loading firmare in bmodel
[BMRT][preload_funcs:2121] INFO: core_id=0, multi_fullnet_func_id=30
[BMRT][preload_funcs:2124] INFO: core_id=0, dynamic_fullnet_func_id=31
Done!
Running on local URL:  http://0.0.0.0:8003

To create a public link, set `share=True` in `launch()`.
IMPORTANT: You are using gradio version 3.39.0, however version 4.29.0 is available, please upgrade.
All good. I still have a 512-byte limit with either method:
Overall, CNX Software is a valuable resource for anyone interested in embedded systems, IoT, and related technologies.
FTL: 0.721 s
TPS: 9.569 token/s

Question: How do you say hello in Thailand language?

Answer: In Thailand, the official language is Thai, and the way to say "hello" is " Sawatdee" (สวัสดี). This is a common greeting used during the day, and it's suitable for most situations.

However, there are a few other ways to greet someone in Thai, depending on the time of day and the level of formality:

* "Sawatdi krap" (สวัสดีค่ะ) - This is a more formal way to say "hello" during the day, and it's often used when speaking to someone you don't know well or when you want to show respect.
* "Sawatdi ka" (สวัสดีคะ) - This
FTL: 0.724 s
TPS: 9.540 token/s
... (reach the maximal length)
Attempting to increase Llama3 answer limit
Let’s see if we can increase the limit to 1024 and to what extent it impacts performance. Note that I first started those instructions on my Ubuntu 22.04 laptop with an Intel Core i5-13500H, 16GB RAM, and about 26GB of free space. But once I read the instructions at the end where we are told that:
Generating the bmodel takes about 2 hours or more. It is recommended to have 64G memory and over 200G of disk space, otherwise OOM or no space left errors are likely.
It’s not going to work. If only I had a machine with 64GB RAM. Oh! wait… I do! So I installed Ubuntu 24.04 on Cincoze DS-1402 embedded computer with an Intel Core i9-12900E processor, 64GB DDR5, and a 300GB Ubuntu partition. That should do. All instructions below are done in the x86 host unless otherwise stated.
We’ll now need to ask permission to download the Llama3 model by filling out the form at https://huggingface.co/meta-llama/Meta-Llama-3-8B-Instruct/tree/main. Note that it requires a manual permission. I asked on Saturday, and I could download it on Sunday. We need to install git-lfs (Large File Storage) first:
Then we have to generate a token to download the model and make sure to select “Read access to contents of all public gated repos you can access”. Let’s run the following command:
and input your username and token to retrieve the code. I did that in the root directory for the current user.
The first time I tried with Python 3.12 preinstalled in Ubuntu 24.04, but the solution requires Torch-1.12.0 not available in Python 3.12. So I had to install Python 3.10 with miniconda3:
Now generate the onnx file using the downloaded Llama3 and a 1024-byte length:
cd compile
(.venv2) (base) jaufranc@DS-1402-CNX:~/LLM-TPU/models/Llama3/compile$ time python export_onnx.py --model_path ~/Meta-Llama-3-8B-Instruct/ --seq_length 1024
This part could be completed in a little over 6 minutes:
Loading checkpoint shards: 100%|██████████████████| 4/4 [00:13<00:00,  3.50s/it]
Special tokens have been added in the vocabulary, make sure the associated word embeddings are fine-tuned or trained.
Layers: 32
Hidden size: 4096

Convert block & block_cache
  0%|                                                    | 0/32 [00:00<?, ?it/s]/home/jaufranc/LLM-TPU/models/Llama3/.venv2/lib/python3.10/site-packages/transformers/models/llama/modeling_llama.py:154: UserWarning: __floordiv__ is deprecated, and its behavior will change in a future version of pytorch. It currently rounds toward 0 (like the 'trunc' function NOT 'floor'). This results in incorrect rounding for negative values. To keep the current behavior, use torch.div(a, b, rounding_mode='trunc'), or for actual floor division, use torch.div(a, b, rounding_mode='floor').
  x1 = x[..., : x.shape[-1] // 2]
/home/jaufranc/LLM-TPU/models/Llama3/.venv2/lib/python3.10/site-packages/transformers/models/llama/modeling_llama.py:155: UserWarning: __floordiv__ is deprecated, and its behavior will change in a future version of pytorch. It currently rounds toward 0 (like the 'trunc' function NOT 'floor'). This results in incorrect rounding for negative values. To keep the current behavior, use torch.div(a, b, rounding_mode='trunc'), or for actual floor division, use torch.div(a, b, rounding_mode='floor').
  x2 = x[..., x.shape[-1] // 2 :]
100%|███████████████████████████████████████████| 32/32 [05:53<00:00, 11.04s/it]
Convert embedding
Convert lm_head
Done

real	6m32.229s
user	9m1.998s
sys	4m57.402s
The next step would be to exit the Python virtual environment and start the compilation:
deactivate
./compile.sh --mode int4 --name llama3-8b --seq_length 512 # same as int8
The last part still fails, and I’m working with Radxa to resolve it.
Radxa Model Zoo – Resnet50 and YOLOV8
I decided to do one last test by following the instructions to install the Radxa Model Zoo and run the 8-bit integer (INT8) Resnet50 model (INT16 and FP32 are also available). We are back in the Fogwise Airbox terminal:
git clone https://github.com/zifeng-radxa/Radxa-Model-Zoo.git
cd Radxa-Model-Zoo/sample/ResNet
wget https://github.com/radxa-edge/TPU-Edge-AI/releases/download/model-zoo/resnet50_int8_1b.bmodel
mkdir images && cd images
wget https://github.com/radxa-edge/TPU-Edge-AI/releases/download/model-zoo/grace_hopper.bmp
Grace Hopper
Again we need to set up a Python virtual environment and install dependencies:
It looks to work but the output is not exactly human-readable… So let’s try Yolov8 object segmentation instead using the same Python virtual environment:
cd ../YOLOv8_seg/
wget https://github.com/radxa-edge/TPU-Edge-AI/releases/download/model-zoo/yolov8s_int8_1b.bmodel
mkdir images && cd images
wget https://github.com/radxa-edge/TPU-Edge-AI/releases/download/model-zoo/dog_bike_car.jpg
cd ..
pip3 install pycocotools
There are also two samples, but let’s keep using OpenCV:
[BMRT][bmcpu_setup:406] INFO:cpu_lib 'libcpuop.so' is loaded.
bmcpu init: skip cpu_user_defined
open usercpu.so, init user_cpu_init
[BMRT][load_bmodel:1084] INFO:Loading bmodel from [./yolov8s_int8_1b.bmodel]. Thanks for your patience...
[BMRT][load_bmodel:1023] INFO:pre net num: 0, load net num: 1
INFO:root:load ./yolov8s_int8_1b.bmodel success!
INFO:root:1, img_file: ./images/dog_bike_car.jpg
sampleFactor=6, cinfo->num_components=3 (1x2, 1x1, 1x1)
Open /dev/jpu successfully, device index = 0, jpu fd = 23, vpp fd = 24
INFO:root:result saved in ./results/yolov8s_int8_1b.bmodel_images_opencv_python_result.json
INFO:root:------------------ Predict Time Info ----------------------
INFO:root:decode_time(ms): 29.25
INFO:root:preprocess_time(ms): 33.29
INFO:root:inference_time(ms): 16.18
INFO:root:postprocess_time(ms): 164.70
all done.
The inference time was 16.18ms (61.8 FPS), and the total time was 246.72ms.
The JSON file is still not human-readable, but the demo also generates an image (or more if there are more input images) with descriptions and outlines for each object.
(.venv) linaro@Airbox:~/Radxa-Model-Zoo/sample/YOLOv8_seg$ ls -l results/images/
total 108
-rw-rw-r-- 1 linaro linaro 110168 Jun 23 17:16 res_bmcv_dog_bike_car.jpg
I added another larger image (1920×1080) with more object to the test:
(.venv) linaro@Airbox:~/Radxa-Model-Zoo/sample/YOLOv8_seg$ python3 python/yolov8_opencv.py --input ./images --bmodel ./yolov8s_int8_1b.bmodel
[BMRT][bmcpu_setup:406] INFO:cpu_lib 'libcpuop.so' is loaded.
bmcpu init: skip cpu_user_defined
open usercpu.so, init user_cpu_init
[BMRT][load_bmodel:1084] INFO:Loading bmodel from [./yolov8s_int8_1b.bmodel]. Thanks for your patience...
[BMRT][load_bmodel:1023] INFO:pre net num: 0, load net num: 1
INFO:root:load ./yolov8s_int8_1b.bmodel success!
INFO:root:1, img_file: ./images/dog_bike_car.jpg
sampleFactor=6, cinfo->num_components=3 (1x2, 1x1, 1x1)
Open /dev/jpu successfully, device index = 0, jpu fd = 23, vpp fd = 24
INFO:root:2, img_file: ./images/people-street.jpg
sampleFactor=10, cinfo->num_components=3 (2x2, 1x1, 1x1)
INFO:root:result saved in ./results/yolov8s_int8_1b.bmodel_images_opencv_python_result.json
INFO:root:------------------ Predict Time Info ----------------------
INFO:root:decode_time(ms): 54.78
INFO:root:preprocess_time(ms): 28.08
INFO:root:inference_time(ms): 14.53
INFO:root:postprocess_time(ms): 3634.29
all done.
Inference is still fast, but postprocessing takes some time. The resulting image is pretty good.
Let’s try the BMCV sample to see if the speed is better:
(.venv) linaro@Airbox:~/Radxa-Model-Zoo/sample/YOLOv8_seg$ python3 python/yolov8_bmcv.py  --input ./images --bmodel ./yolov8s_int8_1b.bmodel
[BMRT][bmcpu_setup:406] INFO:cpu_lib 'libcpuop.so' is loaded.
bmcpu init: skip cpu_user_defined
open usercpu.so, init user_cpu_init
[BMRT][load_bmodel:1084] INFO:Loading bmodel from [./yolov8s_int8_1b.bmodel]. Thanks for your patience...
[BMRT][load_bmodel:1023] INFO:pre net num: 0, load net num: 1
INFO:root:1, img_file: ./images/dog_bike_car.jpg
sampleFactor=6, cinfo->num_components=3 (1x2, 1x1, 1x1)
Open /dev/jpu successfully, device index = 0, jpu fd = 42, vpp fd = 43
INFO:root:2, img_file: ./images/people-street.jpg
sampleFactor=10, cinfo->num_components=3 (2x2, 1x1, 1x1)
INFO:root:result saved in ./results/yolov8s_int8_1b.bmodel_images_bmcv_python_result.json
INFO:root:------------------ Predict Time Info ----------------------
INFO:root:decode_time(ms): 57.77
INFO:root:preprocess_time(ms): 4.90
INFO:root:inference_time(ms): 11.61
INFO:root:postprocess_time(ms): 3439.02
all done.
Preprocessing with BMCV is quite faster than OpenCV. That sample decodes with SAIL, but it’s about as fast as OpenCV. In both cases SAIL handles inferences, so it’s probably just variability between the tests.
Radxa Fogwise Airbox’s power consumption and fan noise
When I first tested the Aibox Fogwise with a 100W GaN power supply, I noted idle power consumption was about 30 Watts. Since then I’ve received a power adapter from Radxa. and the idle power consumption is around 28 Watts. That’s still high. It goes up to 39W while Llama3 provides an answer, and jumps to about 49W when generating an image with Stable Diffusion. The power consumption varies depending on the image generated.
The fan runs all the time and is quite noisy. For a device close to the user such as a mini PC that would be an issue, but considering it’s a headless system, it can always be placed in a room with Ethernet connectivity and adequate ventilation far from users.
Conclusion
Radxa Fogwise Airbox is a great little headless box for offline/onsite AI processing that works with generative AI such as LLMs and text-to-image generators, as well as computer vision models like Resnet50 or YOLOv8. It’s very easy to get started thanks to the Ubuntu + CasaOS image preloaded with Stable Diffusion and Llama3 containers making a plug-and-play AI box. There’s also a Python SDK to customize models or create your own.
The documentation is pretty good, although I often had to run extra commands to succeed, and in one case (recompiling Llama3), it did not work for me despite my best efforts. I still think that overall Radxa Fogwise Airbox is an interesting device for people wanting to experiment with on-device generative AI and computer vision, or even integrate it into a project. Power consumption may be an issue, but the 32 TOPS AI box should be compared to similar solutions such as NVIDIA Jetson modules.
I’d like to thank Radxa for sending the Fogwise Airbox AI box for review. The model reviewed here with 16GB RAM and 64GB eMMC flash, but no SSD and no WiFi can be purchased on Aliexpress for $331 plus shipping.
The Pico Display Base Board is a printed circuit board from Applying Microcontroller Solutions that provides a platform for building Raspberry Pi Pico-based display projects. It works with a Raspberry Pi Pico board and an LCD screen based on the Solomon Systech SSD1963 display controller.
The Pico Display Base Board features a 40-pin header (Display Port) which connects to GPIO on the Pico to provide an 8-bit parallel interface for the display and SPI pins for the touchscreen and integrated SD
The Pico Display Base Board is a printed circuit board from Applying Microcontroller Solutions that provides a platform for building Raspberry Pi Pico-based display projects. It works with a Raspberry Pi Pico board and an LCD screen based on the Solomon Systech SSD1963 display controller.
The Pico Display Base Board features a 40-pin header (Display Port) which connects to GPIO on the Pico to provide an 8-bit parallel interface for the display and SPI pins for the touchscreen and integrated SD card.
It supports various display sizes from 4.3 inches up to 7 inches. Displays up to five inches can be powered directly by the Pico. A jumper block on the board can be used to pass power to the LCD and wire the display’s optional flash chip to the Pico. A USB-C port on the board can provide an alternative power source for larger displays.
It also has male headers attached to the Pico for connecting onboard components such as the potentiometer, LEDs, and user buttons, as well as external devices including an OLED display, a DS3231 RTC module, and an Infrared Receiver (IR).
It was mainly created for building Raspberry Pi Pico-based LCD projects that require a touchscreen and an integrated SD card. The board layout emphasizes easy, simultaneous access to the display and other components. A 40-pin ribbon cable can be used for a more compact, portable product. Both the Raspberry Pi Pico and the Pico W are supported by the Pico Display Base Board.
The board can be programmed using either Thonny IDE (MicroPython) or Arduino IDE. It is also compatible with the PicoMite/WebMite firmware which are implementations of the MMBasic interpreter configured to run on the Pico. Other BASIC interpreters for the Pico include the PiccoloBASIC and JustPicoBasic. Documentation, demo programs, and firmware are hosted in the PicoDisplay GitHub repository.
The Pico Display Base Board is available for $14 on Tindie, the same price as the Car Base Board from the same company. The Pico microcontroller, LCD, and other external components are not included and must be purchased separately.
Adding networking capabilities to a computer or SBC has never been cheaper, as we’ve just written about a $12 M.2 RTL8126 5GbE module, and now I’ve come across a WiFi 6 USB adapter based on AIC8800 chipset that sells for under $3 on Aliexpress.
I found out about it after we published an article about the Luckfox Pico Ultra W SBC that comes with a 2.4 GHz WiFi 6 and Bluetooth 5.2 module that happens to be based on an AIC8800DC module. Upon further investigation, I discovered some ultra-cheap WiFi
Adding networking capabilities to a computer or SBC has never been cheaper, as we’ve just written about a $12 M.2 RTL8126 5GbE module, and now I’ve come across a WiFi 6 USB adapter based on AIC8800 chipset that sells for under $3 on Aliexpress.
I found out about it after we published an article about the Luckfox Pico Ultra W SBC that comes with a 2.4 GHz WiFi 6 and Bluetooth 5.2 module that happens to be based on an AIC8800DC module. Upon further investigation, I discovered some ultra-cheap WiFi 6 USB dongles were available, but with some caveats such as the lack of 5 GHz support and a speed limited to 300 Mbps. But it can still be interesting, so let’s find out.
Specifications:
Chipset – AICSemi AIC8800
WiFi – 2.4 GHz 802.11ax WiFi 6 up to 286.8 Mbps
Tx power – 20dBm
Features – MU-MIMO, OFDMA
Operating modes – Station, Access point, WiFi Direct
Security – WEP, WPA/WPA2
Host interface – USB 2.0 port
Length – 196 mm (with antenna)
Humidity
Operating – 5% to 95% (noncondensing)
Storage – Up to 90% (noncondensing)
Drivers are said to be available for Windows 7/10/11. That’s about all we got from the Aliexpress page. The AIC8800 is also used in Tenda W311MI v6.0 and Tenda U2 v5.0 for which a Linux driver is available and should work with other AI8800 USB adapters although you might need to add USB Vendor and Product IDs in aicwf_usb.h. I could not find the W311MI v6.0 for sale but the BrosTrend AX5 on Amazon looks almost identical.
Tenda W311MI V6 vs BrosTrend AX5
Make sure to check the version of the Tenda dongle since older W311MI models are only 802.11n WiFi 4 up to 150 Mbps. It’s actually not the first time I’ve come across AIC8800 modules, as those are also found in the Lichee Console 4A RISC-V development terminal and Avaota A1 SBC as soldered-on modules. Where it gets confusing is that there are variants of the AIC8800, and for instance, the AIC8800D used in Avaota A1 is a dual-band (2.4 GHz and 5 GHz) WiFi 6 and Bluetooth 5.4 module, instead of being 2.4 GHz WiFi 6 only.
Screenshot from AICSemi website
If we go to AICSemi website, we can see the company provides dual-band WiFi 6 + Bluetooth 5.2, single-band WiFi 6 + Bluetooth 5.2, and WiFi 6-only chipsets, as well as some microcontrollers with integrated WiFi 6, Bluetooth 5.2, and audio codec. But sadly, that’s all the information there is on the website. So I could not find out whether WiFi 6-specific features such as TWT (Target Wait Time) used for low-power IoT applications are supported by AIC8800 chipsets. What’s missing is WPA3 security, and none of the models mention this.
The Luckfox Pico Ultra is a Rockchip RV1106-based Linux micro development board with a MIPI CSI port, an Ethernet port, and a 0.5 Tops NPU to run AI and image processing applications. Additionally, it features a speaker header, RGB LED header, GPIO, UART, SPI, I2C, USB, and much more.
Waveshare also offers a “W” version of the Pico Ultra with built-in 2.4 GHz Wi-Fi 6 and Bluetooth 5.2. If you want to add PoE support, you can connect to the board with a separate PoE module.
Luckfox Pico Ultra Sp
The Luckfox Pico Ultra is a Rockchip RV1106-based Linux micro development board with a MIPI CSI port, an Ethernet port, and a 0.5 Tops NPU to run AI and image processing applications. Additionally, it features a speaker header, RGB LED header, GPIO, UART, SPI, I2C, USB, and much more.
Waveshare also offers a “W” version of the Pico Ultra with built-in 2.4 GHz Wi-Fi 6 and Bluetooth 5.2. If you want to add PoE support, you can connect to the board with a separate PoE module.
10/100Mbps Ethernet controller and embedded PHY with optional PoE
2.4GHz WiFi 6 and Bluetooth 5.2/BLE (Available only in Luckfox Pico Ultra W)
USB
1 x USB-C port
1 x USB-A port (Switching with USB Type-C by chip, enabled automatically for USB communication when USB-C is not connected)
GPIO – 2x 26-pin GPIO headers
Misc
BOOT and RESET buttons
User LED
RTC battery connector
PoE module header
Power Supply – 5V via USB-C port or PoE port (802.3af Compatible)
Dimensions – 50 x 50 mm
In terms of features, the board is very similar to the LuckFox Pico Pro and Pico Max which we wrote in February this year. The only difference is that the new Pico Ultra board features a different form factor and the option to add a wireless module and/or PoE support. LuckFox also offers a Rockchip RV1103 powered pico board which you can check out if you are looking for similar products.
The Rockchip RV1106G3 features the fourth-generation Rockchip NPU unit that supports int4, int8, and int16 hybrid quantization meaning that this NPU can deliver 0.5 TOPS when using int8, and 1.0 TOPS with int4. Additionally, the chip features a third-generation ISP 3.2 with support for up to 5 megapixels camera module, High Dynamic Range and Wide Dynamic Range algorithms.
In terms of software, the board supports the buildroot and Ubuntu 22.04 systems allowing developers to choose the appropriate system based on project requirements.
Different Variants Luckfox Pico Ultra RV1106 Dev Board
The Luckfox Pico Ultra comes in four different versions, so you can choose the one that best fits your needs. You can find more details about each version and other details on the Waveshare wiki page.
The Luckfox Pico Ultra deve board can be purchased on AliExpress for $26.27 and up depending on options such as WiFi and/or PoE, and it should soon become available on Waveshare Amazon store. Alternatively, you can purchase the board from Waveshare’s official store where it is sold for $17.99 to $29.99 depending on the configuration but the Waveshare price dose does not include shipping.
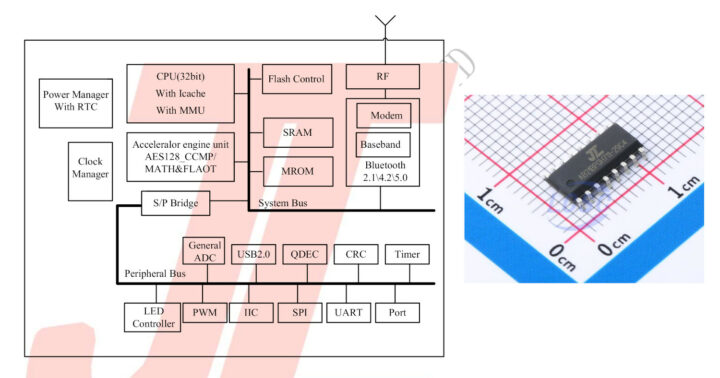
Nuvoton NuMicro M2L31 is a family of Arm Cortex-M23 microcontrollers clocked up to 72 MHz, equipped with 64KB to 512KB high-durability ReRAM (Resistive Random-Access Memory) with fast write speeds, 40KB to 168KB SRAM. The microcontroller supports 1.71V to 3.6V operating voltage, can operate in the -40°C to 105°C temperature range, and offers a wide range of interfaces available through packages as small as WLCSP 25 (2.5 x 2.5 mm) and up to LQFP128 (14 x 14 mm).
Arm introduced the Cortex-M23 cor
Nuvoton NuMicro M2L31 is a family of Arm Cortex-M23 microcontrollers clocked up to 72 MHz, equipped with 64KB to 512KB high-durability ReRAM (Resistive Random-Access Memory) with fast write speeds, 40KB to 168KB SRAM. The microcontroller supports 1.71V to 3.6V operating voltage, can operate in the -40°C to 105°C temperature range, and offers a wide range of interfaces available through packages as small as WLCSP 25 (2.5 x 2.5 mm) and up to LQFP128 (14 x 14 mm).
Arm introduced the Cortex-M23 core in 2016 together with the Arm Cortex-M33 core, but while the latter is widely integrated in a large range of designs, we’ve seen fewer Cortex-M23 microcontrollers with some examples being Microchip SAML10/L11 (2018) and more recently, the Renesas RA0 family. Nuvoton adds another option with the Numicro M2L31 that also happens to integrates ReRAM non-volatile memory.
Key Features:
MCU core – Arm Cortex-M23 core running up to 72 MHz
Memory
64KB, 128KB, 256KB, 512KB Resistive RAM (ReRAM) embedded without the need for an erase cycle to save read and write time; support for byte read/write operations
Up to 168 KB SRAM with 40KB parity check
Independent 4/8 KB Low Power SRAM
8 KB LDROM
4x eXecute-Only-Memory (XOM) regions
4x Memory Protection Unit (MPU) memory regions
Peripheral/Communication interfaces
USB
USB 2.0 full-speed OTG/Host/Device controller with maximum 1024 bytes’ buffer size
Compliant with Type-C (Rev.2.1) and Power Delivery (Rev. 3.0) specification
Up to 8x UART interfaces include LIN and IrDA
1x Low Power UART interface
Up to 2x USCI interface (UART / SPI / I²C)
Up to 4x I2C interfaces
1x Low Power I2C interface (400 kbps)
Up to 4x SPI/I2S interfaces (up to 36 MHz)
1x Low Power SPI interface (up to 12 MHz)
1x Quad Serial Peripheral Interface (QSPI)
Up to 1x External Bus Interface (EBI)
Up to 2x sets of CAN FD controllers
Up to 16x touch keys with single-scan or programmable periodic key scans with 5V tolerance
Analog
Built-in internal reference voltage
Built-in temperature sensor
1x 12-bit SAR ADC up to 24-ch 3.42 MSPS
Up to 2x DAC (12-bit, 1 MSPS with buffer)
3x rail-to-rail comparators with 6-bit DAC function
Up to 3x sets of OP Amplifiers
Control Interfaces
Voltage Adjustable Interface (VAI)
Up to 2x Enhanced Quadrature Encoder Interfaces (EQEI)
Up to 2x input Enhanced Input Capture timers (ECAP)
PDMA – Up to 16 channels of Peripheral DMA Controller
Security
Cyclic Redundancy Calculation Unit
AES encryption with 128/192/256-bit key
True random number generator (TRNG)
Pseudo-random number generator (PRNG)
Up to 3x Tamper pins
Timers
32x PWM output channels
4x 24-bit timers, supporting up to 1 independent PWM output
12x Enhanced PWM (EPWM) with twelve 16-bit counters, up to 72 MHz for timer clock source
12x PWM with six 16-bit timers, up to 144 MHz for timer clock source
2x 24-bit Low Power Timers
2x Tick Timers
1x 24-bit count-down SysTick timer
Watchdog timer
Window watchdog timer
Clocks
4 to 32 MHz crystal oscillator
32.768 kHz crystal oscillator for RTC
Internal 12 MHz RC oscillator with ± 2% deviation at -40~105°C
Internal 48 MHz RC oscillator with ±2.5% deviation at -40~105°C
Internal 1~8 MHz MIRC with ±10% deviation at -40~105°C
Internal 32 kHz RC oscillator with ±10% deviation
Internal PLL up to 144 MHz
Voltage range – 1.71V to 3.6V
Power Consumption
Normal run: 60 μA/MHz at 72 MHz
Idle mode: 33μA/MHz at 25°C/3.0V, all peripherals disabled condition
NPD w/o power gating (NPD2 mode): 55 uA, at 25°C/3.0V
NPD w/ power gating (NPD4 mode): 9 uA, at 25°C/3.0V
SPD w/ 40KB SRAM retention: 1.7 uA, at 25°C/3.0V
DPD: 0.54uA at 25°C/3.0V, RTC and LXT disabled
Packages
WLCSP 25 (2.5 x 2.5 mm)
QFN32 (5 x 5 mm)
LQFP48 (7 x 7 mm)
QFN 48 (5 x 5 mm)
WLCSP 49 (3.0 x 3.0 mm)
LQFP64 (7 x 7 mm)
LQFP128 (14 x 14 mm)
Temperature Range – -40°C to +105°C
Twenty one different SKUs are available with seven different packages and various ReRAM and SRAM capacities. Nuvoton explains that ReRAM (Resistive Random-Access Memory) is a type of non-volatile memory that achieves digital data storage by altering the resistance state of its components through the application of an external voltage. It benefits from fast read/write speeds, low power consumption, and higher durability. One reason for the fast write speed is that ReRAM does not require a page erase operation before writing contrary to traditional embedded flash memories. It also supports single-byte read/write operations. The Nuvoton M2L31 is the first MCU with ReRAM that we’ve ever covered on CNX Software, but sadly, I was unable to find any metrics related to the speed and durability of ReRAM in either the datasheet or technical reference manual of the microcontroller.
The NuMicro M2L31 series microcontrollers are supported by third-party IDEs such as Keil MDK and IAR EWARM, as well as the NuEclipse IDE with GNU GCC compiler. The company also provides the NuMaker-M2L31KI for evaluation.
NuMaker-M2L31KI highlights:
MCU – M2L31KIDAE Cortex-M23 microcontroller with 168KB SRAM, 512KB ReRAM
Expansion
Arduino UNO compatible extension connectors
4x 32-pin expansion headers for access to all I/Os
Debugging – Nu-Link2-Me SWD debugger with USB-C port, Virtual COM switch, status LED, On-line /off-line programming
Misc
Ammeter connector for measuring the microcontroller’s power consumption
Power supply
External VDD power connector
Arduino UNO compatible extension connector Vin
USB power connector on the M2L31 platform
ICE USB connector on Nu-Link2-Me
Target applications for the NuMicro M2L31 Cortex-M23 microcontrollers include motor control, PC peripherals, industrial automation solutions, and battery management systems. The product page has more information including links to documentation such as TRM and datasheet as well as software development resources.
I was unable to find pricing for the M2L31 microcontrollers, but the NuMaker-M2L31KI development board can be purchased for $36 on Novoton Direct.
DFI X6-MTH-ORN is a fanless Edge AI Box Computer that combines an NVIDIA Jetson Orin NX/Nano AI module with a 14th Gen Intel Core Ultra “Meteor Lake-U” 15W processor for AI-driven applications leveraging GPU computing, machine learning, and image processing.
It’s a fully modular computer with an Intel COM Express Type 6 or Type 10 module, an NVIDIA Jetson Orin module, and five M.2 sockets for expansion. The fanless embedded system takes up to 64GB DDR5 RAM, supports M.2 NVMe and 2.5-inch SATA st
DFI X6-MTH-ORN is a fanless Edge AI Box Computer that combines an NVIDIA Jetson Orin NX/Nano AI module with a 14th Gen Intel Core Ultra “Meteor Lake-U” 15W processor for AI-driven applications leveraging GPU computing, machine learning, and image processing.
It’s a fully modular computer with an Intel COM Express Type 6 or Type 10 module, an NVIDIA Jetson Orin module, and five M.2 sockets for expansion. The fanless embedded system takes up to 64GB DDR5 RAM, supports M.2 NVMe and 2.5-inch SATA storage, offers seven video outputs (3x HDMI, 3x DP+, VGA), and six Gigabit Ethernet ports. The X6-MTH-ORN is designed for industrial applications and environments with serial interfaces, wide 9V-36V DC input, and an extended -20°C to 60°C temperature range.
IEC 60068-2-64 Test Fh: Vibration board-band random test
Random,2Grms @ 5~500 Hz, 30min.
Non- Operation
IEC 60068-2-6 Test Fc: Vibration Sinusoidal Test
Sweep sine, 3Grms @ 10~500Hz, 30min.
Certifications – CE, FCC Class A, RoHS, UL 62368-1
IP Rating – IP20
The DFI X6-MTH-ORN Edge AI embedded box PC supports wall mounting using brackets and screws, and the company can also provide a DIN Rail mount. DFI provides support for Microsoft Windows 10/11 and Ubuntu 22.04 Linux.
Intel Meteor Lake processors can deliver up to 32TOPS of AI performance when combining the CPU, GPU, and integrated NPU (itself up to 11 TOPS), and some products – such as the UP Xtreme i14 SBC – are making use of the Intel SoC’s AI capabilities. The DFI Intel Core Ultra system is designed for applications that require more AI performance with the addition of an up to 100 TOPS NVIDIA Jetson Orin NX module although I can also see they offer the NVIDIA Jetson Orin Nano that delivers 20 or 40 TOPS (Sparse). That’s not much more than the Intel SoC, so software support may also be a factor here with NVIDIA providing a wide range of SDKs.
All specifications are preliminary, so the DFI X6-MTH-ORN does not seem to be available just yet and was announced earlier at Computer 2024. Additional information may be found on the product page and in the press release.
Orange Pi KunPeng Pro is a single board computer powered by an unnamed KunPeng quad-core processor from Huawei that features an 8 TOPS NPU for AI workloads.
It’s not the first time Orange Pi has launched an SBC based on a Huawei SoC, as the company introduced the Orange Pi AIPro last year with another unnamed Huawei Ascend SoC with a 20 TOPS NPU. The new Orange Pi KunPeng Pro board has basically the same layout as the AIPro model, but with lower specs overall, although it still comes with 8GB or
Orange Pi KunPeng Pro is a single board computer powered by an unnamed KunPeng quad-core processor from Huawei that features an 8 TOPS NPU for AI workloads.
It’s not the first time Orange Pi has launched an SBC based on a Huawei SoC, as the company introduced the Orange Pi AIPro last year with another unnamed Huawei Ascend SoC with a 20 TOPS NPU. The new Orange Pi KunPeng Pro board has basically the same layout as the AIPro model, but with lower specs overall, although it still comes with 8GB or 16GB LPDDR4x memory.
Orange Pi KunPeng Pro specifications:
SoC – Unnamed Huawei Kunpeng quad-core 64-bit SoC with unnamed GPU, 8 TOPS AI accelerator
System Memory – 8GB or 16GB LPDDR4X
Storage
32MB SPI flash
connector for 32GB, 64GB, 128GB, or 256GB eMMC flash module
MicroSD card slot
M.2 2280 socket for SATA/NVMe drive
Video Output
2x HDMI 2.0 ports up to 4Kp60
2-lane MIPI DSI via FPC connector
Camera Interfaces – 2x MIPI CSI connectors
Audio – 3.5mm audio jack, digital audio via HDMI
Networking
Gigabit Ethernet RJ45 port
WiFi 5 and Bluetooth 4.2
USB
2x USB 3.0 host ports
1x USB 3.0 Type-C host port
Expansion – 40-pin GPIO header
Misc
Power key, Reset key, Flash key
Boot mode selection DIP switch
Fan connector
Power Supply
20V (65W) via USB Type-C port
2-pin connector for battery
Plenty of regulators
Dimensions – 107 x 68 mm
Weight – Around 82 grams
While the AIPro would support openEuler or Ubuntu, the new Orange Pi Kunpeng Pro is only officially supported by openEuler. You’ll find the OS image along with documentation in Chinese on the Orange Pi CN website, since the board is not listed on the English website and never will be.
Orange Pi removed all markings from photos of the board and Huawei does not want to disclose what architecture and GPU the chip is using to prevent or at least delay further US sanctions. But if we look at the documentation, we’ll find an image of the board and accessories that reads “Hilicon Hi1910” on the SoC.
Technically Unsure purchased a sample for a review video last month, and the Orange Pi Kunpeng Pro shows up as Orange Pi Ai Pro (so it’s using the same image as the older board) and the OpenEuler 22.03 OS runs Linux 5.10.10+. GPU acceleration is not enabled (llvmpipe), and the CPU is shown as “0x00″…
Most people who are not based in China should stay away from this specific board, and Orange Pi will never officially sell it outside of China, but it’s still available on Aliexpress for $172.62 and up for people wanting to experiment.
Alif Semi Ensemble E1C is an entry-level addition to the company’s Ensemble Cortex-A32M35 processors and microcontrollers with Ethos-U55 microNPUs that targets the very edge with a 160 MHz Cortex-M55 microcontroller and a 46 GOPS Ethos-U55 NPU.
The Ensemble E1C is virtually the same as the E1 microcontroller but with less memory (2MB SRAM) and storage (up to 1.9MB non-volatile MRAM), and offered in more compact packages with 64, 90, or 120 pins as small as 3.9 x 3.9mm.
Alif Semi Ensemble E1C sp
The Ensemble E1C is virtually the same as the E1 microcontroller but with less memory (2MB SRAM) and storage (up to 1.9MB non-volatile MRAM), and offered in more compact packages with 64, 90, or 120 pins as small as 3.9 x 3.9mm.
Alif Semi Ensemble E1C specifications:
CPU – Arm Cortex-M55 core up to 160 MHz with Helium Vector Processing Extension, 16KB Instruction and Data caches, Armv8.1-M ISA with Arm TrustZone; 4.37 CoreMark/MHz
GPU – Optional D/AVE 2D Graphics Processing Unit
MicroNPU – 1x Arm Ethos-U55 Neural Processing Unit with 128 MAC; up to 46 GOPS
On-chip application memory
Up to 1.9 MB MRAM Non-Volatile Memory
Up to 2MB Zero Wait-State SRAM with optional retention in increments of 64KB (450 nA), 128KB (900 μA), 256KB (1.8 μA), 512KB (3.6μA), 1MB (7.2 μA), 2MB (14.4 μA) at 3.3V
External memory interfaces
1x Octal SPI up to 80 MB/s SDR, 160MB/s DDR with Inline AES Decryption, XIP Mode Support, HyperBus Protocol Support
1x SD v4.2, eMMC v5.1
Display interfaces
1-lane MIPI DSI
1x Display Parallel Interface (DPI) up to 24-bit RGB
Camera interface – Low-Power Camera Parallel Interface (LPCPI), up to 8 bits
Audio Interfaces
2x I2S Synchronous Stereo Audio interfaces
Low-Power I2S Stereo Audio Interface
4× 2-channel Low-Power Pulse Density Modulation (LPPDM) for microphone inputs (up to 8x Mono Microphones)
General Input/Output
Up to 71x 1.8V GPIOs (shared with peripherals)
Up to 6x selectable 1.8V to 3.3V GPIOs (shared with peripherals)
Communication interfaces
1x USB 2.0 HS/FS Host/Device with DMA
1x SDIO v4.1 channel with DMA
2x CAN FD Channel up to 10 Mbps
1x MIPI I3C
2x I2C up to 3.4 Mbps, 1x low-power I2C
6x UART up to 2.5 Mbps (2x with RS485 driver control), 1x low-power UART
3x SPI up to 50 Mbps, 1x low-power SPI
Analog interfaces
2x 12-bit ADCs, 1x 24-bit ADC with programmable gain from 1x to 128x
Internal low-frequency (32.7 kHz) and high-frequency (up to 76.8 MHz) RC oscillators
External low-frequency (32.768 kHz) and high-frequency (24 MHz to 38.4 MHz) crystal oscillators
1x User Fractional Mode PLL, 1x Fractional Audio PLL
Secure Enclave
Hardware-based Root-of-Trust with Unique Device ID
Secure Key Generation and Storage, Secure Certificate Storage
Factory-provisioned Private Keys
Crypto Accelerators—AES (up to 512), ECC, SHA, RSA, and TRNG
Secure Debugging with Certificate Authentication
Secure RTC
Complete Secure Lifecycle Management
Misc
General DMA Controller
CRC accelerator with programmable polynomials
Programmable low supply voltage detection warning (Brown-Out Detector)
Power-On Reset and Brown Out Reset
Real-Time Clock (RTC)
JTAG/SWD debug interface
Power management
1.71 V to 4.2 V Primary Supply Range
Power consumption
700 nA at 3.3 V Consumed in STOP Mode with LPRTC Running; 400 µs Wake Time from STOP Mode
As Low as 22 µA/MHz Dynamic Consumption for High-Efficiency Cortex-M55 at 3.3 V
Autonomous Intelligent Power Management (aiPM)
Packages
FBGA120 – 6.6 x 6.6 mm, 0.5 mm pitch; for maximum I/O while requiring only 4 PCB layers for routing
WLCSP90 – 3.9 x 3.9 mm, 0.4 mm pitch; for maximum space savings
TQFP64 – 10 x 10 mm, 0.5 mm pitch; for maximum durability in harsh environments
Temperature range
-40°C to 105°C industrial ambient temperature range
-40°C to 125°C industrial ambient temperature range
Process – FD-SOI low leakage process
Alif Semi Ensemble MCU Portfolio
Alif says the Arm Ethos-U55 NPU performs 128 MACs/cycle to give ML output of 46 GOPS resulting in inferencing performance about 100x faster and more power-efficient than competing MCUs based on an Arm Cortex-M4 CPU. Some variants of the E1C devices are offered without the NPU for use cases the Helium Vector extension in the Cortex-M55 delivers sufficient performance for a specific machine learning application.
Alif Semi further adds the Ensemble microcontrollers are compatible with the Arm ecosystem of tools, development environments, and software resources for efficient system development without going into details. The DK-E1 development kit can be used for evaluation, but it’s not available yet. Instead, the DK-E7 development kit can be found on Arrow for $249 and is suitable for software development from the E1 up to the E7.
Alif DK-E7 development kit
With low-power consumption and ML capabilities, the Ensembled E1C microcontrollers are especially suitable for battery-power devices running on-device ML workloads such as object recognition, speech recognition, sensor fusion, and adaptive audio noise cancellation without having to rely on the cloud for processing.
The Ensemble E1C Cortex-M55 AI/ML microcontrollers and the related DK-E1 kits will be available to lead customers in August 2024, and mass production is expected to start in Q4 2024. Further details may be found on the product page and in the press release.
WeAct STM32WB55 is an inexpensive development board based on STMicro STM32WB55 Arm Cortex-M4 wireless SoC with Bluetooth LE 5.4 and an 802.15.4 radio for Zigbee, Thread, and Matter connectivity that sells for just $3.40 shipped.
STMicro STM32WB55 wireless microcontroller was introduced in 2019, and we have covered a few development boards such as the official P-Nucleo-WB55 development pack, the STM32WB-Feather board, and the MRK-SharkyPro following the Arduino MRK form factor. All those boards w
WeAct STM32WB55 is an inexpensive development board based on STMicro STM32WB55 Arm Cortex-M4 wireless SoC with Bluetooth LE 5.4 and an 802.15.4 radio for Zigbee, Thread, and Matter connectivity that sells for just $3.40 shipped.
STMicro STM32WB55 wireless microcontroller was introduced in 2019, and we have covered a few development boards such as the official P-Nucleo-WB55 development pack, the STM32WB-Feather board, and the MRK-SharkyPro following the Arduino MRK form factor. All those boards would go for about $40, but thanks to China manufacturing and procurement “magic” and the cutting of a few features, the WeAct STM32WB55 board sells for just a fraction of the price making it even cheaper than the company’s ESP32-H2 board with similar connectivity options.
Expansion – 20-pin + 15-pin headers with GPIOs, 10x analog input pins, USART, I2C, SPI, 5V, 3.3V, GND
Debugging – 4-pin SWD debug connector
Misc – NRST and BOOT0 buttons, user LED, 32MHz crystal
Power Supply – 5V via USB Type-C port
Dimensions – 56.06 x 21.08 mm
As usual, WeAct will bring the bare minimum documentation on GitHub with PDF schematics and step files, the STM32WB55 microcontroller datasheet, and a Bluetooth LE code sample. For more details about software development, you’d have to look at the documentation and resources for the P-Nucleo-WB55 or other boards.
The main strength of WeAct Studio is not software, but delivering ultra-low-cost hardware, and they’ve done a decent job on that front again…
Yesterday we noted Sipeed was working on the LM5A system-on-module powered by ESWIN EIC7700X quad-core RISC-V processor with a ~20 TOPS AI accelerator in order to integrate it into its Lichee Book laptop and other carrier boards. So today, I’ve decided to look into the EIC7700X SoC designed by “BEIJING ESWIN COMPUTING TECHNOLOGY CO., LTD”, or ESWIN for shorts.
The EIC770X features four 64-bit RISC-V (RV64GC) cores clocked up to 1.8 GHz, unnamed 3D and 2D GPUs, a 19.95 TOPS NPU, H.265/H.264 video
Yesterday we noted Sipeed was working on the LM5A system-on-module powered by ESWIN EIC7700X quad-core RISC-V processor with a ~20 TOPS AI accelerator in order to integrate it into its Lichee Book laptop and other carrier boards. So today, I’ve decided to look into the EIC7700X SoC designed by “BEIJING ESWIN COMPUTING TECHNOLOGY CO., LTD”, or ESWIN for shorts.
The EIC770X features four 64-bit RISC-V (RV64GC) cores clocked up to 1.8 GHz, unnamed 3D and 2D GPUs, a 19.95 TOPS NPU, H.265/H.264 video encoder/decoder capable of handling up to 32x 1080p30 videos, various video output (HDMI + DSI) and input interfaces, dual GbE, 4-lane PCIe Gen 3, and more.
ESWIN EIC7700X block diagram
ESWIN EIC7700X specifications:
CPU
4x SiFive Performance P550 RV64GC RISC-V cores @ 1.4GHz (up to 1.8GHz) with Cortex-A75-class performance
32KB(I) + 32KB(D) L1 Cache
256KB L2 Cache
4MB shared L3 Cache
Cache supports ECC (support SECDED)
DNN Accelerator – 19.95 TOPS (INT8)
Vision DSP – DSPs single cluster; support 512 INT8 SIMD
Multimedia Decoder/Encoder
HEVC (H.265) and AVC (H.264) supported
H.265 up to 8K @ 50fps or 32 channels of 1080p30 video decoding
H.265 up to 8K @ 25fps or 13 channels of 1080p30 video encoding
JPEG ISO/IEC 10918-1, ITU-T T.81, up to 32K x 32K
Vision Engine
HAE (2D Blit, Crop, Resize, Normalization)
3D GPU (support OpenGL-ES 3.2, EGL 1.4, OpenCL 1.2/2.1 EP2, Vulkan 1.2, Android NN HAL)
OSD (3 layers)
Audio Codec
AAC-LC encoding
G.711/G.722.1/G.726/MP2L2/PCM/MP3/AAC-LC decoding
Memory – Up to 32GB 64-bit LPDDR 4/4x/5
Storage I/F – eMMC 5.1, 2x SDIO 3.0, SATA III (6Gb/s), SPI NOR flash
Video Output
HDMI 2.0 supports HDCP1.4/2.2
4-lane MIPI-DSI TX
Video input
MIPI DPHY v2.1 and CPHY v1.2 Sub LVDS/SLVS or 6 cameras input
4-Lane MIPI D-PHY/2-Trio C-PHY interface, up to 2.5Gbps/Lane
4-Lane LVDS/Sub-LVDS/HiSPi interface, up to 1.0Gbps/Lane
Peripheral Devices and Interfaces
2x USB 3.0/2.0 (DRD)
4-lane PCIE 3.0 (RC+EP)
2x GMAC with RGMII (GbE) support
12x I2C @ 1Mbps, 5x UART, 2x SPI
3x I2S (slave + master)
Security
TEE, TRNG, ECDSA, RSA4096, AES, SM4, DES, HMAC, CRC32,
Dual-core hardware acceleration
16KB OTP
Power Consumption – Typical: 8W with CNN
Packages
FC-CSP – 17 x 17 mm
FC-BGA – 23 x 23 mm
Temperature Range – -20°C to +105°C
Software support is a little confusing, as we’re told the SoC can work in “M.2 Key Card mode” in which case Ubuntu 18.04 and CentOS 7.4 Linux distributions are supported (on the host?), while in standalone (SoC) mode, it supports Linux 5.17 / Linux 6.6 with an SDK provided. The NPU is compatible with development frameworks such as Pytorch, Tensorflow, PaddlePaddle, ONNX, etc., and high-precision LLMs.
HiFive Premier P550 SBC with ESWIN EIC7700 processor
The EIC7700X is one of four members of ESWIN’s “Intelligent Computing SoCs” with the EIC7700 offering the same design but clocked at up to 1.4 GHz and with a 13.3 TOPS NPU. It will be found in the upcoming SiFive HiFive Premier P550 scheduled for launch in July 2024.
The EIC7702 and EIC7702X are more complex octa-core SiFive P550 RISC-V SoCs designed for AI PCs. They are also clocked at 1.4 or 1.8 GHz but support up to 64GB RAM, offer two eMMC, two SATA III, and two NOR flash interfaces, and support up to 8K video encoding/decoding, or up to 64x 1080p30 video decoding. The number of PCIe and GbE interfaces are both increased to four leading to a larger 35x35mm package. Finally, the NPU is more powerful as well with 26.6 TOPS (EIC7702) and 39.9 TOPS (EIC7702X).
ESWIN EIC7702X block diagram
The EIC7700(X) SoC is best suited for edge AI applications such as Industrial quality inspection, LLM, behavior recognition, intelligent sorting, secure identification, and face identification, while the EIC7702(X) targets speech synthesis, LLM, image/video generation, and text generation.
Based on Sipeed and SiFive announcements, hardware based on EIC7700(X) quad-core RISC-V edge AI SoC should become available as early as next month. More details – mostly the product briefs at this time – may be found on the products page.
8devices Carambola 3 is a compact System On Module (SoM) built around the Qualcomm QCA4531 WiFi 4 chipset. The module comes in two variants – the Carambola3 for commercial applications (0 to +65°C) and the Carambola3-I for industrial environments (-40 to +85°C). Additionally, 8devices offers a development kit with integrated features like a 2.4 GHz chip antenna, dual LAN ports, USB, GPIO, and much more. Notably, the development kit also supports OpenWrt Upstream, making it ideal for IoT, industr
8devices Carambola 3 is a compact System On Module (SoM) built around the Qualcomm QCA4531 WiFi 4 chipset. The module comes in two variants – the Carambola3 for commercial applications (0 to +65°C) and the Carambola3-I for industrial environments (-40 to +85°C). Additionally, 8devices offers a development kit with integrated features like a 2.4 GHz chip antenna, dual LAN ports, USB, GPIO, and much more. Notably, the development kit also supports OpenWrt Upstream, making it ideal for IoT, industrial automation, and smart home projects.
The Carambola3 is a pin-to-pin compatible module with the Carambola2, but with a faster processor, more memory, and lower power consumption while the original Carambola was discontinued due to its older technology. 8devices has been developing and selling Wi-Fi modules such as the Rambutan Atheros module, Komikan 802.11ac Wave 2 Module, and recently announced Noni M.2 WiFi 7 module feel free to check those out if you are looking for Wi-Fi modules.
When we compare the Carambola 2 with Carambola 3 it boasts a 250 MHz faster CPU, 64 MB more RAM, and a faster RAM controller, the only disadvantage is that it has fewer GPIOs, but the overall performance upgrades outweigh this minor reduction.
8devices Carambola 3 block diagram
For easy reference, the company also provides a simple block diagram and a pinout diagram of the module which can be found on the download section of the products page.
Carambola3 Wi-Fi Dev Kit
8devices also provides an open-source development kit for the Carambola 3 module. The devkit not only provides access to a chip antenna, dual Ethernet, USB-A, and USB-C ports but it also gives access to a hardware reset button a programmable GPIO button, and a 2.54 mm GPIO heaviest for breadboard compatibility.
According to the 8devices announcement page, the Carambola 3 now has upstream OpenWrt support, offering developers better security, the latest updates, more software choices, and broader community support. The announcement page also mentions that this isn’t the first 8devices module with OpenWrt support. Others include Carambola 2, Lima, Jalapeno, and others. The source code for QCA4531 (Ath9) 7 hardware can be found on GitHub.
The Carambola 3 Development kit, the Carambola3, and the industrial Carambola3-I are all available on the official 8devices store where the devkit sells for $43.00. the commercial Carambola3 Wi-Fi module is priced at $27.00, and the industrial version of the module can be purchased for $29.00.
We’ve just written about Deep Computing’s DC-ROMA RISC-V Laptop II, but Sipeed has just launched the Lichee Book 4A modular RISC-V laptop based on the quad-core Alibaba T-head TH1520 processor and running Debian Linux.
I was expecting the Lichee Book to launch with the SpacemIT K1 octa-core RISC-V processor, but Sipeed started with the time-tested TH1520 quad-core RISC-V processor coupled with up to 16GB RAM and 128GB eMMC flash and equipped with a 14-inch IPS display. In the future, we’ll get t
We’ve just written about Deep Computing’s DC-ROMA RISC-V Laptop II, but Sipeed has just launched the Lichee Book 4A modular RISC-V laptop based on the quad-core Alibaba T-head TH1520 processor and running Debian Linux.
I was expecting the Lichee Book to launch with the SpacemIT K1 octa-core RISC-V processor, but Sipeed started with the time-tested TH1520 quad-core RISC-V processor coupled with up to 16GB RAM and 128GB eMMC flash and equipped with a 14-inch IPS display. In the future, we’ll get the Lichee Book 3A with the SpacemIT K1, and the Lichee Book 5A with an unnamed Cortex-A75-class RISC-V SoC with a 20 TOPS AI accelerator.
Sipeed Lichee Book specifications:
260-pin SO-DIMM system-on-module (SoM)
Sipeed LM3A – Upcoming module based on SpacemIT K1 octa-core RISC-V CPU (Cortex-A55 class) with 2 TOPS NPU
USB – USB 3.0 Type-A port, USB 3.0 Type-C port, USB 2.0 Type-A port
User input – 88-key round cap silent QWERTY keyboard and touchpad
Battery – 35Wh battery (4500 mAh @ 7.6V)
Dimensions – 314 x 217 x 17mm
Weight – 1.3Kg
The Lichee Book 4A laptop is like a large brother of the Lichee Console 4A 7-inch terminal as both share the same motherboard and module. I reviewed the Lichee Console 4A earlier this year and found out that performance was somewhat disappointing (slightly lower than a Raspberry Pi 4) and there were still plenty of things to improve on the software front while running Debian 12. That may be why Sipeed says the platform is targeted at developers in the Wiki where most of the information about the RISC-V laptop is available:
Note: High-performance RISC-V consumer electronics are still in the early stages as of 2024. Lichee Book 4A is mainly aimed at RISC-V developers with at least proficient Linux operating experience, and ordinary consumers may not be able to use it directly. If you are an ordinary user without Linux experience, please do not purchase.
Note it’s not specific to Sipeed hardware, and if you are a regular user and purchase a RISC-V laptop in 2024 you’ll almost certainly be disappointed. Sipeed also ranks the TH1520 quad-core SoC as a faster processor than the SpacemIT K1 octa-core processor because of the different RISC-V core. As a modular platform, you’ll eventually be able to replace the system-on-module with a choice between the LM3A, LM4A, and LM5A modules.
The good news is that it’s relatively inexpensive to get a Lichee Book laptop with pricing starting at just $188 without the CPU module for people who already own a Lichee LM4A system-on-module. A complete laptop goes for $298.40 with 8GB RAM and a 32GB eMMC flash, or $348.80 with 16GB RAM and a 128GB eMMC flash on the same link. Aliexpress currently runs a summer sale, so you can also benefit from using the discount code USAFF40 for a $40 discount on orders over $269 (US only), or code SS40 for some other countries.
AAEON uCOM-ADN is a SMARC-compliant system-on-module (SoM) based on an Intel Core i3-N305, Intel Atom x7425E, or Intel Processor N97 Alder Lake-N SoC and mainly designed for the digital signage and smart kiosk markets.
The module is equipped with up to 8GB LPDDR5, up to 64GB eMMC flash, two 2.5GbE controllers, and offers a range of interfaces through a standard 314-pin MXM 3.0 connector such as SATA III, three PCIe Gen3 x1, DP++ and eDP video outputs, MIPI CSI camera input, and more.
uCOM-ADN S
AAEON uCOM-ADN is a SMARC-compliant system-on-module (SoM) based on an Intel Core i3-N305, Intel Atom x7425E, or Intel Processor N97 Alder Lake-N SoC and mainly designed for the digital signage and smart kiosk markets.
The module is equipped with up to 8GB LPDDR5, up to 64GB eMMC flash, two 2.5GbE controllers, and offers a range of interfaces through a standard 314-pin MXM 3.0 connector such as SATA III, three PCIe Gen3 x1, DP++ and eDP video outputs, MIPI CSI camera input, and more.
AAEON provides support for Windows 10 64-bit, Windows 11 Enterprise, and Ubuntu 22.04 with Linux 5.19. The company does not provide any information about the carrier board, although they used to offer the CB-960T SMARC Carrier Board which has been phased out since December 2020. So I’d assume customers would have to use other reference SMARC carrier boards or directly integrate the module into their existing designs.
Customizable mini PCs are becoming increasingly prominent among enterprises across a wide range of industries, such as IoT, digital signage, telemedicine, and much more. Mini PCs, which provide enterprises with greater customization options and the capacity to alter components, prove once more that size is no barrier to personalization.
Barebone mini PCs have become more popular over the years as they are designed to give businesses the freedom to configure and install all their requirements to
Customizable mini PCs are becoming increasingly prominent among enterprises across a wide range of industries, such as IoT, digital signage, telemedicine, and much more. Mini PCs, which provide enterprises with greater customization options and the capacity to alter components, prove once more that size is no barrier to personalization.
Barebone mini PCs have become more popular over the years as they are designed to give businesses the freedom to configure and install all their requirements to suit their preferences. This offers several advantages: enterprises can scale computing power by upgrading parts as required, saving money by avoiding full device replacements, and simplifying maintenance through easy component changes. The modular design also maximizes space efficiency while providing sufficient processing power. Azulle, one of the leading brands of mini PCs, has manufactured the Elite, an industrial grade, ultra-powerful barebone mini PC ensuring businesses remain future-proof and ready to tackle demanding environments.
Key Features of Azulle’s Barebone Mini PC: The Elite
The Elite’s key features are meant to empower businesses with the performance and customization they need to remain relevant in a competitive market while reducing operation costs. The Elite has a 13th Gen Intel Raptor Lake Processor (Core i3/i5/i7) and is fully customizable with your choice of OS, RAM, and storage. This barebone mini PC boasts a comprehensive array of connectivity options, including dual-band Wi-Fi, 1Gbps LAN, and 2.4Gbps WLAN, ensuring a direct and stable internet connection. With a plethora of ports and wireless capabilities, these devices become the central hub for all your connectivity needs.
However, the Elite mini PC’s most surprising enhancement is the 4G LTE module, resulting in an always-on solution for primary and backup network connectivity, ensuring continuous operation in remote places and during power interruptions, ideal for those businesses that require wireless connectivity on the go!
Powering 4G LTE Connectivity, Proving the Elite mini PC’s Versatility
Azulle’s 4G LTE module, certified by AT&T, provides faster, broader, and safer internet connectivity for your mini PC, offering network resiliency for business continuity, anywhere and at any time. Throughout different use cases of the Elite mini PCs, all aspects of public safety are enhanced by 4G solutions that improve response time and increase day-to-day operations. Here are some scenarios where such a device would be particularly beneficial:
Remote Work and Mobility: Field workers in manufacturing plants benefit from using IoT devices to update project information on-site. The robust Elite is used to power screens in tractors and remote locations, even where data speeds fall short of enterprise expectations, as they usually do in rural areas.
Backup Connectivity: Businesses can use the Elite mini desktop PC with 4G as a backup internet source during outages or emergencies, ensuring continuous operations. This is especially useful for emergency notification systems, whose whole purpose is to display alerts in real-time when it matters most.
Logistics & Transportation: The Elite mini PC with 4G LTE connectivity on moving vehicles is one of the most popular use cases. Some of the most crucial jobs that would benefit from the 4G module are police cars, cash-in-transit (CIT) vehicles, and ambulances to provide security and real-time information. Following, fleet managers and drivers also require ongoing, reliable communication for route planning, especially for long-distance deliveries. Finally, in order to support cities’ transportation systems’ structural capacities, monitors inside buses, trains, and subways will provide an advantage with improved location accuracy and efficiency.
Temporary Worksites: Retail pop-up shops, exhibitors, and construction sites would benefit from the Elite mini PC with 4G LTE connectivity as a support network operation for out-of-office locations. For instance, in construction sites, project managers or engineers might need to update progress and communicate back to the main office without needing a wired internet connection. Moreover, sales representatives from any company or industry can monitor and handle inventory management, customer data, and even collect leads at different locations without needing a permanent internet setup.
Underserved Areas: According to the International Telecommunications Union, 3.6 billion people live entirely unconnected, exposing some shocking inequalities in internet access. The education and healthcare industries are some of the most affected, where cost-effective and long-lasting devices like the Azulle Elite can power monitors that provide online learning resources and virtual classrooms for schools in rural areas and even provide medical clinics with the right tools for telemedicine services.
Let’s Wrap Up!
The combination of high-performing capabilities, cost-efficiency, connectivity, and customization options make the Elite, one of Azulle’s stellar mini PC solutions, ensuring longevity and reliability in different industries and use cases.
Whether you’re an enterprise or a small business looking for a modular and customized mini PC to run your operations, the Azulle Elite barebone mini PC delivers unparalleled power and customization in a small package. Even more, with Azulle as a supplier, the barebone kit is just the start, as they offer premium U.S.-based technical and customer support before, during, and after purchase. For further details or inquiries please contact Azulle at 786-233-6769 or via email at sales@azulle.com.
Deep Computing has announced the DC-ROMA RISC-V Laptop II powered by a 2.0 GHz SpacemIT K1 octa-core 64-bit RISC-V processor coupled with up to 16GB DDR4 and running Ubuntu with official support from Canonical.
Deep Computing unveiled the first RISC-V laptop – named ROMA – in 2022 but it never really took off because of all the web3 and cryptocurrency features plus the ultra-high price. The new DC-ROMA RISC-V Laptop II does without those and features a 14-inch IPS display, a 1TB SSD, a WiFI 6 an
Deep Computing unveiled the first RISC-V laptop – named ROMA – in 2022 but it never really took off because of all the web3 and cryptocurrency features plus the ultra-high price. The new DC-ROMA RISC-V Laptop II does without those and features a 14-inch IPS display, a 1TB SSD, a WiFI 6 and Bluetooth 5.2 module, a webcam, several USB ports including a USB-C with DisplayPort Alr mode, and a “development interface” with a few GPIOs.
DC-ROMA RISC-V Laptop II specifications:
SoC – SpacemiT K1
CPU – 8-core X60 RISC-V processor @ up to 2.0 GHz; single-core performance equivalent to about 1.3x the performance of an Arm Cortex-A55
GPU – Imagination IMG BXE-2-32 with support for OpenCL 3.0, OpenGL ES3.2, Vulkan 1.2
1x USB 3.2 Gen 1 Type-C “full function” port with power, data, and DisplayPort Alt mode to connect another display
1x USB 3.2 Gen 1 Type-C port with power and data support
User input – QWERTY keyboard and touchpad
Expansion – 8-pin “development interface” with GPIO, UART, I2C, 3.3V, and GND
Misc – Fastboot button, Reset button
Battery – Good for up to 8 hours on a charge
Power Supply – Via USB-C port
Dimensions – 32.3 x 20.9 x 1.7cm
Weight – 1.36 kg
That’s the exact same hardware design as the Muse Book laptop that Leo looked into details – including a teardown – a couple of months ago. The DC-ROMA II laptop is said to run an optimized version of Ubuntu 23.10 Desktop, which is odds since support for Ubuntu 23.10 will end in July 2024, or in other words: next month… Canonical will likely release Ubuntu 24.04 for the laptop soon. I’m unable to find additional technical documentation (including links to OS images), but a few more details may be found on the product page.
The DC-ROMA RISC-V Laptop II has a much better price than the first model with pre-orders starting at $399 with 8GB RAM and booting the OS from a microSD card. Adding a 1TB SSD adds $100 to the cost, and note that a power supply is not included by default. Two options are available:
$50 Standard Dev ToolKit – 32G microSD card with Debian images, 32GB microSD card with Ubuntu Desktop images USB Type-C Cable, and Special Dev Cable to connect to the GPIO connector
$100 Power Dev ToolKit – With everything in the Standard Dev Toolkit plus an 87W GaN 10000 mAH Charger Power Bank
The DC-DOMA laptop is not the only SpacemiIT K1 laptop in the works, as the aforementioned Muse Book laptop is up for pre-order on Arace Tech for $299 with 8GB RAM and a 64GB eMMC flash, and the Sipeed LicheeBook – that was initially planned with a TH1520 SoC, will also launch this month with the SpacemIT K1 octa-core RISC-V SoC according to a message on Sipeed Telegram channel.
The low-power RealTek RTL8126(-CG) PCIe 3.0 x1 to 5GbE controller was unveiled at Computex 2023 last year, and a few M.2 modules and PCIe cards are now available at very competitive prices.
The first module that came to my attention was the “5000Mbps Networking Card B+M Key to PCIe Adapter” from STDEV sold for $27 on Amazon (where there’s also a 7% discount) that’s an M.2 PCIe module with a ribbon cable that is connected to a board with an RJ45 jack attached to a PCIe bracket.
There’s limited i
The first module that came to my attention was the “5000Mbps Networking Card B+M Key to PCIe Adapter” from STDEV sold for $27 on Amazon (where there’s also a 7% discount) that’s an M.2 PCIe module with a ribbon cable that is connected to a board with an RJ45 jack attached to a PCIe bracket.
There’s limited information about it, and it was just added to Amazon on June 8, so there aren’t any user reviews just yet. But earlier today, Jiri Brejcha informed us he had tested a similar card (might even be the same) from Iocrest with a Raspberry Pi 5 and a Pineboards HatDrive BM1 HAT+ managing to reach 4.7 Gbps transfer speeds in both directions with iperf3 using PCIe Gen3 mode on the Pi SBC. The transfer rates dropped to 3.43 Gbps (Rx) and 3.31 Gbps (Tx) in PCIe Gen2 mode.
Raspberry Pi 5 connected to RTL8126 5GbE M.2 card. Source: Jiri Brejcha
I’ve read the 10GbE chips can get really hot well over 100°C without cooling, but the RealTek RTL8126 chip used here tops at about 82°C under heavy traffic. Jiri also tested it successfully in Windows 11 with the drivers installed automatically. Note you’ll need to install the Linux drivers provided by RealTek for this to work since the new 5GbE controller has not made it to most Linux distributions. What’s amazing is that the Iocrest model can be purchased for $12.88 plus shipping on Aliexpress.
If your system does not happen to have a spare M.2 PCIe Key M or Key B slot available, you’ll also find RTL8126 PCIe x1 cards from Iocrest going for a similar price on Aliexpress.
The choice is currently limited, but I’m sure we’ll see plenty of RTL8126 PCIe cards and M.2 modules thanks to the low prices. I would also expect the RealTek RTL8126 5Gbps Ethernet controller to replace the RealTek RTL8125 2.5Gbps controller in some upcoming mini PCs. If you prefer a 5GbE USB dongle, we’ll need to wait for the RTL8157 PCIe to USB 3.2 controller also announced at Computex 2023. What might be complicated/pricey is finding a switch as searching for “5GbE switch” or “5Gbps Ethernet switch” returns plenty of results with “2.5GbE switch“… The best option might be getting a 10GbE switch as of now.
Cavli Wireless C17QS is a Cat 1.bis cellular IoT and GNSS module that builds up on the Qualcomm QCX216-powered C16QS Cat 1.bis Cellular IoT module introduced last year, with more memory (2MB RAM) and storage (8MB flash), a wider range of LTE bands, multi-band (L1 and L5) GNSS, and a new FreeRTOS SDK for more flexibility compared to the C16QS.
The Cavli C17QS Cat 1bis module is designed around a Qualcomm QCX217 Arm Cortex-M3 microcontroller clocked at up to 306MHz clock speed and running FreeRTOS
Cavli Wireless C17QS is a Cat 1.bis cellular IoT and GNSS module that builds up on the Qualcomm QCX216-powered C16QS Cat 1.bis Cellular IoT module introduced last year, with more memory (2MB RAM) and storage (8MB flash), a wider range of LTE bands, multi-band (L1 and L5) GNSS, and a new FreeRTOS SDK for more flexibility compared to the C16QS.
The Cavli C17QS Cat 1bis module is designed around a Qualcomm QCX217 Arm Cortex-M3 microcontroller clocked at up to 306MHz clock speed and running FreeRTOS real-time operating system. The module features a range of interfaces including UART, USB 2.0, USIM, SWD, ADCs, I2S, I2C, SPI, and GPIO pins. The new module is pin-to-pin compatible with the C16QS module for easier design upgrades.
Cavli C17QS specifications:
Wireless IC – Qualcomm QCX217 Arm Cortex-M3 @ 306 MHz, cellular modem-RF
Memory – 2MB RAM
Storage – 8 MB flash
Cellular connectivity
LTE CAT 1.bis based on 3GPP Release 14
Peak speeds – 10Mbps (DL), 5Mbps (UL)
Global Bands: B1/B2/B3/B4/B5/B7/B8/B12/B13/ B14/B18/B19/B20/B25/B26/B28/ B34/B38 TDD/B39/B40 TDD/ B41 TDD/B66/B71
Interfaces – 4x UART, 1x USB 2.0, 1x USIM x1, 1x SWD, 2x ADC, 1x I2S, 1x SPI, 2x I2C, 8x GPIO, 2x ANT, Network Status Indicator, Power ON Status Indicator
Supply Voltage – 3.8V
Dimensions – 26.5 x 22.5 x 2.3 mm; LGA package pin-to-pin compatible with Q16QS module
Temperature Range – Standard: -35°C to 75°C; extended: -40°C to 85°C
I added new features compared to Q16QS in bold and wrote TDB when the information was not available.
Q17QS Device Development Kit (DDK)
The company provides an open SDK for the module but without any further public information released, support for Cavli Hubble cloud-based platform for device management, and a C17QS Device Development kit (DDK) for evaluation and early software development. Sadly all documentation – even the product brief! – is behind a registration wall that requires human approval.
The Cavli C17QS Cat 1.bis Cellular IoT module is suitable for IoT applications for Smart Agriculture (e.g. remote monitoring and management of farming operations), healthcare and e-health (e.g. real-time patient monitoring and advanced telemedicine solutions), logistics, retail, Smart Cities, utilities, manufacturing, etc…
Cavli Wireless did not provide pricing information for the C17QS IoT module, but the C16QS was launched as a sub-$5 Cat 1.bis cellular IoT solution when it was announced last year, so I’d assume the price is in that range, just a little higher. More details may be found on the product page and in the press release.
Ninkear N9 is an inexpensive mini PC powered by an Intel Processor N95 quad-core Alder Lake-N processor that sells for just around $123 shipped on AliExpress with 8GB RAM and a 256GB SSD. European readers will also find it on GeekBuying for 149 Euros shipping from the company’s European warehouse.
The mini PC supports three independent displays through HDMI, DP, and USB-C connectors, comes with a 3.5mm audio jack, offers gigabit Ethernet and WiFi 5 connectivity, and four USB 3.0 ports for expan
Ninkear N9 is an inexpensive mini PC powered by an Intel Processor N95 quad-core Alder Lake-N processor that sells for just around $123 shipped on AliExpress with 8GB RAM and a 256GB SSD. European readers will also find it on GeekBuying for 149 Euros shipping from the company’s European warehouse.
The mini PC supports three independent displays through HDMI, DP, and USB-C connectors, comes with a 3.5mm audio jack, offers gigabit Ethernet and WiFi 5 connectivity, and four USB 3.0 ports for expansion.
Ninkear N9 specifications:
SoC – Intel Processor N95 quad-core Alder Lake N-series processor @ up to 1.10 GHz / 3.4 GHz (Turbo) with 6MB cache, 16EU Intel HD graphics @ 1.20 GHz; TDP: 12W
System Memory – 8GB DDR4
Storage – 256GB M.2 SSD (Unclear whether SATA or NVMe)
Video Output
HDMI port up to 4Kp60
DisplayPort connector up to 8Kp60
USB-C via DisplayPort Alt mode up to 8Kp60
Triple independent display support
Audio – 3.5mm headphone+mic jack, digital audio output via HDMI and DP ports
Networking
Gigabit Ethernet RJ45 port
Dual-band Wi-Fi 5 and Bluetooth 4.2
USB – 4x USB 3.0 ports, 1x USB Type-C port
Misc
Power button
Kensington lock slot
Power Supply – 12V/2A via DC jack
Dimensions – 12.8 x 12.8 x 4.5 cm
Weight – 370 grams
The mini PC ships with Windows 11, but the company claims Ubuntu/Linux is supported. The mini PC is said to ship with a SATA cable, a screw pack, and a user manual. The SATA cable would imply it’s possible to add a 2.5-inch drive, but it’s not listed in the specs, and I don’t see any illustrations or photos to confirm that. There should also be a power adapter, but only with an EU plug from whatever shop it is purchased.
The type of M.2 SSD used is also unclear as the GeekBuying page mentions “256GB SSD SATA storage”, but at the same time we are shown a funny illustration with a weird “8GB DDR4 RAM stick” with and M.2 Key-B connector and a SATA port and a 256GB M.2 Key-M NVMe SSD, namely WD Blue SN550. So at this point, I’d expect no 2.5-inch SATA support and a 256GB M.2 SATA drive to be on the safe side.
What is that!?
If you are sensitive to fan noise, you may want to avoid it, as one customer left feedback on AliExpress as follows:
Its so loud fan noise and, I have no idea how to change fan speed. I did change all cmos setting but, there was no different. So I just put a resistor of 100 ohm on the fan. Now its quiet enough.
Autosport Labs, a company that makes products for motorsport acquisition and real-time telemetry, has launched the ESP32-CAN-X2 board with an ESP32-S3 microcontroller, two CAN bus interfaces, and an automotive-grade power supply with a 6V to 20V DC input range.
ESP32 boards with CAN Bus have been around for years starting with the Olimex ESP32-EVB Board which we covered in 2017, and followed by boards such as the CAN32 board, CanLite ESP32, or RejsaCAN-ESP32-S3. The ESP32-CAN-X2 adds another opt
Autosport Labs, a company that makes products for motorsport acquisition and real-time telemetry, has launched the ESP32-CAN-X2 board with an ESP32-S3 microcontroller, two CAN bus interfaces, and an automotive-grade power supply with a 6V to 20V DC input range.
ESP32 boards with CAN Bus have been around for years starting with the Olimex ESP32-EVB Board which we covered in 2017, and followed by boards such as the CAN32 board, CanLite ESP32, or RejsaCAN-ESP32-S3. The ESP32-CAN-X2 adds another option with ESP32-S3 and two CAN Bus interfaces.
ESP32-CAN-X2 board specifications:
Wireless module – ESP32-S3-WROOM-1-N8R8
MCU – ESP32-S3 dual-core Tensilica LX7 microcontroller up to 240 MHz with 384KB ROM, 512KB SRAM, 16 KB SRAM in RTC
Memory – 8MB PSRAM
Storage – 8MB flash
Wireless – WiFi 4 and Bluetooth LE 5
PCB antenna
USB – USB Type-C port for flashing and power
CAN Bus
6-pin header for 2x CAN V2.0B communication
1x CAN bus is built into the ESP32-S3 MCU
1x CAN Bus is provided through MCP2515 connected over SPI
Integrated CAN transceivers
Configurable CAN termination resistors, which can be disabled via breakable jumpers
Expansion – All pins are broken out to a DIP form factor and for a future range of stackable “bolt-ons” (like hats) add-on boards
Misc
Power LED, user LED
Reset and Boot push button
Automotive-grade Power Supply
6-20V DC via USB-C port or VIN pin (peaks up to 40V Vmax)
3.3V Voltage regulator
Power consumption – 330mW typ, up to 1.65W
Dimensions – 72 x 42.10 mm
Temperature Range – -40°C to +85°C
The company provides Arduino and CircuitPython examples on GitHub to help users get started quickly with a ping pong example that sends packets between the CAN1 and CAN2 interfaces of the board. More technical details about the hardware and instructions to get started with the Arduino and CircuitPython can be found in the wiki.
The ESP32-S3 dual CAN Bus board targets automotive and industrial applications with some potential projects including creating a button panel to broadcast messages to a PDM, triggering a relay (with additional support circuitry) via a CAN bus message, bridging two CAN bus networks with different baud rates, collecting data from two different CAN bus networks with different baud rates, isolating traffic between CAN networks, and creating a “man in the middle” agent to identify the source of CAN messages to reverse-engineering CAN Bus implementations.
Autosport Labs sells the ESP32-CAN-X2 board on its website for $49.95.
The ESP32 Internet Radio from Poland-based maker, The MicroMaker, is a simple hardware kit that combines the LilyGo T-Display S3 Development board with an I2S audio breakout module and other components to form a radio that can access and stream from online radio stations. With the ESP32 Internet Radio, you are not limited to the radio stations available in your immediate vicinity.
It is powered by the LilyGo T-Display S3 which integrates the network-capable ESP32-S3 microcontroller (Wi-Fi + BLE
The ESP32 Internet Radio from Poland-based maker, The MicroMaker, is a simple hardware kit that combines the LilyGo T-Display S3 Development board with an I2S audio breakout module and other components to form a radio that can access and stream from online radio stations. With the ESP32 Internet Radio, you are not limited to the radio stations available in your immediate vicinity.
It is powered by the LilyGo T-Display S3 which integrates the network-capable ESP32-S3 microcontroller (Wi-Fi + BLE 5), a 1.9” full-color capacitive touchscreen display, and two programmable buttons. The ESP32-S3’s integrated Wi-Fi capability allows the radio to connect to the Internet, and the touchscreen brings an intuitive and easy-to-use interface to the device.
It supports up to 512 stored radio stations, and you can manage these stations from a web browser on your PC or mobile phone.
The Internet Radio can be powered by an 18650 Lithium-ion battery for portable applications. We have recently covered various other interesting projects powered by the ESP32-S3 microcontroller such as the ThingPulse Pendrive S3, M5Stack CoreS3 SE, T-Camera S3, and the Air Quality Sensor.
18650 Li-ion battery and battery holder (optional)
The Internet Radio is not open-source. The precompiled firmware is hosted on OneDrive and can be flashed onto the microcontroller using Espressif’s Flash Tool, but you will need to activate it with a product key from the maker. It is listed on Tindie for about $10.
The hardware kit itself is currently priced at $95, and includes a LilyGo T-Display S3 module, the SparkFun I2S Audio Breakout module, a 5W speaker, a battery holder, a Wi-Fi Antenna, an enclosure, and other components. A hot glue gun is required for assembly, but buyers can opt for the pre-assembled version for $30 extra. If you decide to build the Internet Radio yourself, you will be able to swap any component with a better replacement, except for the LilyGo T-Display S3.
It is important to note that the ESP32 Internet Radio does not have a radio antenna and is unable to receive local radio transmissions. More detailed instructions about installation, setup, and usage are available in the GitHub repository for the device.
NapCat R112 is a 5MP video doorbell with dual-band 2.4/5GHz WiFi, AI features such as human and package detection, 2-way audio, and no subscription. It’s waterproof – rated IP65 – so it can be used outdoors, and powered by either a built-in battery or traditional wires.
The company sent me a sample of the Napcat R112 for review. I’ll check out the camera in battery-powered mode only in this review, install it on the wall close to the gate of my house, and use the Napcast Android app to access th
NapCat R112 is a 5MP video doorbell with dual-band 2.4/5GHz WiFi, AI features such as human and package detection, 2-way audio, and no subscription. It’s waterproof – rated IP65 – so it can be used outdoors, and powered by either a built-in battery or traditional wires.
The company sent me a sample of the Napcat R112 for review. I’ll check out the camera in battery-powered mode only in this review, install it on the wall close to the gate of my house, and use the Napcast Android app to access the camera and answer calls.
Napcat video doorbell unboxing
The retail package shows a photo of the (white) base station and (black) camera and lists some of the main features such as a wide-angle camera, dual-power option, on-device human detection and package monitoring, and dual-band WiFi. There’s no monthly fee to pay to use the device after purchasing it.
The package contains the Napcat S1 base station, the Napcat R1 video camera, a mounting bracket, a 15° mounting wedge to install the camera at an angle, a screw hole positioning card, a USB-A to USB-C cable to charge the camera, US/EU/UK plug adapter for the base station, some wires and wire nets to power the camera (for those no using the battery), a surveillance sticker, and various screws.
The Napcat S1 WiFi base station/chime comes with two antennas, the top side features a speaker, and an LED, and the bottom side has an attachment mechanism for the power plug adapters.
The device is already fitted with a microSD card to record the videos and a Reset button can be found on the side of the microSD card slot.
I’ll use the EU plug adapter for the review. Note that the plug adapter can be detached easily, so it’s better to plug the base station into a socket that is out of reach for children. Later on, I switched to the US plug adapter and it clips better, so maybe I was just unlucky with my EU plug adapter…
The Napcat R1 video doorbell comes with a 5MP camera, a microphone, an ambient light sensor, a motion sensor, a button with an LED ring, a speaker, and a release hole to take it out of its mount using a pin.
The bottom side features four bracket installation slots, a power terminal for existing doorbell wires, a USB-C connector for charging, and a power button.
Napcat R1 teardown
The Napcat S1 base station does not seem that straightforward to open, but I think I heard the Napcat R1 Wi-Fi video doorbell tell me to “please open me” after I saw the screws. So I loosen those six screws to have a look inside.
Wireless communication with the base station is handled by an “A211” module for which I was unable to find any details.
The Napcat S1 is powered by two rechargeable 18650 batteries.
Removing the batteries and loosening a few more screws give us access to the other side of the board, but there’s not much to see here besides an EMI shield that does not look to be easy to remove.
Finally, we’ll find the camera board with six LEDs and another small board with an ambient light sensor and a motion sensor.
Reassembly was not 100% straightforward, but I did manage, and it’s now time to test whether the WiFi video doorbell works as expected. At this point, I also charge the camera through its USB-C port.
Adding the S1 base station to the NapCat Life Android app
We’ll now need to install the NapCat Life mobile app on an Android or iOS smartphone. I used an Android 14 smartphone for this review.
After registering an account with your email, you can tap on Add Device, scan the QR code on the Napcat S1 Wi-Fi doorbell base station, and go through the setup process.
This involves connecting the S1 to a wall socket and waiting for a voice prompt that indicates the device is ready for configuration.
We’ll then need to go back to the Android app to select the WiFi SSID and enter its password. What’s odd is that we allegedly own a dual-band WiFi device, but somehow we’re now told: “Your device is only compatible with 2.4 GHz networks!”.
The app will try to connect within 120 seconds, but it failed at all my attempts. The S1 was already close to the router, so I reset it as requested in the user manual, but still no luck. I eventually contacted support but we were unable to find a solution. So I put back everything in the package and worked on other reviews for the next several weeks.
But one day (or night), some old memories were suddenly brought back to me… A couple of years ago, I configured a smart vacuum cleaner and had a similar issue. The trick was to disable Blokada (an adblocker that works as a VPN) on my phone, and I could finally complete the onboarding process. Blokada can be reenabled after that step.
Mounting the Napcat R1 video doorbell
Now that we know the camera is working it’s time to install it in a strategic location. I will mount the camera on the left side of my house’s gate. The bottom side of the screw hole positioning card should be placed at around 1.40m from the floor.
You’ll note two pairs of four mounting holes. That’s because “1” is for mounting the 15° mounting wedge, and “2” is for directly mounting the mounting bracket to the wall. I went with “1”.
The package only includes screws suitable for wood mounting and did not come with plastic drywall anchors. So I used some of my own to install the mounting wedge. One of the holes was not perfectly aligned and I had to skip. I should probably have used the time and test “pencil” method to mark the location of the holes…
The next step is to install the mounting bracket using the screws provided in the package. Finally, we’ll need to slide the video doorbell into the four slots of the mount until it clicks and is firmly secure.
The video doorbell can be removed from the mount through the pinhole underneath and the provided doorbell detaching pin. It looks similar to pins used to open the SIM card holder in smartphones, so anybody could potentially steal it and where you install it the way I did depends on your neighborhood. An anti-theft alarm can be enabled if necessary so that when the camera is removed the alarm is triggered. Just remember to disable it before you remove the camera to charge it.
NapCat R112 video doorbell review with NapCat Life Android app
Within the app, there’s a live and playback view, and when somebody presses the button, you’ll receive a call on your phone with clear video and audio. I’ve tested audio with some security cameras in the past, but most are garbage, and the NapCat clearly shines with the video call being smooth and sharp and the audio crystal clear. The doorbell is loud and can be heard from both the S1 and R1 devices.
What’s less impressive is that I can’t share a video with you. There’s a download button in the Playback section, and downloading initially looks to be working, but you’re told to find it in Person Center -> Albums. I don’t see anything like that in the app or Android file systems. No new videos are showing up in Google Photos, the Downloads and Videos directories, etc… So in a desperate attempt to get a video sample, I took the microSD card out of the base station, but only a log (FAT32) partition is accessible from a Windows or Linux machine, and the rest (around 14GB) is not recognized and shows as an assigned partition.
What’s nice is the ability to filter the video by smart events.
The app shows all videos by default, but in the screenshots above, I filtered the videos to only show package events and only the FedEx delivery videos were listed for the selected day.
The NapCat Life app has plenty of settings for the camera, time, LED status, watermark, storage, notifications, and so on. I was not allowed to select 5 GHz WiFi access point when adding the device, but both 2.4 GHz and 5 GHz networks show in the settings.
The “Intelligent Setting” allows us to configure motion detection (including pedestrian detection) and package detection. The latter is only “beta” but seems to work OK. Based on the recordings I got, “Pedestrian” means actual pedestrians, motorbikes, and even cars with windows closed… It works great in my location with only a few pedestrians, cars, or motorbikes passing by my house every day, usually well under 10.
The “Message Notification” section can be used to configure whether you want to receive any notifications at all, what type of notifications (motion or/and package), and how often. The Power Management will be important for people who use the Napcat WiFi video doorbell using the battery. I selected the “optimal surveillance” option so my doorbell acts as a video doorbell and a security camera. The downside is that I got a low-battery notification within about 6 weeks (including a few weeks in its box) after fully charging the camera. I basically live in the middle of the jungle with very few alerts a day, but I imagine people living in a busier area may have to recharge the battery once or twice a month with this setting. I have other security cameras, so I’ve now switched to the “Optional Battery Life” settings to disable motion detection so that video recording only occurs when somebody presses the button.
I usually receive several packages a week, and I’ve noticed very few people are using the doorbell (I think only two). Instead, they are calling me on my phone before arriving, or simply shout “parcel” or “the name of the company” when they are at the door… Maybe the usage of the doorbell will increase over time as more people are aware of it… When somebody does ring the bell, I usually walk outside instead of answering the call, and it should be mostly useful when I’m not at home so I can see what parcel is being delivered.
Conclusion
I quite like the NapCat R112 WiFi video doorbell, and I’ll continue using it even though I’m mostly using it as a regular doorbell. It works well both as a video doorbell and a Smart security camera with person and parcel detection, although enabling the AI features will seriously impact battery life. The Android app is easy to use and video/audio quality during calls is great. I also appreciate when companies include storage for this type of device, and NapCat did provide a 16GB microSD card in the base station. It’s the rainy season in Thailand now, and the NapCat R1 video doorbell passed its waterproofness test perfectly.
There are some downsides too such as the EU plug adapter coming off easily from the base station potentially creating a safety hazard for families with young children. Another annoying issue is that videos can’t be downloaded to your phone (the feature is implemented but does not seem to work), so hopefully they’ll fix that soon. We are told the battery life should last half a year with 8 triggers per day and 15 seconds per video recording, but this was not my experience at all with the battery lasting about 6 weeks with less than 8 triggers per day. That number may be achieved when disabling motion-sensing using only the button as a trigger.
I’d like to thank NapCat for sending the R112 kit for review. It can currently be purchased for $79.99 on Amazon when ticking the box for the $50 discount coupon.
Father’s Day is just around the corner, and an ideal gift for a dad may be the Creality CR-Scan Raptor 3D scanner especially since it is now sold for 10% off when using RAPTOR100 discount coupon code.
Creality is better known for its 3D printers, but the company is now also selling a 3D scanner as a perfect companion for a 3D printer, and the Creality CR-SCan Raptor 3D is capable of scanning objects up to 2x2x2m. This advanced 3D scanner supports two scan modes namely 7-line Blue laser and infra
Father’s Day is just around the corner, and an ideal gift for a dad may be the Creality CR-Scan Raptor 3D scanner especially since it is now sold for 10% off when using RAPTOR100 discount coupon code.
Creality is better known for its 3D printers, but the company is now also selling a 3D scanner as a perfect companion for a 3D printer, and the Creality CR-SCan Raptor 3D is capable of scanning objects up to 2x2x2m. This advanced 3D scanner supports two scan modes namely 7-line Blue laser and infrared binocular structure light (NIR) depending on the required accuracy, frame rate, and model size as we’ll detail in the specifications below.
Creality CR-Scan Raptor 3D scanner specifications:
Scan modes
7-line Blue laser
Accuracy – Up to 0.02mm
3D Resolution – 0.02 – 2mm
Scanning Speed – Up to 60fps
Single Capture Range – 270x170mm @ 300mm
Working Distance – 150 to 400mm
Color Mapping support
Alignment Modes – Marker
NIR (infrared binocular structured light)
Accuracy – Up to 0.1mm
3D Resolution – 0.1 – 2mm
Scanning Speed – Up to 20fps
Single Capture Range – 930x580mm @ 1000mm
Working Distance – 170 to 1000mm
Color Mapping support
Alignment Modes – Marker, geometry, and texture
3D imaging camera resolution – 1920×1200
Scannable object size – 5 to 2000mm
Color Supplemental Light – 12 white LEDs
Marker Recognition Enhancement – 12 blue LEDs
Laser Safety – Class I (eye safe)
Sensors – Built-in IMU
Output Format – OBJ/STL/PLY
Host interface – USB 3.0 Type-C port; Note: wireless scanning will be supported with additional accessories in the future
Dimensions – 215 x 74 x 50mm
Weight – 372 grams
The portable 3D scanner works with computers and laptops running Windows or macOS. You’ll find instructions to get started with the scanner as well as firmware and Creality Scan software in a Wiki with detailed documentation.
Users can scan tiny objects as small as 5x5x5mm up to much larger objects measuring up to 2 meters in all directions. It’s especially suitable for the 3D modeling industry, copying and redesigning objects, the production of customized parts for automobile repairs, and other applications that may benefit from 3D scanning. The scanner is suitable for both indoor and outdoor usage.
FluidNC “TMC2209 Pen/Laser CNC Controller” is an ESP32-based 2-axis CNC controller that runs FluidNC open-source firmware and takes up to two TMC2209 stepper drivers to drive pen plotters and laser engravers
ESP32 wireless modules have been used in a range of 3D printer and CNC controllers for years with boards such as Grbl_ESP32 CNC breakout board, Phi MainBoard 5LC 3D printer controller, and the Makerbase MKS DLC32 board we found in TwoTrees TS2 laser engraver and TTC 450 CNC router running MK
FluidNC “TMC2209 Pen/Laser CNC Controller” is an ESP32-based 2-axis CNC controller that runs FluidNC open-source firmware and takes up to two TMC2209 stepper drivers to drive pen plotters and laser engravers
Power Supply – 12 to 30VDC (3A minimum) via 2-pin terminal
Dimensions – 70 x 70mm
Pinout diagram
You’ll find further technical details, a YAML configuration file, and instructions to get started on the wiki. FluidNC source code can be found on GitHub, and a convenient web installer can be used in Chrome, Edge, or Opera (WebSerial is needed so Firefox won’t work) to install the firmware to compatible boards. The PCB is open-source hardware with all resources available on EasyEDA, meaning you can (relatively) easily build it yourself if you would rather do that than purchase it.
FluidNC ESP3D WebUI to control the board
I first found the TMC2209 Pen/Laser CNC Controller board on Tindie sold for $45, but it can also be purchased on Elecrow for $40 or even lower if you buy it in bundles of 2 or 5. If you’re interested in FluiNC but a 2-axis CNC controller does not cut it for your application, you’ll find a long list of supported hardware on the project’s wiki.
The LimeNET Micro 2.0 Developer Edition board is a modular software-defined radio (SDR) platform from Lime Microsystems that is based on the Raspberry Pi Compute Module 4 and the company’s own SDR board, the LimeSDR XTRX.
It builds upon previous versions from Lime Microsystems, such as the LimeSDR Mini and LimeSDR Mini 2.0. It features a MIMO (multiple-input, multiple-output) radio and runs the more powerful Compute Module 4, an upgrade from the Raspberry Pi CM3 in earlier versions.
The LimeSDR
The LimeNET Micro 2.0 Developer Edition board is a modular software-defined radio (SDR) platform from Lime Microsystems that is based on the Raspberry Pi Compute Module 4 and the company’s own SDR board, the LimeSDR XTRX.
It builds upon previous versions from Lime Microsystems, such as the LimeSDR Mini and LimeSDR Mini 2.0. It features a MIMO (multiple-input, multiple-output) radio and runs the more powerful Compute Module 4, an upgrade from the Raspberry Pi CM3 in earlier versions.
The LimeSDR XTRX is an open-source, high-performance SDR in a compact, Mini PCIe form factor. It provides a platform for building logic-intensive digital and RF designs and can be used for MIMO antenna configurations from 2Tx2R to 32Tx32R.
The platform is built around a planar system board, the LimePSB RPCM, which integrates the CM4, the XTRX, and other components and interfaces to make a complete baseband + RF solution for diverse wireless applications. These potential applications include satellite ground stations, amateur digital TV and audio broadcasts, wildlife tracking, drone command and control, radio astronomy, and bit pattern generation. There is a detailed description of the RPCM board on a separate webpage.
Misc – 2-pin and 4-pin fan connector (5 V default or 3.3 V or VCC_INT voltage)
RF front end
Configuration: MIMO (2x TRX, 2x RX)
LNAs, PAs, RF switches, power, and mode control (TDD and FDD)
Coaxial RF (4x SMA female + 4x U.FL female) connectors for RF front end
Coaxial pass-through U.FL to external SMA connector
Misc – Temperature sensor, shift registers, EEPROM, USB 2.0 hub (unpopulated) secure key storage, shift registers, RTC, ADC, 4x RG user LEDs, status LEDs (power, CM, Ethernet), front button and buzzer
Clock system – 30.72 MHz (default) onboard VCOCXO and 30.72/38.4/40.00 MHz (optional) VCTCXO oscillators
Power
Barrel jack connector (9-14 V, 2-3 A)
USB Power Delivery (12 V, 1.5 A or 2.5 A)
Power over Ethernet (12 V, 2 A)
Dimensions – 170 x 110 mm
The LimeSDR board supports the free, 64-bit version of Xilinx Vivado v2022.1, and a gateware project for the FPGA can be found hosted on GitHub. It is also fully supported by the Lime Suite software stack, as well as Fairwaves’ legacy XTRX gateware and driver to retain compatibility and aid the transition from earlier devices.
The LimeNET Micro 2.0 Developer Edition board has been successfully funded on Crowd Supply with 36 days left to go, due to the $1 symbolic funding goal. You can get the carrier board (Lime Planar System Board) alone for $799, while the LimeNET Micro 2.0 DE (i.e. the complete package with the CM4, an enclosure, and a cooling fan pre-installed) is priced at $1,699.
For users that want to go all in and build a complete private 5G network, there is an $11,900 5G Deluxe Kit that features the LimeNET Micro 2.0 DE plus SMA antennas, a compatible power supply, 5G stack, and Amarisoft core, two 5G smartphones, and ten SIM cards. There are other product offerings listed on the Crowd Supply page. All orders will be fulfilled by Mouser Electronics and are expected to ship by November 30, 2024.
Cincoze has sent me a sample of the DS-1402 modular embedded computer for review. The system is offered with a range of 12th Gen Alder Lake-S or 13th Gen Raptor Lake-S processors and features various expansion options with two PCIe slots, two CMI module slots, a CMF module slot, and three MEC (mini PCIe) module slots.
The review sample is equipped with an Intel Core i9-12900E 16-core Alder Lake-S processor, 64GB DDR5 memory, a 512GB NVMe SSD, and an NVIDIA GTX1630 graphics card inserted into one
Cincoze has sent me a sample of the DS-1402 modular embedded computer for review. The system is offered with a range of 12th Gen Alder Lake-S or 13th Gen Raptor Lake-S processors and features various expansion options with two PCIe slots, two CMI module slots, a CMF module slot, and three MEC (mini PCIe) module slots.
The review sample is equipped with an Intel Core i9-12900E 16-core Alder Lake-S processor, 64GB DDR5 memory, a 512GB NVMe SSD, and an NVIDIA GTX1630 graphics card inserted into one of the PCIe slots. The company also fitted the embedded system with two CMI modules on the front panel with four GbE (Intel I210) RJ45 each.
Cincoze DS-1402 specifications
When we first wrote about the Cincoze DS-1400 series in 2022 only 12th Gen Alder Lake-S processors were available, but the company has now added 13th Gen Raptor Lake-S processors to the list of options.
65W TDP Processor: -40°C to 50°C with external fan kit
Storage – -40°C to 85°C
Relative Humidity – 95%RH @ 70°C (non-condensing)
Shock and vibration – MIL-STD-810G
EMC
CE, UKCA, FCC, ICES-003 Class A
EN 50155 (EN 50121-3-2 Only)
EMI
CISPR 32 Conducted & Radiated: Class A
EN/BS EN 50121-3-2 Conducted & Radiated: Class A
EN/BS EN IEC 61000-3-2 Harmonic current emissions: Class A
EN/BS EN61000-3-3 Voltage fluctuations & flicker
FCC 47 CFR Part 15B, ICES-003 Conducted & Radiated: Class A
EMS
EN/IEC 61000-4-2 ESD: Contact: 6 kV; Air: 8 kV
EN/IEC 61000-4-3 RS: 80 MHz to 1000 MHz: 20 V/m
EN/IEC 61000-4-4 EFT: AC Power: 2 kV; Signal: 2 kV
EN/IEC 61000-4-5 Surges: AC Power: 2 kV
EN/IEC 61000-4-6 CS: 10V
EN/IEC 61000-4-8 PFMF: 50 Hz, 1A/m
EN/IEC 61000-4-11 Voltage Dips & Voltage Interruptions: 0.5 cycles at 50 Hz
Safety – UL, cUL, CB, IEC, EN 62368-1
So basically, you can get a fanless or actively cooled system depending on the selected processor. Since my review sample is powered by a 65W Intel Core i9-12900H CPU a fan is attached to the top of the metal enclosure. Supported operating systems include Windows 11, Windows 10, or Ubuntu 22.04 Linux.
Cincoze DS-1402 unboxing
The embedded computer did not come alone, as the company also includes a 480W power supply. The front panel comes with two CMI modules (4x GbE each) that are not included by default. Customers can select CMI modules to add networking, serial, or digital I/O interfaces as needed. The front panel also includes a power button, some LEDS, two USB 3.0 ports, as well as HDMI and DisplayPort video outputs. There’s also a cover with some ports, which we’ll look at shortly.
Let’s have a quick look at the PSU. It’s a MeanWell SDR-480-24 power supply with 100-240VAC 5.0A input and 24VDC 20A output or up to 480 Watts.
The back of the power supply features a DIN Rail mounting mechanism.
The construction feels rugged and it’s pretty heavy: 1.9 kg.
Back the Cincoze DS-1402’s front panel without the front cover. There’s an AT/ATX selection switch, two SIM card sockets, a CMOS CLEAR switch, an Ignition switch and 12V/24V selection switch that require an additional CFM module not included in this kit, and a Reset button.
We’ll also find a mounting mechanism with a 2.5-inch SATA SSD.
There aren’t any ports on either side of the embedded system.
So we’ll find the remaining ports on the rear panel with a ground screw, a VGA port, a PS/2 port, two Ethernet ports, two COM ports, 3.5mm Line In/Out audio jacks, terminal blocks for power switch and LED, a 3-pin DC input terminal taking 9V to 48V, a 4-pin connector connected to the fan, a DisplayPort connector, two USB 2.0 ports, and four USB 3.0 ports.
The bottom side of the Cincoce DS-1402’s rear panel comes with three slots that take mini-PCIe modules – the company calls them MEC modules – with dual gigabit Ethernet, RS232, or dual USB 3.0 ports, as well as two standard PCIe slots, one of them fitted with an NVIDIA GTX 1630 graphics card in your review sample.
The Cincoze DS-1402 computer is even heavier than in the specs once accessories are taken into account since the review sample weighs a cool 6.7 kg!
Cincoze DS-1402 rugged computer teardown
I removed the fan before turning the computer around in order to access the bottom cover. We’ll need to loosen six “star” screws to take out the cover.
We’ll find the NVIDIA graphics on top securely installed into its PCIe slot using PCIe card retainers. Cincoze even patented those (Patent No. I773359) and describes the solution as a “unique design effectively prevents the cards from loosening due to vibrations in high-vibration environments, ensuring the stable operation of the system”. The system can be utilized in trains and industrial environments with lots of vibrations, and you would not want the PCIe card to become dislodged after a while…
That also means removing the graphics card requires some effort. I remove one of the screws on the PCIe brackets, then removed the small fan, loosen out the remaining screw securing the bracket, and finally loosen the four screws on the PCIe retainers to finally remove it from its slot.
The DS-1402 has plenty of expansion slots and modular mounting mechanisms. Our computer is fitted with a CERVOZ SSD, but we’ll find two mPCIe sockets on the bottom of the picture above, two 2.5-inch SATA bay, one accessible from the outside as we’ve shown, and the other for an internal 2.5-inch drive connected to a standard SATA port. I didn’t pay attention during the teardown, but the RAM sticks can be found under the internal SATA bay which can be removed by loosening a few screws.
A PCIe riser card is connected to the main board and features a PCIe x16 slot and a PCIe x1 slot. The former is populated by the NVIDIA GTX 1630 graphics in our sample.
First boot
I’ve connected the DS-1402 to its power supply, an HDMI display, and two RF dongles for a wireless keyboard and a wireless mouse, before pressing the power button to boot into Windows 11 Pro. I also used one of the USB ports to power the CrowView display.
Cincoze DS-1402 Windows 11 Pro review
The system booted directly into Windows 11 Pro which was already installed and configured with the “TEST” user.
Going to the System->About section in the settings confirms we have a DS-1400 series system with a 2.3 GHz (base frequency) Intel Core i9-12900E processor and 64GB of RAM running Windows 11 Pro 21H2 which we’ll probably want to upgrade before further testing…
That will be all for today. I’ll test Windows 11 Pro in detail in the second part of the review, before reviewing the DS-1402 embedded computer with Ubuntu 24.04 in the final part of the review. I’d like to thank Cincoze for loaning the DS-1402 embedded system for review. You’ll find more information on the product page, and people can order a system that matches their requirements via distributors such as Steatite or EG Electronics among other distributors.
Waveshare has recently introduced the Serial Bus Servo Driver HAT (A) ESP32-powered servo motor controller for the Raspberry Pi designed to drive up to 253 serial servos simultaneously. The servos can be controlled via UART or USB through the Pi SBC or used as a standalone controller for a robotics project. The board has a wide input voltage range of 9 to 25 volts and features an onboard XT60 connector, a screw terminal, and a DC barrel jack any of which can be used as power input. Besides that,
Waveshare has recently introduced the SerialBus Servo Driver HAT (A) ESP32-powered servo motor controller for the Raspberry Pi designed to drive up to 253 serial servos simultaneously. The servos can be controlled via UART or USB through the Pi SBC or used as a standalone controller for a robotics project. The board has a wide input voltage range of 9 to 25 volts and features an onboard XT60 connector, a screw terminal, and a DC barrel jack any of which can be used as power input. Besides that, the board features an RS485 port a TTL Servo header, and a UART control switch for convenience.
Previously we have written about the Suptronics X200 HAT multifunction expansion board for the Pi with servo support, as well as the ELECFREAKS Wukong 2040 which can also be used to drive servos.
Waveshare Serial Bus Servo Driver HAT specifications
CPU – Espressif ESP32-WROOM-32 dual-core Tensilica wireless microcontroller
Storage – 32Mbit SPI flash
Connectivity – Wi-Fi 4 802.11 b/g/n up to 150 Mbps, Bluetooth 4.2 LE
Antenna – On-board PCB antenna
I/Os – 28 Usable I/O
Supported servo – Allows controlling up to 253 ST / RSBL series serial bus servos at the same time
Communication interface – UART, 2x USB Type-C port
Crystal – 40 MHz
Additional feature – Supports controlling the serial bus servos directly via onboard USB Type-C port.
Power supply – 9 to 25V (the input voltage and the servo voltage must be matched)
Dimensions – 65×57 mm
Mounting hole diameter: 3 mm
As the servo driver HAT is built around an ESP32 MCU, it supports both wired and wireless control modes enabling the user to send simple commands to the ESP32 to move the servos. Or, if you prefer, you can control the servos directly using a USB Type-C cable all you need to do is flip the selector switch in the right position.
In wireless control mode, the servo driver board creates its own Wi-Fi hotspot. You can connect your phone, tablet, or computer to this network which gives access to their web application, and with that, you can control the servo motors wirelessly. Based on Waveshare’s product page, we can assume that the firmware for wireless control mode will come preinstalled with the board. In USB control mode, the board can be controlled with Python code.
The servo driver board has a built-in buck converter onboard, meaning when it’s attached to the Raspberry Pi it can power the Pi with 5V through the power pins, and all the communication with the board happens through the UART interface (Tx/Rx) of the Raspberry Pi.
In terms of documentation, the company provides a detailed specifications diagram for the serial bus servo driver board, and if you want to learn more about the product you can find that on the Waveshare Wiki page.
JieLi Technology AC6329C4 is an ultra-cheap microcontroller with Bluetooth 5.0 connectivity and several I/Os including some for motor control that sells for just 35 cents on LCSC in single units, or 25 cents per piece for 1K+ orders.
The microcontroller features a 32-bit RISC core clocked at 96 MHz with 73KB SRAM, and up to 4Mbit (512KB) flash. The 16-pin (SOP16) package offers plenty of multiplexed interfaces including USB 2.0, ADC, PWM, I2C, SPI, UART, and in-phase (I) and quadrature (Q) enco
JieLi Technology AC6329C4 is an ultra-cheap microcontroller with Bluetooth 5.0 connectivity and several I/Os including some for motor control that sells for just 35 cents on LCSC in single units, or 25 cents per piece for 1K+ orders.
The microcontroller features a 32-bit RISC core clocked at 96 MHz with 73KB SRAM, and up to 4Mbit (512KB) flash. The 16-pin (SOP16) package offers plenty of multiplexed interfaces including USB 2.0, ADC, PWM, I2C, SPI, UART, and in-phase (I) and quadrature (Q) encoders.
AC6329C4 specifications:
CPU – 32-bit RISC CPU @ 96 MHz with
Cache – 8KB I-cache 2-way, 1KB R/O cache 1-way
64x Vectored interrupts
8x Levels interrupt priority
Memory – 73KB data RAM
Storage – 4Mbit flash (another part called AC6329C2 comes with 2Mbit flash)
Bluetooth
CMOS single-chip fully-integrated radio and baseband
Compliant with Bluetooth 5.0+BR+EDR+BLE specification
Bluetooth Piconet and Scatternet support
Meets class2 and class3 transmitting power requirement
Support GFSK and π/4 DQPSK all packet types
+8 dBm Tx power
-92 dBm Rx sensitivity
Support for a2dp, avctp, avdtp, avrcp, hfp, spp, smp, att, gap, gatt, rfcomm, sdp, and l2cap profiles
4x Multi-function 32-bit timers with support for capture and PWM modes
3x full-duplex advanced UART (DMA)
3x SPI host/device interfaces (DMA)
1x I2C host/device interface
RTC with alarm clock and time base to wake up the chip
16-bit PWM generator for motor driving
3x IQ Encoder
6 channels 10-bit ADC
1-channel 8 levels Low Power Detector
Embedded PMU support low power mode
Watchdog
Power-on reset
Power Supply
LDOIN – 4.5V to 5.5V
VBAT – 1.8V to 4.5V
VDDIO – 1.8V to 3.4V
Package – SOP16 (9.9 x 6 mm)
Temperature Range
Operating – -40°C to +85°C
Storage – -65°C to +150°C
AC6329C package diagram
There’s not a lot of public information about the AC6329C(4/2) except for the datasheet.But if we extend the search to AC63 more information pops up. First, Zhuhai Jieli Technology Co.,Ltd has a GitHub account with two SDKs for the AC63 series, one named fw-AC63_BT_SDK for the Bluetooth part (based on Zephyr RTOS) with documentation in English and Chinese, and the other called fw-AC63_GP_MCU for the MCU core with instructions in Chinese only. A documentation website is available, but only in Chinese.
Jieli Tech sells several development boards on Taobao with a few AC63-based boards, but none specifically powered by the AC6329C4 or AC6329C2. I did find a final product based on the AC6329C4: a 2G GSM Bluetooth GPS tracker that relies on the microcontroller for Bluetooth connectivity.
AC6366C Demo Board
While the AC6329C4 is interesting due to its low price and Bluetooth connectivity, it might be a challenge to build something around it at this time unless you can read Chinese and are based in China. Besides being sold on LCSC, the MCU is also offered on Aliexpress for $7.62 for a bundle with twenty chips, or about 38 cents per chip, but again, I was unable to find any development board there. We’ll have to wait and see how it evolves, although the datasheet is dated 2021 so I’m not sure there’s much hope…
Apple has released a beta version of Embedded Swift that notably works with Espressif ESP32-C6 wireless RISC-V microcontroller, and the company also built a Matter sample based on ESP-IDF and ESP-Matter SDKs. Embedded Swift is not limited to the ESP32-C6 and supports other microcontrollers from STMicro, Raspberry Pi, Nordic Semi, etc…
Apple Swift programming language is mostly designed for mobile app development, but we’ve also seen it being used on Mad Machine’s SwiftIO board powered by a 600 M
Apple has released a beta version of Embedded Swift that notably works with Espressif ESP32-C6 wireless RISC-V microcontroller, and the company also built a Matter sample based on ESP-IDF and ESP-Matter SDKs. Embedded Swift is not limited to the ESP32-C6 and supports other microcontrollers from STMicro, Raspberry Pi, Nordic Semi, etc…
Apple Swift programming language is mostly designed for mobile app development, but we’ve also seen it being used on Mad Machine’s SwiftIO board powered by a 600 MHz NXP i.MX RT1052 Arm Cortex-M7 crossover processor and the tiny SwiftIO Micro launched a few years later. The company has now decided to create a subset of the Swift programming language better suited to microcontrollers simply called Embedded Swift that’s currently working on STMicro STM32F746, Raspberry Pi Pico, nRF52840, and ESP32-C6.
let led = LED()

@_cdecl("app_main")
func app_main() {
  print("   Hello, Embedded Swift!")

  led.color = .red
  led.brightness = 80

  while true {
    sleep(1)
    led.enabled = !led.enabled
    if led.enabled {
      led.color = .hueSaturation(Int.random(in: 0 ..< 360), 100)
    }
  }
}
It looks quite similar to C without the semi-colons… You’ll find the sample code for the Matter demo on GitHub, and additional Embedded Swift examples for ESP32-C6, STM32, RP2040, and nRF52840 in a separate repository.
Apple explains that Embedded Swift is a subset of the Swift programming language with a much smaller footprint (the binary can be around 10KB based on the diagram below). They’ve removed some features but added others needed for MCU-class hardware such as the ability to access memory-mapped registers through the Swift MMIO library. Support is provided through online forums.
I assume most developers already familiar with the ESP-IDF will ignore this news, but Swift mobile application developers may have a shorter learning curve with Embedded Swift than having to learn to use the ESP-IDF framework or Arduino programming. Note that Embedded Swift is still at the development stage, so you need to download snapshots of Swift to try it out since there’s no stable release just yet.
 LILYGO T-Encoder-Pro specifications:
 The T-Encoder Pro supports PlatformIO/Arduino programming using the Arduino_GFX library for the AMOLED driver, SensorLib for the CHSC5816 touchscreen controller, and the LVGL library for UI design. You’ll find PDF schematics, datasheet, basic instructions to get started, and Arduino sketches for the main features (touchscreen, display, encoder, and LVGL-based test program) on GitHub.


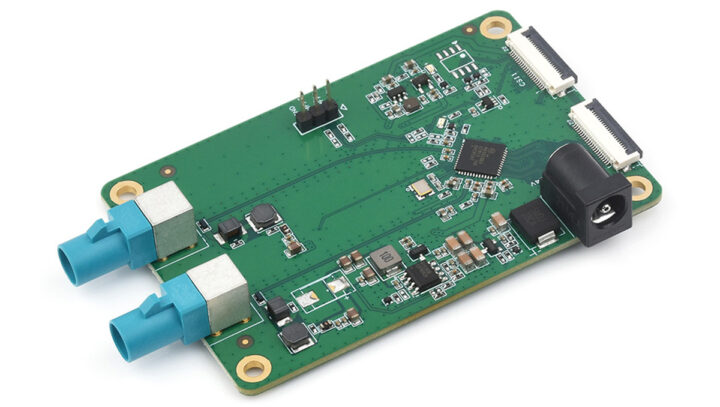


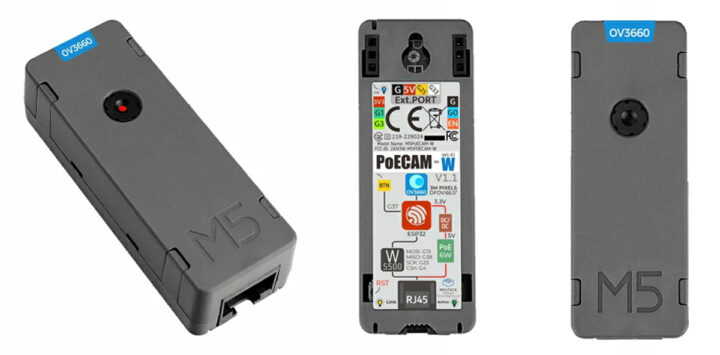


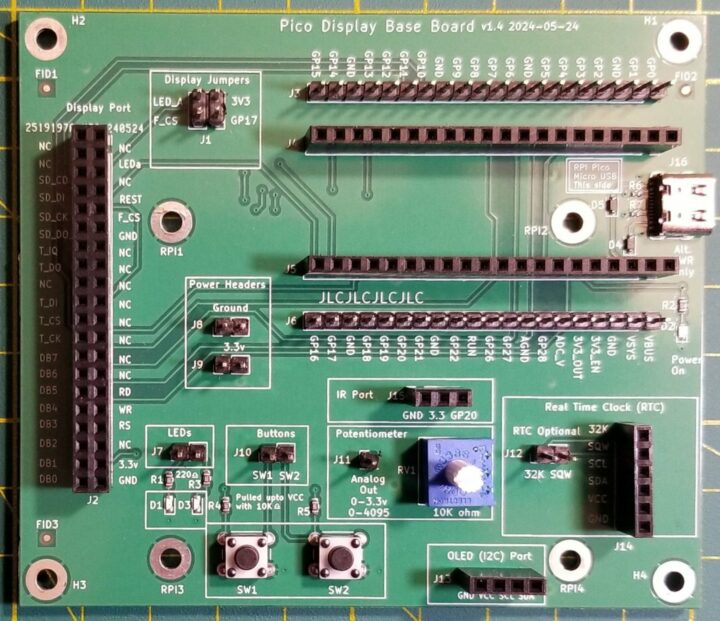


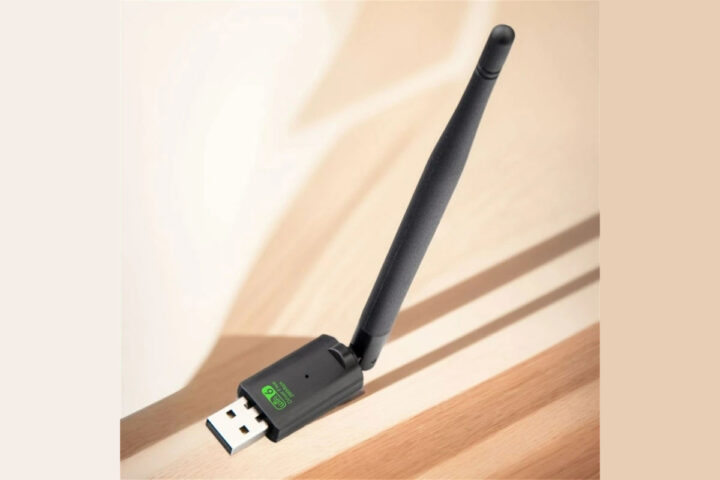


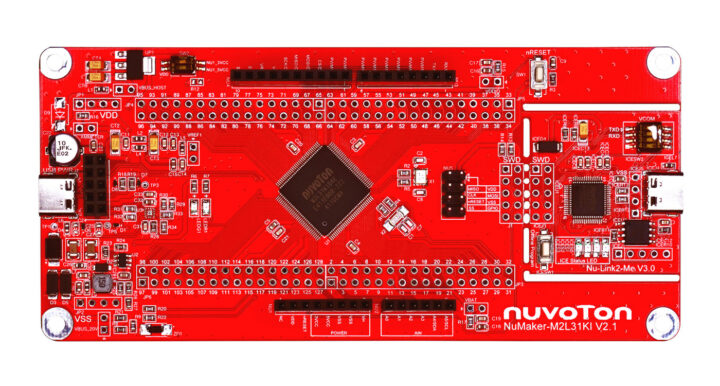


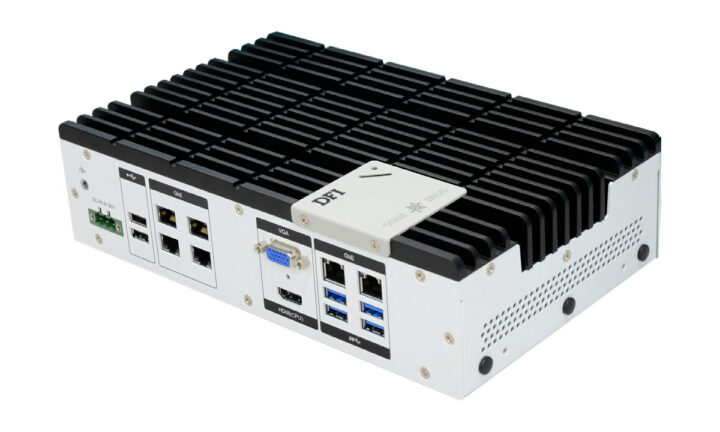


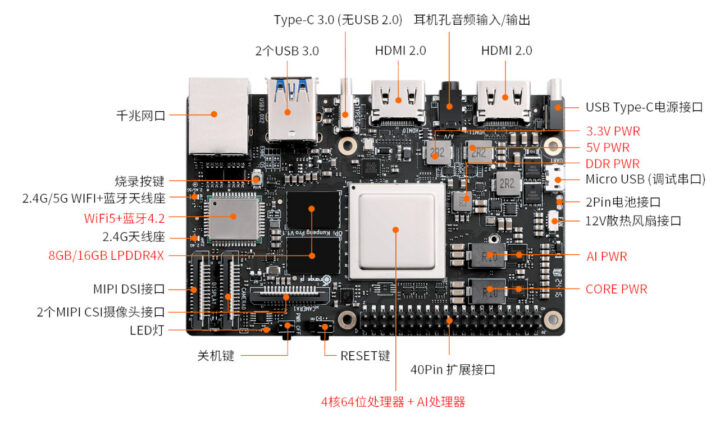


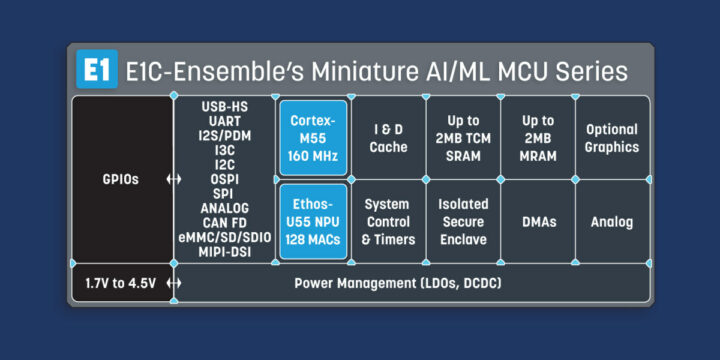


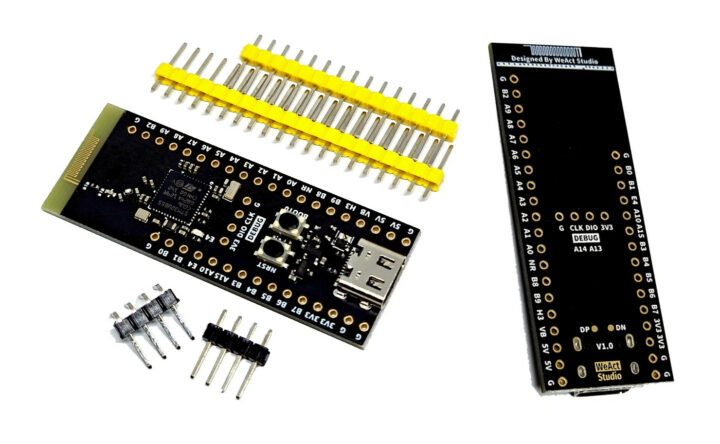


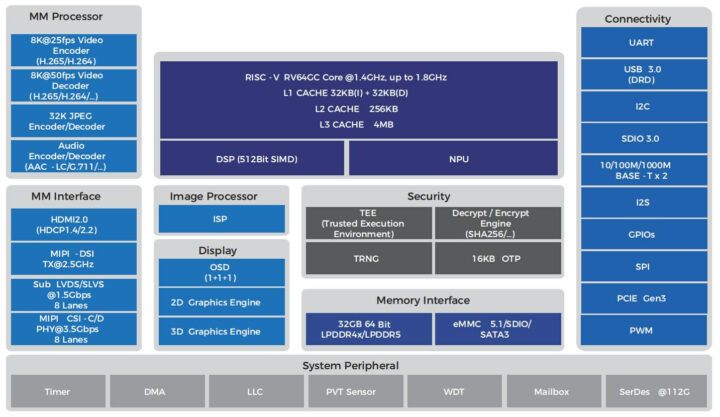


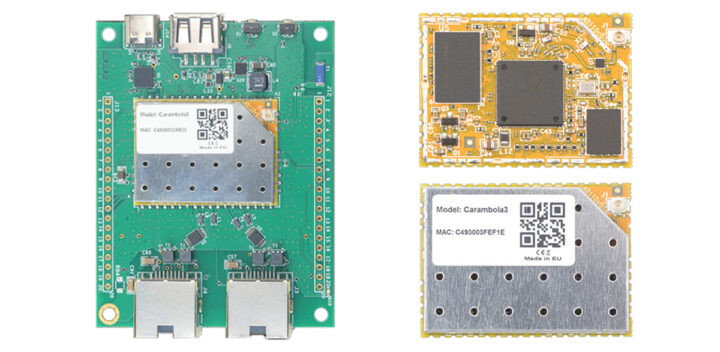


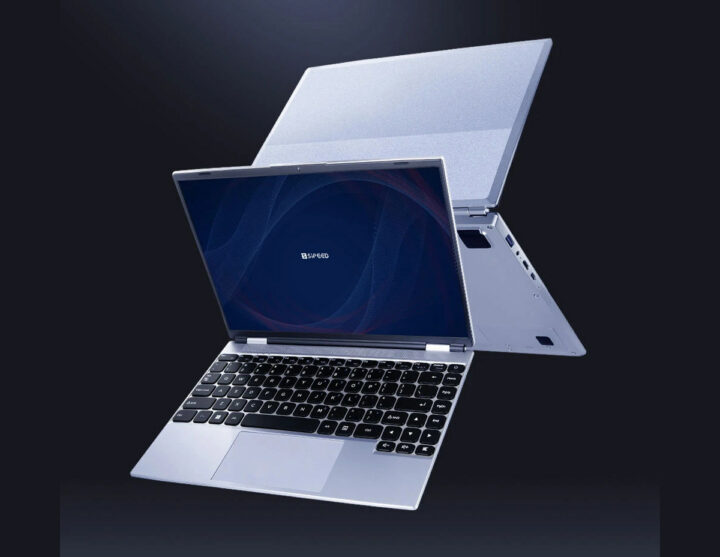


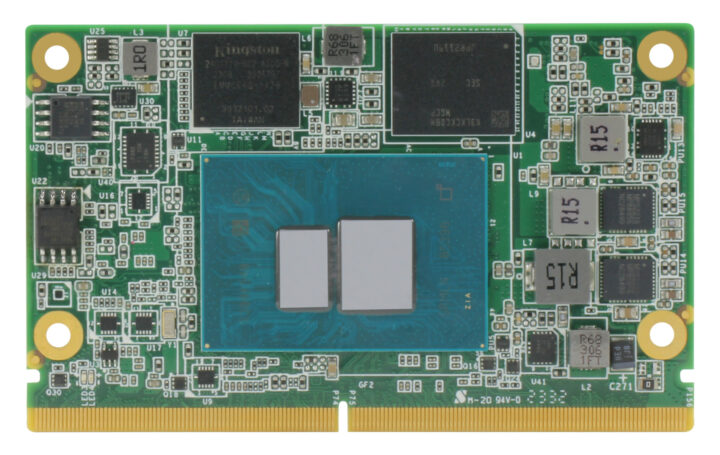


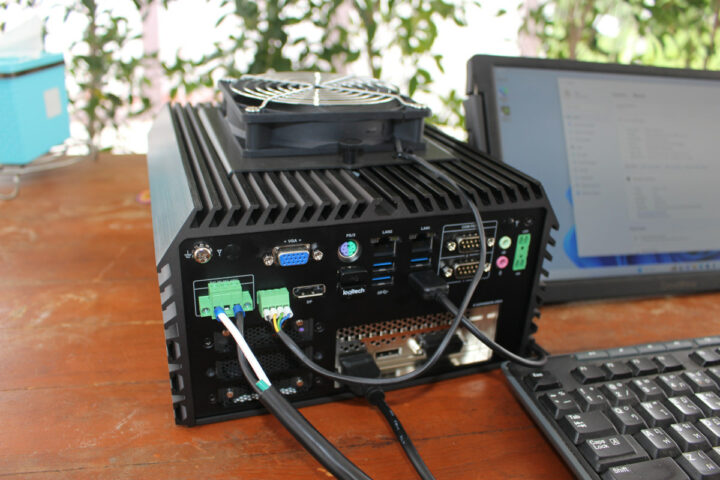


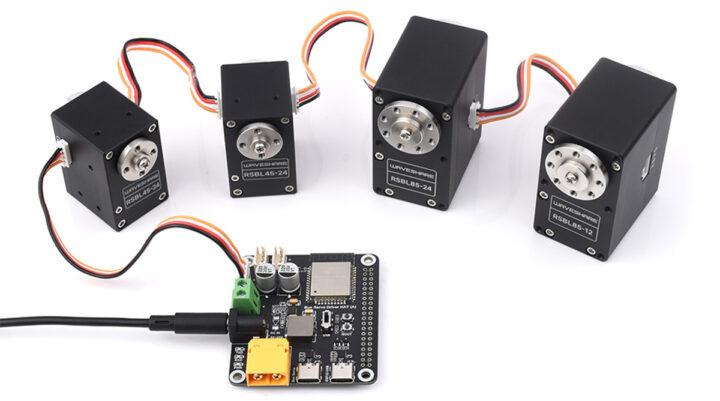
")


")