One of the most impactful ships in the Second World War were the Carriers. These giant floating islands work as a landing and take-off point for planes, which can move around on the sea, allowing them to perform effective missions in enemy territories.
Carriers are the bread and butter of the United States since they can’t really use their planes on the Pacific front otherwise.
Recommended Read: How to Increase Supply in HOI4
They are also vital for naval-focused countries like the Un
One of the most impactful ships in the Second World War were the Carriers. These giant floating islands work as a landing and take-off point for planes, which can move around on the sea, allowing them to perform effective missions in enemy territories.
Carriers are the bread and butter of the United States since they can’t really use their planes on the Pacific front otherwise.
They are also vital for naval-focused countries like the United Kingdom and Japan for their continuous use of naval invasions.
These ships are also very important in naval battles since they allow the powerful bombers that deploy off of them to deal massive damage to enemy fleets.
To put planes on Carriers in Hearts of Iron 4, you need to leave them out of combat manually where you want them to. Then, you can deploy your planes on them, as you would on any normal airfield.
You can’t just throw any plane on a carrier! You must first research the land-based version of an aircraft. Then, you’ll need to research the carrier-capable versions of Fighters, Close Air Support, and Naval Bombers.
These variants have different names, stats, and artwork compared to their land-based counterparts. You’ll find the research option by clicking the aircraft carrier button on the aircraft type in the air research tab.
When you build a new carrier, it comes with a pre-assembled air wing produced during construction using your dockyards.
This air wing will be equipped with the most up-to-date carrier-capable models you’ve researched. Before launching the carrier, you can adjust the types of planes included in its air wing to fit your strategy.
When your carrier joins a patrolling fleet, its air wing automatically transforms into a Carrier Air Group. This Carrier Air Group automatically engages in any naval combat your fleet encounters.
How Carriers Work and How to Use Them
Carriers can do two things in HOI4:
Carriers act as floating air bases for carrier-capable aircraft (fighters, CAS, and naval bombers). These planes can be launched for various missions outside of combat.
During combat, carriers deploy their aircraft as a Carrier Air Group, automatically engaging enemy fleets. They don’t require the usual 8-hour wait to join the fight.
Carriers function as mobile airfields. The number of planes they can carry depends on the available hangar space. This allows for incredible strategic flexibility. You can equip your carriers with:
Naval Bombers: Deliver devastating blows to enemy fleets, particularly effective against capital ships.
Fighters: Provide crucial air defense against enemy carrier aircraft, safeguarding your fleet from aerial assaults.
Close Air Support (CAS): Offer offensive support for land forces during amphibious assaults or naval invasions. By strategically positioning your carriers near the invasion zone, you can provide crucial air cover for your landing troops.
How to Design a Carrier
The design of the Carrier can be very important, since this allows you to get the most out of this huge, heavy ship.
Carriers are very vulnerable, so focus on maximizing their hangar space to carry more planes. Heavy armor is a waste. Rely on your escorts for protection. If your frontline screen is gone, your carriers are likely doomed anyway.
Match your carrier’s engine speed to your fleet’s overall speed. Carriers are often faster than battleships. Secondary weapons are a personal choice, offering some light attack against destroyers.
Tips on How to Use Them
Before engaging enemy fleets, consider swapping any carrier CAS for naval bombers. This maximizes your damage output.
Strive for a balance between offense and defense. A common strategy is using 1 fighter for every 5 naval bombers. Fighters protect against enemy carrier aircraft, while bombers deal heavy damage with their piercing attacks.
Carriers are vulnerable once their escorts are destroyed.
Unlike land-based aircraft, carrier wings can be trained and require micromanagement for optimal performance.
That’s everything you need to know about how to put planes on carriers in Hearts of Iron 4!
Have any input or suggestions for this guide? Let us know in the comment section below.
The Fire Cape is one of the most iconic items in Old School RuneScape. Earned by completing the Fight Caves, it is considered a coveted achievement for those progressing in their OSRS journey.
Commonly seen as a “must need” item for players upgrading their Melee loadout, it is the game’s second-best Melee cape slot item, just behind the Infernal Cape.
Recommended Read: Where Can You Sell Items in OSRS?
However, getting a Fire Cape won’t be easy, as you must undergo the many monsters o
The Fire Cape is one of the most iconic items in Old School RuneScape. Earned by completing the Fight Caves, it is considered a coveted achievement for those progressing in their OSRS journey.
Commonly seen as a “must need” item for players upgrading their Melee loadout, it is the game’s second-best Melee cape slot item, just behind the Infernal Cape.
However, getting a Fire Cape won’t be easy, as you must undergo the many monsters of the Fight Caves to earn it yourself.
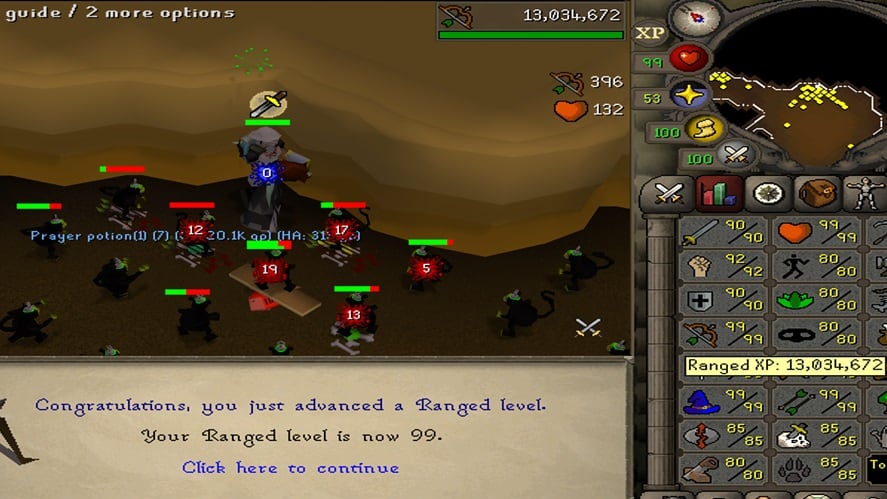
To obtain the Fire Cape in OSRS, you must complete the entirety of the Fight Caves, defeating TzTok-Jad at the end. This will require moderate/advanced knowledge of combat mechanics and decent combat stats and gear.
The Fight Caves is a PvM endurance test where players must fight through 63 waves of monsters completely solo.
Depending on how long they last, they will earn a specified amount of Tokkul or the Fire Cape if they complete all 63 waves.
Overall, the Fight Caves is much more of a marathon than other PvM content in Old School RuneScape. With a single misclick causing you to die and have to start over, it is highly advised to stay focused one wave at a time.
Note: The Fight Caves are considered a “Safe Death” area, where you will NOT lose any items if you die. Furthermore, for Hardcore accounts, it is considered a SAFE death for solo HCIM, but it is NOT SAFE for Group HCIM accounts.
Basic Fight Caves Gear Setup & Recommended Stats
The basic setup for completing the Fight Caves that most players go for is a well-balanced Ranged set-up with some Prayer-boosting items.
Since monsters will come from all angles, quickly attacking them from a distance is critical to efficient runs.
That being said, there are a few stats that are recommended if you are completing the Fight Caves for the first time:
43+ Prayer (The only “required” stat as you will need to use all three Protection Prayers to increase your chances of survival)
75+ Ranged
70+ Defence
With 75 Ranged, you can use a Toxic Blowpipe, a fantastic Ranged weapon with a high DPS. Not only will the Toxic Blowpipe allow you to poison enemies, but its special attack will heal you based on the damage dealt, further prolonging your trips and saving on supplies.
If a Toxic Blowpipe is not feasible, you can still use a Dragon/Rune Crossbow with the best bolts possible (enchanted Diamond/Ruby bolts are highly recommended here).
With 70 Defence and a minimum of 70 Ranged, you can wear Karil’s armour, which provides excellent offensive and defensive Ranged bonuses. However, Black D’Hide armour, although much cheaper and only requiring 40 Defence and 70 Ranged, is still effective if you want to invest more in your supplies and offensive items.
All other gear slots should include your best-in-slot Ranged DPS items, yet a few can be traded out in place for Prayer bonus.
For example, a Dragonbone Necklace gives the same offensive bonuses as an Amulet of Fury but gives a +12 Prayer bonus at the trade-off of some defensive stats.
Other notable items to use include an Ava’s Device (Attractor, Accumulator, Assembler) to save on ammunition, Barrow’s Gloves (which give all-around combat bonuses), a Helm of Neitiznot/Armadyl Helm, and Blessed D’Hide Boots or greater.
It may be worth getting TzHaar creatures or even TzTok-Jad as a Slayer Task from a Slayer Master. This way, you can equip a Slayer’s Helm and utilize the extra 15% Ranged accuracy and damage when fighting against all TzHaar creatures (which will make a major difference in DPS).
It is recommended that your inventory include a mix of Saradomin Brews and Super Restores. By following the 3:1 ratio between the two, you will be able to heal efficiently while restoring your Prayer points.
Bringing one or two Ranging potions is also recommended. Some players also opt to bring a Rune Pouch with runes for Blood Barrage or Ice Barrage, utilizing Ancient Magicks for emergency healing/ preventing Melee-based monsters from reaching them.
It is also worth noting that you cannot bring a Dwarf Multicannon into the Fight Caves.
All items mentioned can be interchanged for higher-tiered gear, such as Armadyl, Masori, Dizana’s Quiver, Pegasian Boots, and/or a Necklace of Anguish. This is merely a basic setup for encountering the Fight Caves for the first time.
Fight Caves Monsters
In the Fight Caves, you will encounter eight different types of monsters. Starting at level 22, each monster’s combat level doubles, with TzTok-Jad’s being the highest at 702.
Fight Caves Monsters
Combat Level
Combat Style They Attack With
Combat Description
Tz-Kih
Lvl 22
Melee
They will drain your Prayer points as they attack you. Keep your distance from them as much as possible.
Tz-Kek
Lvl 45
Melee
When you attack with Melee, it will recoil damage back.
Tz-Kek
Lvl 22
Melee
When you kill the Lvl 45 Tz-Kek, two will spawn from it.
Tok-Xil
Lvl 90
Ranged & Melee
As long as you keep your distance, you will only use a Ranged attack. Say the prayer “Protect from Range” unless a Ket-Zek has spawned.
Yt-MejKot
Lvl 180
Melee
Will occasionally heal itself and nearby monsters. Kill them first when present to get through the waves quicker.
Ket-Zek
Lvl 360
Magic & Melee
Stay outside of Melee range, pray “Protect from Magic” when present, and kill them first.
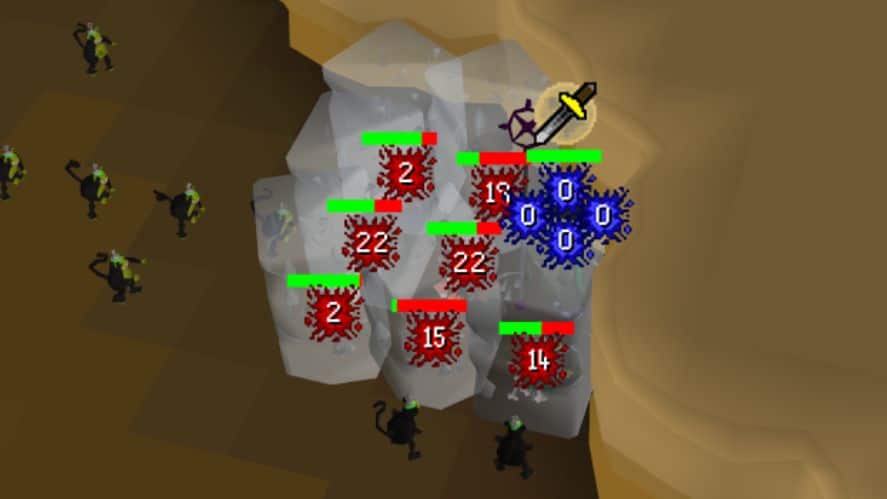
TzTok-Jad
Lvl 702
Melee, Ranged & Magic
The final boss of the Fight Caves. Keep out of melee distance and switch Protection prayers between Magic and Ranged.
YT-Hurkot
Lvl 108
Melee
Four of them will spawn when TzTok-Jad reaches half health and will start to heal him. “Hit” each of them once to shift their focus and continue killing Jad. Note that as long as Jad dies, the Fight Caves will be over, so they do not necessarily need to be killed.
Fight Caves Fight Breakdown
As you go through the Fight Caves, you will start to expect what creatures will spawn in the next wave. It can be tracked by the combat level of the monsters currently spawning.
For example, wave 1 will only have a single Tz-Kih (Lvl 22), wave 2 will have two Tz-Kihs (Two Lvl 22s), and wave 3 will have a Tz-Kek (Lvl 45; i.e., doubling the previous number of combat levels).
While memorizing what spawns at every single wave is handy, it is not necessary when completing runs. Instead, you can remember the priority of monsters that should be killed and note some of the more critical waves.
The priority for killing monsters while progressing through the Fight Caves (from first to last) goes as follows:
There are also a few notable waves you should keep an eye on that will cause you to change how you continue the fight:
Wave 7: Tok-Xils will start to spawn. Continue to pray “Protect from Range,” killing them first and using hit-and-run tactics against the Melee-only monsters.
Wave 15: YT-MejKots will start to spawn. Use safe spots around the map or other monsters to prevent them from attacking you. Otherwise, continue attacking the Ranged monsters first while safe spotting them, and use “Protect from Melee” if needed.
Wave 31: Ket-Zeks will start to spawn. Keep “Protect from Magic” active at all times, as they hit the hardest of the other monsters. Kill them first, using safe spots and hit-and-run tactics to avoid the others.
Wave 62: Two Ket-Zeks will spawn, one of which will be orange. The spot where the orange Ket-Zek spawns will be the same one from which Jad spawns.
Wave 63 (The Final Wave): Tz-Tok Jad will spawn. Watch its attack animation and sound ques to use the correct Protection Prayer against it quickly. When the healers spawn, they hit them once, so they stop trying to heal Jad and continue to kill Jad. Use map-safe spots to avoid Jad while killing off the healers so you can focus more on Jad.
If you die in the Fight Caves, you will spawn back in the lobby, and your stats will be replenished. You will also earn an amount of Tokkul equal to (( Number of waves completed – 1 ) * Number of waves completed ) / 2.
Fight Caves Safe Spots
Multiple spots in the Fight Caves can be used as safe spots against certain creatures. The two important ones are “Italy Rock” on thewest side of the caves and “Long Rock” on the east side.
These can be used to kite monsters around a corner so you can focus on killing monsters while avoiding the attacks of others.
The most common example is kiting the Yt-MejKot around Italy Rock so they can’t reach you while you attack the Tok-Xils and Ket-Zeks at later waves.
Jad can also be trapped around one of these rocks if you want to breathe or reassess your inventory. Run to the corner of one end, ensuring Jad follows you, then quickly run to the other side.
Note that you will need to continue using the appropriate protection prayers and Protect from Melee when you are close while setting up the safe spot.
However, once Jad is in position, it will not be able to reach you with any combat style, and you can safely turn your Prayer off to conserve points.
Defeating Jad
Once you reach Wave 63, Jad will spawn along with a dialogue message. Once you click off the dialogue box, Jad will start to attack, so it is always good to immediately turn on Protect from Magic as soon as possible.
When fighting Jad from a distance, Jad will attack with one of two animations, each indicating either a Ranged or Magic attack. Stay calm, continue attacking while switching between the correct protection prayer.
Lifts legs and stomps them on the ground: Ranged Attack / Use Protect from Ranged
Raises legs and stands on hind legs for a moment: Magic Attack / Use Protect from Magic
When Jad reaches half of his health, four healers will spawn and head towards him to heal him. Attack each of the healers to draw their attention away from Jad.
From here, there are multiple methods to deal with them, as them attacking you will also allow them to heal Jad:
Trap Jad behind one of the main safe spots, luring the healers away to kill them off, going back to fight Jad when they are dead (Beginner Method)
Pray switch between Protect from Melee, Ranged, and Magic for the rest of the fight (Advanced Method).
With all healers focused and standing next to you, quickly run through Jad, trapping them on the other side and making it so you can continue killing Jad without dealing with the healers (Easiest Method).
Regardless of which method you choose, keep an eye on using the correct protection prayers and drink your supplies when needed. Since this is the final wave, spare no expense to completing the fight!
Once Jad is defeated, the Fight Caves will be over. You don’t have to defeat the healers but make sure they don’t get close and accidentally kill you.
All Fight Caves Rewards
Once TzTok-Jad is defeated, you will respawn in the lobby of the Fight Caves and earn 8,032 Tokkul and the Fire Cape!
Additionally, you will have a chance to receive the TzRek-Jad Pet at a 1/200 rate at completion. You can also trade in a Fire Cape for another roll at the pet.
The Fire Cape
The Fire Cape is the second-best melee cape in Old School RuneScape, and it is a great item to work towards.
While it only provides a +1 bonus to all offensive combat styles, it gives +11 bonuses to all defensive combat styles, +4 Melee Strength, and +2 Prayer bonus.
The Fire Cape can also be used to enter Mor Ul Rek (the inner ring of TzHaar city) by showing it to a guard at least once. You must also sacrifice one Fire Cape to partake in the Inferno.
That is how to obtain the Fire Cape in Old School RuneScape!
Do you have any input or suggestions for this article? Let us know in the comment section below.
In Hearts of Iron 4, your biggest enemy will more often than not be Supply. As soon as you see that annoying red supply bag above your troops, you will start seeing real hits to your equipment and Manpower pool.
To stop this useless loss of resources, you will need to somehow increase the Supply in those provinces.
Recommended Read: Best Air Doctrine in HOI4
Most players don’t really understand how Supply works, which is why they often fail to provide enough of it for their dying troo
In Hearts of Iron 4, your biggest enemy will more often than not be Supply. As soon as you see that annoying red supply bag above your troops, you will start seeing real hits to your equipment and Manpower pool.
To stop this useless loss of resources, you will need to somehow increase the Supply in those provinces.
Most players don’t really understand how Supply works, which is why they often fail to provide enough of it for their dying troops.
There are a few ways to increase Supply in Hearts of Iron 4, and those are to increase Motorization levels, build new Supply Hubs, build Railways connecting Hubs, and to improve Infrastructure.
Supplies aren’t physical items you build. Instead, they’re a resource automatically generated in your states based on factors like population, infrastructure, victory points, and how well-connected they are.
Each division has a “supply appetite.” They need a certain amount of supply to function effectively. If they don’t get enough, their organization suffers, making them easier to defeat.
There are two ways your troops get their supplies:
State Supply – This comes directly from the province itself based on population, infrastructure, and victory points. Think of it as the local food stores and farms keeping your troops fed.
Hub Supply – This comes from a network of supply hubs connected to your capital. Think of these hubs as regional distribution centers sending supplies to your troops on the front lines.
Your capital acts as the main supply hub, sending supplies to other hubs via railways. The maximum amount of supply your capital hub can handle depends on the number of factories you have. It’s like a giant warehouse with limited space.
This capital supply cap doesn’t directly dictate how much reaches all your hubs. It’s just a total limit. Each individual hub also has its own maximum supply level based on the quality of the railway connecting it to the capital.
Beginner Explanation
So, imagine your capital as a giant supply depot. It has a limited capacity, the Supply Cap, based on your factories. This cap represents the total amount of supplies it can hold and distribute.
Now, you connect this central depot to other smaller depots called Supply Hubs using railways. These hubs act like regional distributors, sending supplies to your troops. Here’s the catch:
The maximum supply a Hub can provide depends on the railway quality connecting it to the capital. Better railways mean higher supply flow!
This Hub’s supply capacity is either based on the capital’s Supply Cap or the railway level, whichever is lower. Think of it as a bottleneck.
The Hub then distributes supplies to nearby troops. If the total amount of supplies needed by these troops is greater than the Hub’s cap, they won’t get enough.
Railways only connect hubs to the capital, they don’t directly supply troops. Building a railway to a province with no supply won’t magically create some!
By keeping your capital’s Supply Cap high (more factories) and upgrading railways, you ensure your troops get the supplies they need to win!
How to Increase Supply in HOI4
There are four ways to increase Supply in a state or province in HOI4:
Increase Motorization Level
Increase Railway Level
Build Supply Hubs
Increase Infrastructure Level
Increase Motorization Levels
Every Supply Hub in HOI4 has a limited range for supplying troops. This range depends on your chosen Motorization Level, which essentially determines whether you use trucks or horses for deliveries.
Motorization Levels:
Horse (Default): This is the standard option at game start for both Hubs and armies. It has a short range but requires minimal resources. Great for early game when trucks might be scarce.
Trucks: Upgrading to trucks increases the Hub’s supply reach and the amount of supplies it can deliver to existing provinces. However, you’ll need to dedicate trucks in your Logistics to keep this supply flowing.
Many Trucks: This doubles the range and supply of the “Trucks” level, but also uses twice the amount of trucks.
There are two ways to leverage Motorization Levels for better supply:
Individual Hub Control: Click on a Supply Hub in the Supply Map Mode. You’ll see three bubbles on the right. The rightmost one represents Motorization Level. Click it to switch between Horse, Trucks, and Many Trucks.
Army-Wide Priority: Set a global preference for all your armies. Select an army or army group, then click the “horse button” above its weight (the boat icon) to adjust the Motorization Priority. Be careful though, prioritizing trucks for all armies can strain your economy if you’re not prepared.
By choosing the right Motorization Level, you can ensure your troops receive the supplies they need, no matter where they are on the battlefield.
Increase Railway Levels
The maximum supply a Hub can provide (its cap) depends on the quality of the railways connecting it to your capital. This can become a problem if you have too many divisions stationed near a Hub, causing it to reach its capacity.
You can increase the supply capacity by improving the railways between the Hub and your capital. Here’s how to do it easily:
Open the Supply Map Mode and click on the affected Supply Hub.
Look for the button labeled “Upgrade Bottlenecks” in the middle.
Clicking this button will automatically optimize the railways connecting the Hub to the capital. This can involve either:
Eliminating bottlenecks – Ensuring all railway segments between the Hub and capital are at the same level, removing any bottlenecks that restrict flow.
Upgrading the entire line – If all segments are already the same level, the button will upgrade them all to a higher level, increasing the overall supply capacity.
If you conquer a new Supply Hub and it lacks supply, the most likely culprit is a missing connection.
Simply build a railway from the Hub to any existing railway line in your territory. This will integrate the Hub into your supply network.
Build Supply Hubs
A common challenge you’ll face is the vast distance between existing Supply Hubs. This creates gaps in your supply coverage, leaving some areas underserved. To solve this, you will need to build new Supply Hubs.
However, constructing Hubs is a heavily time-consuming process. In the base game, it can take a significant amount of time to complete just one.
To counter this, consider prioritizing the construction of essential Supply Hubs at the beginning of the game. This proactive approach ensures your troops have the coverage they need from the outset.
Many countries have access to a national focus called “Reorganize the Railway System.” Completing this focus significantly speeds up the construction of Supply Hubs, allowing you to build them three times faster.
By strategically placing new Hubs and taking advantage of this decision, you can ensure your troops have a reliable supply chain, even in remote areas.
Increase Infrastructure Levels
Even with a well-developed network of Hubs and railways, sometimes you might need an extra supply nudge in specific regions. This is where Infrastructure comes in.
Building Infrastructure in states facing supply issues provides a small but helpful bonus. Each level of Infrastructure adds 0.3 Supply to all provinces within that state, reaching a maximum of 1.5 Supply at the highest level.
This bonus is fantastic because it’s “free” supply, not relying on Hubs or railways. It’s also used first, before supplies from Hubs, ensuring your troops get this local boost first.
Essentially, well-developed infrastructure acts as a local supply buffer, reducing the burden on your Hubs and ensuring your troops have a reliable baseline supply.
This can be particularly helpful in remote areas or during the early game when Hub construction might be limited.
That’s everything you need to know about how to increase Supply in Hearts of Iron 4!
Have any input or suggestions for this guide? Let us know in the comment section below.
The most versatile combat style in Old School RuneScape, Magic involves using runes to cast powerful spells that can be used for both combat and utility purposes.
With such versatility, it should come as no surprise that there are dozens of different gear items to choose from when assembling a Magic-based setup.
Recommended Read: How to Obtain the Fire Cape in OSRS
However, since magic gear also has much horizontal progression, it can be tricky to pinpoint which gear you should invest
The most versatile combat style in Old School RuneScape, Magic involves using runes to cast powerful spells that can be used for both combat and utility purposes.
With such versatility, it should come as no surprise that there are dozens of different gear items to choose from when assembling a Magic-based setup.
However, since magic gear also has much horizontal progression, it can be tricky to pinpoint which gear you should invest in. The key point is that it all comes down to the content you will participate in (whether combat, skilling-based, or otherwise).
Players often start with simple Wizard’s Robes and the different Elemental Staves for Magic gear progression in OSRS. Eventually, they can move on to Mystic Robes, Ahrim’s Robes, and Ancestral Robes. As for their weapons, it is worth upgrading to either a Master/Kodai Wand or a Trident of the Sea/Trident of the Swamp.
While Magic relies on runes to cast spells, it relies heavily on various staves, wands, robes, and other items to grant additional bonuses and abilities.
More commonly, various staves and wands in Old School RuneScape will provide an unlimited amount of a specific rune (e.g., the Staff of Fire gives you an unlimited Fire Rune source while equipped).
As you progress in your Magic level and upgrade your armour and gear, consider acquiring items that enhance your Magic capabilities.
Staves, wands, robes, and other items, like magic books and the Imbued Heart, can significantly boost your Magic abilities. Although not traditionally considered ‘gear,’ these items play a crucial role in your Magic setup.
Note: When you see brackets indicating an average Magic level, it’s important to note that they can also be interpreted as your combat level.
Wearing certain gear may require additional Defence or Hitpoint levels. Understanding this can help you plan your gear progression more effectively.
When starting to train magic, using the basic Wizard Robes is your best bet. This is also when you get acclimated to the different elemental staffs and can save up on runes.
At 40 Magic and 20 Defence, you can wear Mystic Robes, which are cheap but effective armour for mid-level Slayer, PvM, and even some PvP activities.
You can also equip the different Mystic Battlestaves at 40 Magic and 40 Attack, with some staffs, like the Mystic Smoke Battlestaff, giving extra offensive bonuses when casting Fire Spells.
Levels 40-70: Void Knight Armour, Swampbark/ Bloodbark Armour, God Staffs
While Mystic Robes can continue to be worn well within the mid-level combat bracket, there are other alternatives that you can strive for.
At 42 Magic (as well as 42 Ranged, 42 Attack, 42 Strength, 42 Defence, 42 Hitpoints, and 22 Prayer), you can wear Void Knight armour, unlocked through Pest Control.
The completed set is extremely effective for all sorts of content, primarily because it is great for hybrid/tridbriding and because of its set effect.
While wearing the full Void Knight outfit with the Void Mage Helm, you will have an increased 45% Magic accuracy.
There is also the Elite Void Knight outfit that you can unlock, which will give you another 2.5% Magic accuracy and some Prayer bonuses.
At 50 Magic and 50 Defence, you can wear Swampbark Armour, with Bloodbark Armour being unlocked at 60 Magic and 60 Defence.
While relatively low in defensive bonuses, each set provides decent offensive Magic bonuses and comes with its own set effects:
Swampbark: Increases the duration of binding spells, such as Bind, Snare, and Entangle, depending on how much of the armour set you wear.
Bloodbark: Increases the siphoning effect of Blood spells depending on how much of the armour set you are wearing.
These set effects make both Swampbark and Bloodbark armour viable for PvP content.
At 60 Magic, you can complete the Mage Arena and earn a God Cape and God Staff. The God Capes are effective Magic-based capes with a +10 Offensive and Defensive Magic bonus.
There are also three God Staffs in Old School RuneScape that can be used to cast their associated god spell (after casting said spell 100 times within the Mage Arena).
While the cost efficiency to continuously cast each spell is relatively high, they are still worth using in some PvM and PvP encounters.
Guthix Staff – “Claws of Guthix” spell – Lowers a target’s Defense on hit.
Zamorak Staff – “Flames of Zamorak” spell – Lowers a target’s Magic on hit.
Saradomin Staff – “Saradomin Strike” spell – Lowers a target’s Prayer on hit.
Levels 70-100: Ahrim’s Robes, Ancestral Robes, Imbued God Cape, Master Wand, Trident of the Seas/ Trident of the Swamp
You can wear Ahrim’s Robes at 70 Magic and 70 Defence. Considered one of the best magic armour sets in Old School RuneScape, they provide a high number of Offensive and Defensive stats.
Earned naturally as a reward from the Barrows minigame, the Ahrim’s Robes has an average of +100 Defensive bonuses to all combat styles. The full set itself (including the Ahrim’s Staff) also has a set effect that will reduce the Strength of a target.
However, since the set effect is not normally utilized, most players will wear the robes and a more powerful staff when creating a magic setup.
On the other hand, wearing the full set along with an Amulet of the Damned will allow you to auto-cast Ancient Magicks with the Ahrim’s Staff, making this a powerful set to wear for PvP scenarios.
Ancestral Robes, which are much more expensive yet stronger than Ahrim’s robes, can be worn at 75 Magic and 65 Defence. Earned as a reward from the Chambers of Xeric raid, the full set can sell for around 400m on the Grand Exchange.
Ancestral Robes provide the highest Offensive Magic bonuses in the entire game, giving a total of +69 Magic Attack and moderate Defensive stats. This makes them top-tier for using Magic against the toughest bosses.
Once you have 75 Magic, you can complete the “Mage Arena II” miniquest and earn the Imbued God Capes.
A step up from the regular God Capes, they are the best-in-slot Magic capes in Old School RuneScape, giving +15 Offensive and Defensive Magic bonuses and an extra +2% Magic Strength.
At 75 Magic, you can also wield the Trident of the Seas. A powerful staff dropped from both the Cave Krakens and the Kraken Boss gives you a +15 Offensive and Defensive Magic bonus and is excellent for any kind of Magic-based combat.
The Trident of the Seas has a built-in spell, so you must charge it instead of bringing runes.
The Trident of the Seas also comes with an upgraded variant: the Trident of the Swamp, giving it a venoming effect similar to items earned through Zulrah.
Requiring 78 Magic to wield, the Trident of the Swamp is an incredibly effective Magic weapon used in nearly every PvM scenario, often side-by-side with Ancient Magicks in some cases.
In addition to the different tridents, the Master Wand becomes available at 60 Magic.
While only a moderate Magic level is required, it is one of the few weapons that can auto-cast Ancient Magicks. Therefore, in situations where you will be predominately using Ancient Magicks (Raids, PvP, etc.), the Master Wand is worth investing in.
Virtus Robes, which require 78 Magic and 75 Defence to wear, is a powerful and unique set of Magic robes that are earned naturally as drops from the different “Desert Treasure II” bosses.
Like Ancestral Robes, they have increased Defensive and Prayer bonuses and a set effect that increases damage dealt when using Ancient Magicks.
Knowing this, these robes are often preferred over Ancestral Robes when solely using Ancient Magicks, while Ancestral Robes are used to increase overall magic DPS.
While various boots in Old School RuneScape provide Magic bonuses, Eternal Boots are the best-in-slot boots for Magic.
They require 75 Magic and 75 Defence to wear and give a +8 Offensive and Defensive Magic bonus; while this is not much of a difference to cheaper boot alternatives, it can make a difference when partaking in high-level content.
The Kodai Wand is the highest-tiered wand available. It is created by using a Kodai Insignia on a Master Wand.
Able to be used at 80 Magic, it can auto-cast any spell book, has a chance of not spending runes when casting a spell, and provides an additional 15% Magic damage.
The Kodai Wand also gives you an unlimited supply of Water Runes, similar to a Staff of Water, making it an excellent choice for casting Ice Spells.
Able to be used in any scenario, the Kodai Wand is considered one of the strongest weapons in the game and a staple to an endgame Magic gear setup.
Out of all off-hand items that provide Magic bonuses, the Elidinis’s Ward is the most powerful magic-based off-hand.
Requiring 80 Magic, 80 Defence, and 80 Prayer to equip, it gives a +5 Offensive Magic, +3% Magic Strength, and +1 Prayer bonus.
However, this shield truly shines when combined with an Arcane Spirit Shield to create the Elidinis’ Ward (f). This fortified variant gives you +25 Offensive Magic Attack, +5% Magic Strength, +4 Prayer, and a plethora of Defensive bonuses across all combat styles.
This shield can turn any player into a Magic tank with its excellent combination of offensive and defensive bonuses.
Other Magic Items to Consider
While most players will focus on the robes or weapons they use to upgrade their gear, plenty of other items provide additional bonuses/ effects to progress your Magic loadout.
Imbued Heart/ Saturated Heart
Earned as a drop from superior slayer creatures, the Imbued Heart temporarily boosts your Magic level by a certain amount (depending on your current Magic level).
Although you do not need a specified Magic level to use it, it is a great item to have with you to help give you extra Magic capabilities.
The Imbued Heart can also be upgraded into the Saturated Heart, which will not only increase the boost by an extra +3 when used but also prevent your Magic boost from gradually draining for a certain amount of time while decreasing the cooldown to use it again.
Seers Ring/ Seers Ring (i)/ Magus Ring
There are two rings in Old School RuneScape that directly give you additional Magic bonuses.
The Seers Ring dropped from Dagannoth Prime gives a +6 Offensive and Defensive Magic bonus.
Additionally, it can be imbued through the Nightmare Zone, Soul Wars, or Last Man Standing to turn it into the Seers Ring (i), doubling the bonuses to +12.
Even further, the Magus Ring is a ring earned from Duke Sucellus (one of the Desert Treasure II bosses) that provides a total of +15 Offensive and Defensive Magic bonuses, the highest in the entire game.
While there is not technically a level requirement to wear it, you must complete the “Desert Treasure II” quest, which already requires 75 Magic.
Tormented Bracelet
The Tormented Bracelet requires 75 Hitpoints to wear and is the best-in-slot glove-slot item for Magic in OSRS.
It provides a +10 Magic Attack, a +2 Prayer bonus, and a +5% Magic Strength bonus, making it very effective for any DPS-based Magic setup.
Barrows Gloves
While not specific to Magic, Barrows Gloves are fantastic gloves that provide +6 Offensive and Defensive Magic bonuses and a +10 bonus to all other stats, making them incredibly useful for any kind of gear setup.
Earned after completing the “Recipe for Disaster” quest, Barrows Gloves are an iconic item that can be used in virtually any scenario and are much cheaper than the Tormented Bracelet.
Book of Darkness/ Mage’s Book
Once you complete the “Horror from the Deep” quest, you can fill and complete the different god books available. One of which, Zaro’s book, or the Book of Darkness, directly provides additional Magic bonuses when worn.
While equipped, it gives you a +10 Offensive Magic bonus and a +5 Prayer bonus. Given that wielding it does not require a specific Magic skill, it is a fantastic off-hand item for a Magic setup, albeit at a low price.
On the same note, the Mage’s Book is earned from the Mage Training Arena or bought from the Grand Exchange for around 3m.
Requiring 60 Magic to wear gives a +15 Offensive and Defensive Magic bonus, making it the third-best off-hand item for Magic attack.
Tome of Fire/ Tome of Water
Two books in the game, the Tome of Fire and the Tome of Water provide additional rune supplies and magic bonuses.
The Tome of Fire is earned as a reward from the Wintertodt boss. It requires 50 Magic to wield, but it can be charged with Burnt Pages/ Seared Pages, which can be used in place of Fire Runes.
Using the Tome of Fire will increase the hit of Fire Spells by 50%, making it incredibly useful when paired with something like the Mystic Smoke Battlestaff, which also increases your damage and accuracy.
Furthermore, if the Tome of Fire is charged with Seared Pages, it will increase your minimum hit by 10%, effectively making it so you can never hit a zero when using Fire Spells.
On the other hand, the Tome of Water is a reward from the Tempoross boss and requires 50 Magic to wield. When charged with Soaked Pages, it can be used as a supplement for Water Runes.
With the Tome of Water equipped, you will also have additional benefits when casting certain spells, including:
Water spells have a 20% increased accuracy and damage bonus.
Curse spells have a 20% increased accuracy bonus.
Stat-draining spells have a 50% increased effectiveness.
This can make the Tome of Water incredibly effective when paired with Swampbark armour, which also gives bonuses to binding spells.
Occult Necklace
Considered the best Magic necklace in Old School RuneScape, the Occult Necklace requires 70 Magic to wear and is dropped from Smoke Devils.
The +12 Offensive Magic bonus also gives you +10% Magic Strength and a +2 Prayer bonus, which will drastically increase your Magic DPS while worn.
This has been a Magic gear progression guide for Old School RuneScape!
Do you have any input or suggestions for this article? Let us know in the comment section below.
Doctrines are the part of Heart of Iron 4 that cause the most debates. Since you will always have to choose only one out of 3 or 4, players get really heated about which one is actually the most useful.
Most of the time, the right answer is: “the doctrine that fits your needs.” This is generally the right answer for air doctrines as well since the bonuses are very good no matter which doctrine you choose, as opposed to the land doctrines, where you should never pick Mass Assault.
Recommen
Doctrines are the part of Heart of Iron 4 that cause the most debates. Since you will always have to choose only one out of 3 or 4, players get really heated about which one is actually the most useful.
Most of the time, the right answer is: “the doctrine that fits your needs.” This is generally the right answer for air doctrines as well since the bonuses are very good no matter which doctrine you choose, as opposed to the land doctrines, where you should never pick Mass Assault.
The first thing you will need to ask yourself is where are you willing to be weaker and what exactly do you want to gain from using your air force.
In this guide, we will go through all of the air doctrines in Hearts of Iron 4, explain why each one of them is very useful, and why, most of the time, Operational Integrity is the best one to choose.
Generally, all doctrines offer very similar bonuses, which is why you can’t really go wrong here. There are only a few bonuses that are different, and those can make a big difference.
Here are all the bonuses that you get by investing in any of the air doctrines, that you will receive no matter which path you go down:
Air Superiority: +15%
Fighter Detection: +10%
Ground Support: +10%
Interception Detection: +10%
Naval Mission Efficiency: +10%
Strategic Destruction
As explained by the developers under the doctrine, Strategic Destruction is the go-to doctrine for people that want to destroy their enemies’ provinces using Strategic Bombers.
There are two choices you will have to make down this path, where you will first have to choose between better Fighter skills in Interception or Air Superiority missions, and then choose between a big flat bonus to Strat Bombing or a smaller one with a decreased night debuff.
Usually, if your goal is to bomb your enemies to hell, this is the right doctrine to choose.
Here are the exact bonuses you can get down this doctrine, ignoring the general ones we listed above:
Air Superiority: +15%
Bomber Defense: +25%
Escort Efficiency: +25% & Strategic Bombing: +50% / +40% & Night Time Strategic Bombing Penalty: -50%
Fighter Agility: +10%
Interception Mission Efficiency: +20% / Air Superiority Mission Efficiency: +20%
Naval Mission Efficiency: +5%
Battlefield Support
This is the doctrine to buff your CAS and deal crazy damage to the land troops below your air force. Or, at least, that’s how it’s described. If you actually look at the buffs, your CAS do become more powerful, but not enough to make a huge difference.
It does feel, however, that you are dealing huge damage to the troops on the ground, as long as you’ve got Air Superiority.
Here are the exact bonuses you can get down this doctrine, ignoring the general ones we listed above:
Weirdly enough, the Operational Integrity doctrine is described as the tactical bomber doctrine since it’s got a single Strategic Bombing boost for tactical bombers.
However, analyzing the doctrine better will likely make you realize that this is actually the best doctrine for fighters.
Most players in HOI4 want to make their fighters better than their enemies’, since this is the way you will win the aerial battles and gain the Air Supremacy needed to also get that intense CAS damage.
Operational Integrity gives you exactly what you need to effectively win in the air and get that Air Supremacy you clearly want over your land troops.
Here are the exact bonuses you can get down this doctrine, ignoring the general ones we listed above:
Ace Generation Chance: +20%
Air Superiority Mission Efficiency: +20%
Bomber Defense: +20%
Fighter Agility: +10%
Fighter Detection: +10%
Interception Detection: +10%
Interception Mission Efficiency: +20%
Strategic Bombing Visibility: -50%
Tactical Bomber Strategic Bombing: +20%
What Everything Means
Here’s a brief description of all the bonuses you can get with these doctrines so you can understand exactly what they do:
Ace Generation Chance: Increase the probability of generating aces during missions.
Air Superiority Mission Efficiency: Improves air attack, air defense, and agility for planes on this mission.
Air Support Mission Efficiency: Improves air attack, air defense, and agility for planes on this mission.
Bomber Defense: Increases the air defense for planes on Strategic Bombing mission.
Enemy Air Support: Modifies the negative effect enemy air superiority has on the combat ability of our ground troops.
Escort Efficiency: Reduces disruption from enemy attacks.
Fighter Detection: Increases the amount of detection planes on Air Superiority mission contribute to the region.
Ground Support: Increases the scaling rate of the Enemy Air Support bonus provided by air superiority
Interception Detection: Increases the amount of detection planes on Interception mission contribute to the region.
Interception Mission Efficiency: Improves air attack, air defense, and agility for planes on this mission.
Naval Mission Efficiency: Improves air attack, air defense, and agility for planes on this mission.
Night-time strategic bombing penalty: Reduces the negative effects of night for planes on Strategic Bombing mission, notably the Ground Bombing Targeting penalty.
Strategic Bombing Visibility: Counteracts enemy detection when on Strategic Bombing mission, reducing the maximum number of enemy planes responding to the bombers.
Strategic Bombing: Improves Strategic Bombing damage for planes on that mission.
What Is the Best Air Doctrine in Hearts of Iron 4?
Though all three doctrines are useful, depending on the country you select at the start, Operational Integrity will usually be your main choice for most countries, making it the best air doctrine in HOI4.
Most of the time, the most important thing in air battles is losing fewer fighters than your enemy. If you and your rivals place all of your planes in one air region, destroying more of their fighters to get Air Superiority is the way to go.
At that point, it becomes an attrition battle, where you see which one of you can keep destroying more planes, as bombers and CAS also get destroyed in the process. For this reason, Operational Integrity is the main doctrine to go for if you play as any minor country.
Since you don’t have the capabilities to build a large air force, your goal is to just keep your skies safe, to avoid the total destruction that CAS deal or the annoying Civ factory usage that bombers cause by leveling your country.
So, to avoid most problems, you just need to pick the Operational Integrity doctrine and send your fighters to fight. The Fighter Detection bonus, combined with Ace Generation and Fighter Agility, will make you the biggest power in the air.
71Cloakhas made a video where he made nations fight with the same number of fighters and same tech, using different doctrines.
He pit Strategic Destruction against Battlefield Support, Battlefield Support against Operational Integrity, and Strategic Destruction against Operational Integrity.
In all scenarios, Operational Integrity lost 10 to 20% less fighters in the battles against the other doctrines, making it the superior choice for Air Superiority.
Which Countries Should Choose Strategic Destruction
Though Operational Integrity is the best choice for most countries, this does not mean you need to pick it. As you’ve seen from the stats, you just lose more fighters in the air battles, but this does not mean you lose if you have bigger production pools.
So, if you can afford to lose fighters and don’t care about losing more than your enemy, then you can pick one of the other two doctrines. This is usually the better choice for major countries that have huge production capabilities and can afford to lose thousands of planes.
Countries like the United Kingdom and the USA should always complete the Strategic Destruction doctrine, since they spend most of their time away from the fighting.
They also have amazing industries, allowing them to pump out as many fighters as it is necessary.
Destroying Germany’s industry is very important in taking them down, and the Strategic Destruction doctrine will help out a lot on this front.
This doctrine is also very useful for Commonwealth nations that won’t really be very involved in the fighting on the ground, but that can constantly pester Germany by bombing various different parts of Europe in hopes of destabilizing the country.
Most of America should choose this doctrine, unless they plan on attacking their neighbors. However, in most cases, even if you do attack your neighbors, Supply will be your biggest enemy, not air forces.
Which Countries Should Choose Battlefield Support
If you spend most of your time in huge land battles with your enemies, then Battlefield Support is a really good choice.
Though CAS deals a ton of damage even without this doctrine, this one allows you to quickly push through enemy lines with its amazing prowess.
A country like Germany, the USSR, and Japan would profit a lot from Battlefield Support, since all of them have to win their land battles first and foremost.
The only problem is that Battlefield Support gets the worst fighter bonuses out of the bunch, so you’ll always lose more planes than your enemies.
This doctrine will usually only be useful if you have a giant air force that doesn’t mind losing a lot, in exchange for huge wins on land. Or, if you have a really good fighter design, then you shouldn’t really be afraid of the air battles and just concentrate on destroying divisions.
Battlefield Support will make sure that the ground troops truly suffer if you’ve managed to gain Air Superiority, which should be easily done against the AI with enough research into Fighter and a design that focuses on Agility and damage.
Recommended Air Doctrine Per Country
Here are the best air doctrines to choose for each country in HOI4:
Afghanistan: Operational Integrity
Albania: Operational Integrity
Argentina: Operational Integrity
Sultanate of Aussa: Operational Integrity
Australia: Strategic Destruction
Austria: Operational Integrity
Belgium: Strategic Destruction
Bhutan: Operational Integrity
Bolivian Republic: Operational Integrity
Second Brazilian Republic: Operational Integrity
British Malaya: Strategic Destruction
British Raj: Operational Integrity
Bulgaria: Operational Integrity
Dominion of Canada: Strategic Destruction
Chile: Operational Integrity
China: Operational Integrity
Colombia: Operational Integrity
Communist China: Operational Integrity
Costa Rica: Operational Integrity
Cuba: Operational Integrity
Czechoslovakia: Operational Integrity
Denmark: Operational Integrity
Dominican Republic: Operational Integrity
Dutch East Indies: Operational Integrity
Ecuador: Operational Integrity
El Salvador: Operational Integrity
Estonia: Operational Integrity
Ethiopia: Operational Integrity
Finland: Operational Integrity
France: Strategic Destruction
Germany: Battlefield Support
Kingdom of Greece: Operational Integrity
Guangxi Clique: Operational Integrity
Guatemala: Operational Integrity
Haiti: Operational Integrity
Honduras: Operational Integrity
Kingdom of Hungary
Iceland: Operational Integrity
Iran: Operational Integrity
Iraq: Operational Integrity
Ireland: Strategic Destruction
Italy: Battlefield Support
Japan: Battlefield Support
Latvia: Operational Integrity
Liberia: Operational Integrity
Lithuania: Operational Integrity
Luxembourg: Operational Integrity
Manchukuo: Operational Integrity
Mengkukuo: Operational Integrity
Mexico: Strategic Destruction
Mongolia: Operational Integrity
Nepal: Operational Integrity
Netherlands: Strategic Destruction
New Zealand: Strategic Destruction
Nicaragua: Operational Integrity
Norway: Operational Integrity
Oman: Operational Integrity
Panama: Operational Integrity
Republic of Paraguay: Operational Integrity
Peru: Operational Integrity
Philippines: Operational Integrity
Poland: Operational Integrity
Portugal: Operational Integrity
Romania: Operational Integrity
Saudi Arabia: Operational Integrity
Shanxi: Operational Integrity
Siam: Operational Integrity
Sinkiang: Operational Integrity
South Africa: Strategic Destruction
Soviet Union: Battlefield Support
Spain: Battlefield Support
Sweden: Operational Integrity
Switzerland: Operational Integrity
Tannu Tuva: Operational Integrity
Tibet: Operational Integrity
Turkey: Operational Integrity
United Kingdom: Strategic Destruction
United States: Strategic Destruction
Uruguay: Operational Integrity
Venezuela: Operational Integrity
Xibei San Ma: Operational Integrity
Yemen: Operational Integrity
Yugoslavia: Operational Integrity
Yunnan: Operational Integrity
That’s everything you need to know about the best air doctrines in Hearts of Iron 4!
Have any input or suggestions for this guide? Let us know in the comment section below.
In Hearts of Iron 4, your main goal will be to win the Second World War. Unfortunately, it is quite hard to do this without doing some research beforehand, as the gameplay mechanics are very complicated for newcomers.
There are many moving parts when it comes to warfare in Hearts of Iron 4. You will need to know what most of the stats mean, how to design your divisions properly, and how to keep everyone supplied throughout the battles.
Recommended Read: How to Use Floating Harbor in HOI4
In Hearts of Iron 4, your main goal will be to win the Second World War. Unfortunately, it is quite hard to do this without doing some research beforehand, as the gameplay mechanics are very complicated for newcomers.
There are many moving parts when it comes to warfare in Hearts of Iron 4. You will need to know what most of the stats mean, how to design your divisions properly, and how to keep everyone supplied throughout the battles.
To properly win all your wars, you will need to master some of the tedious parts of micromanaging your troops, which are usually worth the effort.
In this guide we will show you everything you need to know about warfare in Hearts of Iron 4, ranging from how divisions work, to how to win every war you participate in.
Divisions are the bread and butter of war. They are your troops which you guide on the battlefield to win wars.
These divisions have two main stats that will decide their ability to fight properly and win:
Strength (orange bar)
Organization (green bar)
Strength is the closest thing to HP your divisions have. If a unit completely loses its Strength it will be destroyed, and you will lose whatever was left of it forever. The Strength is a combination between equipment and Manpower.
Organization is the morale of your division. If they lose all Organization when attacking, they will immediately stop their offensive.
If they lose all Organization when defending, the division will start retreating to a different province, in order to recover their Org.
Divisions with lower than maximum Strength or Organization are much easier to defeat and are usually your first sign either you or your enemy are starting to lose the war.
There’s no way to make sure your Strength is larger and all you can do to keep this stat high is to make sure you always have surplus equipment and Manpower to supply back to your divisions after battles.
For Organization, on the other hand, you personally decide how much max Organization you can have in the division designer
Division Designer
The division template designer is a huge part of the game. In the Recruit & Deploy menu players can edit their divisions, choosing exactly what battalions are part of it and what stats they actually have.
What All Division Stats Mean
In the division template designer, players will see three columns: Base Stats, Combat Stats, and Equipment Costs.
Under these columns, they can see the division composition, which will help figure out what bonuses the division will get from advisors and doctrines, and the Hardness percentage.
Base Stats
Max Speed – the speed that the division will have. The minimum is 4 km/h, with everything above 10 being really fast.
HP – number that represents how easy it is to destroy the division. The higher the number, the longer the division will last in a situation where it will likely disappear forever.
Organization – the real health of a division. In battles, divisions lose if they lose all of their Organization. Once they retreat, they have to wait to recover before being at full strength.
Recovery Rate – the speed at which Organization recovers out of combat.
Reconnaissance – stat that decides if the general of the army will counter the tactic of the enemy. The total is a combination between the division’s stat and the one of the general.
Suppression – efficiency when it comes to suppressing occupied territory. Stat only relevant for Garrisons.
Weight – determines how many Convoys are needed for transport across water.
Supply use – determines how much Supply the division needs in the province they are stationed.
Reliability – how likely it is that equipment will break down due to attrition. A low Reliability will result in a lot of meaningless losses of equipment.
Reliability Bonus – extra Reliability gained from Support Companies.
Trickleback – returns a percentage of lost Manpower in battles to the country’s Manpower pool.
Exp. Loss – determines the amount of division experience lost per Manpower lost.
Combat Stats
Soft Attack – the main Attack stat. All units that have low Hardness (no tanks or armored divisions) take mainly Soft Attack damage.
Hard Attack – the Attack stat for armored divisions. Units with higher Hardness take more Hard Attack damage.
Air Attack – lowers damage taken from CAS by up to 75% and attacks planes above them.
Defense – reduces damage that enemies deal to the division when defending.
Breakthrough – reduces damage that enemies deal to the division when attacking.
Armor – if Armor is higher than the attacking division’s Piercing, the defending division loses -50% less Organization and the attacking division loses +50% more Organization.
Piercing – if Piercing is higher than the defending division’s Armor, the defending division loses +50% more Organization and the attacking division loses -50% less Organization.
Initiative – increases reinforcement rate and Coordination. Relatively useless stat.
Entrenchment – increases Max Entrenchment. Every point of Entrenchment gives a division +2% Defense and Soft Attack. Lose the bonus when moving.
Eq. Capture Ratio – the amount of equipment the division captures during battles.
Combat width – how much space the division takes on the battlefield. Check out our guide on Combat Width for more info.
How to Make Defensive and Attacking Divisions
When designing your divisions, there will only be a few stats that you should care about, depending on what you want to do with those divisions.
If you want to make defensive divisions that only need to hold back your enemies, then concentrate on Defense, Armor, and Entrenchment.
If you want to make attacking divisions, concentrate on Soft Attack, Hard Attack (if you’re fighting tanks), Breakthrough, and Piercing.
Hardness
There are two types of Attack in HOI4: Soft and Hard.
Soft Attack mainly targets divisions with low Hardness and Hard Attack hits divisions with high Hardness. Here is the exact formula that decides how a division is damaged in HOI4:
Hardness is a stat that represents the number of armored battalions that are part of the division. Infantry has 0% Hardness, while Tanks have 100%.
A normal Infantry division will have less than 10% Hardness, while normal Armored divisions will have around 50% to 70%.
This means that an Infantry division with 0% Hardness won’t receive any of the Hard Attack damage, but 100% of the Soft Attack. A division with around 50% Hardness will receive half of both.
In singleplayer the AI generally uses only divisions with close to 0% Hardness, which means that Soft Attack is king. Generally aim to build divisions with really high Soft Attack to win most fights.
In multiplayer, most will focus on getting some Hardness on all divisions, with a lot of elite Tank divisions to push the lines while micromanaging.
To combat these, you will need a few Tank Destroyers to combat them with Hard Attack.
A single Tank Destroyer in most defensive divisions will usually be enough to also deal damage to the powerful Tank divisions that players use in multiplayer.
Combat Width
Combat Width in HOI4 is the amount of space that divisions can take up in a province battle.
Each province will have a set maximum Combat Width based on the terrain type (Plains, Urban, etc.), and each division will have its own Combat Width stat, which will decide how they fit in the battle.
When you create a division using the division designer, you will notice that most line battalions will add either 1, 2, or 3 Combat Width to your division, with most of them using 2 (Support Companies don’t add any Combat Width).
You can also check the Combat Width of a province before attacking by clicking on the tile and hovering over the image of the Province in the bottom left corner of the screen, which will tell you the terrain type and Combat Width.
When you start a battle, you can see if you open the fight menu (press the bubble with numbers in it) a number in the center that represents the Combat Width.
This can also change based on how many directions the province is attacked from (+half of the normal Combat Width per attack direction).
What Is the Best Combat Width?
When optimizing and designing your divisions in HOI4, you need to make sure that you choose the best Combat Width that will get the least amount of negative modifiers in most terrain types.
One problem that you can often bump into is making your divisions too small (less than 12 Combat Width) or too large (bigger than 40 Width), which will often either give you horrible Combat Width debuffs or just bad stats in the battle.
Taking this into consideration, the best Combat Width stats that you can use for your divisions in HOI4 are these:
14/15
18
24/25
35/36
Supply
Another thing that will decide if you can win battles or not is Supply. Supplies aren’t actually an item or equipment you can produce in the game.
Supplies are a resource that appears in your states based on various factors, such as state population, Infrastructure, Victory Points, and connection through Hubs.
All divisions in the game have a Supply consumption stat that decides how much Supply they need, which you should provide, otherwise their Organization will lower, making them easy to destroy.
There are two main sources of Supply in all provinces: State and Hubs.
The State Supply is the amount of Supply a province will get based on population, Infrastructure, and Victory Points. Supply from Hubs is the amount of Supply a province will get based on its connection to the capital.
The capital of your country has a main Supply Hub, the Capital Hub, that sends Supply to all the Hubs in the country through Railways.
The maximum amount of Capital Hub Supply (the Supply Cap) is based on the number of factories in the country.
This does not mean that the Supply Cap in your capital is how much supply you can send to all the Hubs. It is just a number that represents the maximum Supply you can have in all your Hubs.
Based on the Railway level, the other Supply Hubs have a maximum level of Supply they can provide as well.
How to Win Wars in HOI4
To actually win wars, you just need to plan everything better than your enemy.
If your divisions have good designs, they have Supply, and there are no huge debuffs against them, you shouldn’t have a lot of problems pushing through.
HOI4 is a numbers game, and having the bigger numbers will always allow you to win. Having huge Soft Attack, for example, is all you need to win in single player.
Putting a lot of Artillery in all of your divisions, even if they are Infantry divisions, is more than enough to win almost every fight.
A decent strategy is usually to allow the enemy to lose Manpower and equipment before pushing through. Trick your enemy into attacking and defend, losing almost nothing while they lose everything.
This strategy is usually the best way to win absolutely every war in the game, as the AI will usually throw troops at you until their Strength begins to waver. Once you notice that their Strength is below 70%, you should usually start pushing.
If you are playing as an offensive country, like Japan or Germany, then your main goal is capturing important cities. Build around speed and just push hard to get around the enemy line and get Victory Points.
Also, always look for encirclements. Even if you aren’t micromanaging and like just staring at your army as they push, help by creating encirclements.
Completely destroying enemy divisions is the way to win wars. This significantly lowers their Manpower and equipment, speeding up their capitulation.
That’s everything you need to know about how to win wars in Hearts of Iron 4!
Have any input or suggestions for this guide? Let us know in the comment section below.
The most dangerous combat style in Old School RuneScape, Ranged combat allows players to fight from a distance while delivering a multitude of powerful attacks from bows, crossbows, and other Ranged weaponry.
Most often used in bossing content, the Ranged combat style has an entire arsenal of weapons and gear to choose from.
Recommended Read: Old School RuneScape – Magic Gear Progression Guide
Since the Ranged skill is one of the easiest to train in Old School RuneScape, you will find
The most dangerous combat style in Old School RuneScape, Ranged combat allows players to fight from a distance while delivering a multitude of powerful attacks from bows, crossbows, and other Ranged weaponry.
Most often used in bossing content, the Ranged combat style has an entire arsenal of weapons and gear to choose from.
Since the Ranged skill is one of the easiest to train in Old School RuneScape, you will find yourself upgrading your gear often. But with so many different options and weapons, deciding which to use as you progress your account can be challenging.
As you train your Ranged level in OSRS, you will progress your gear by first going through the different leather armour, up to Black D’Hide at 70 Ranged. Eventually, you can start to wear Karil’s armour, Armadyl, then Masori armour at 80 Ranged. As for your weapons, they will vary between the different metal darts/knives available and the higher-tiered crossbows (Rune, Dragon, Armadyl, and Zaryte). The Toxic Blowpipe and the Twisted Bow are also incredibly strong weapons that you may work towards.
Unlike the progression for Melee gear, we don’t need to differentiate between playing a Tank/DPS role because Ranged gear is mostly the same.
While you can still use Ranged combat and play a DPS role, the only true difference would be swapping one or two items for an equipment item that has higher defense (i.e., switching a Twisted Buckler for a Dragonfire Shield or Pegasian Boots for Guardian Boots).
Another key difference is that while there is a high number of different Ranged gear to choose from, much of it has linear progression.
In other words, you wouldn’t be missing out on a key bonus or feature by choosing the higher-tiered armour over another.
This is handy because you can simply upgrade your gear with the best Ranged armour you can wear while spending more time focusing on which weapon you will use (which is arguably much more important as the best-in-slot (BIS) will change depending on what you will be fighting.
Note: The level brackets below are used to describe the average combat level you will be at for each selection of gear upgrades, however, they can also be interpreted as what your current Ranged/Defence level is.
Levels 3-40: Leather Armour, Snakeskin, Green D’Hide, Darts/Knives
As you start your Ranged journey, you will learn about the different types of Leather armour and other basic forms of weaponry.
Aside from standard Leather armour, you will eventually unlock Studded Leather at 20 Ranged, Frog Leather at 25 Ranged, Snakeskin at 30 Ranged, and finally Green D’Hide armour at 40 Ranged.
Note: To wear the Green D’Hide Body, you will need to complete the “Dragon Slayer I” quest. However, you can still wear the Chaps and Vambraces.
While unlocked early, Darts and Knives are a great way to quickly train your Ranged level.
In this combat bracket, you can use up to Rune Darts and Rune Knives; however, it is much more efficient to use a cheaper metal like Mithril or Steel, as you will be using a lot of them to train your Ranged level.
You may have started the process to unlock Void Knight Equipment at around this level, which will drastically boost your accuracy and damage when wearing the full Ranged set.
Due to its versatility in being able to change combat styles in a single equipment switch, Void armour is continuously used, even for endgame content.
Other than Void equipment, you will also begin to wear higher tiers of D’Hide armour, with Blue D’Hide unlocked at 50 Ranged, Red D’Hide at 60 Ranged, and Black D’Hide at 70 Ranged.
It is worth noting that D’Hide armour also provides excellent Magic Defence, so it is often used in the Wilderness for its cheap cost but great stats to defend against Pkers.
At 45 Defence and after completing the “Fremennik Trials” quest, you can wear the Archer’s Helm, one of the Fremennik helms suited directly for Ranged combat.
While not much of a bonus, the additional +6 Ranged Attack and minimum +6 Defensive bonuses can make a difference when training early on.
The Magic Shortbow and Magic Longbow are unlocked at 50 Ranged, providing decent Ranged DPS at an early to mid-game level.
While they aren’t typically used beyond 60 Ranged except for niche scenarios, they could still be used as an effective training/casual PvM weapon for when Ranged combat is called for.
More importantly, the Magic Shortbow can be imbued with a scroll to be turned into the Magic Shortbow (i), which decreases the special attack energy from 55% to 50%, allowing you to use it back-to-back.
You can equip the Rune Crossbow at 61 Ranged, and the Dragon Crossbow at 64 Ranged. Both are excellent weapons that are still used in mid-to-high level PvM content.
While the Dragon Crossbow is only an okay step up from the Rune Crossbow, it sells for around 2m on the Grand Exchange, far more expensive than a Rune Crossbow that sells for around 10k.
However, the Dragon Crossbow comes with a special attack and is able to fire dragon ammunition, which is significantly stronger than regular bolts.
Once you enter what is often considered mid-game Old School RuneScape, you unlock equipment and weapons that will be standard at most bossing and Raid activities.
Ranged gear in Old School RuneScape has a linear progression with little horizontal variety.
Therefore, you are safe to invest in a single setup for the best Ranged DPS you can gather and only have to switch one or two gear items for other scenarios.
At 70 Ranged and 70 Defence, you can wear Karil’s armour, which is a great set of armour to wear as soon as you can.
While Ironman can unlock Karil’s armour as a Barrows reward, you can purchase the Karil’s Leathertop and Leatherskirt for around 2m total on the Grand Exchange, which is cheap when comparing it to higher-tiered armour, while still providing excellent offensive and defensive bonuses.
Also at 70 Ranged and 70 Defence is Armadyl armour, the second strongest Ranged-based armour in Old School RuneScape.
Coming with the full set of the Armadyl Helm, Armadyl Chestplate, and Armadyl Chainskirt, it is obtained as a drop from Kree’arra of the God Wars Dungeon, or purchased from the Grand Exchange for a total of 90m.
Wearing full Armadyl gives you incredible bonuses, with a +10 to Ranged Attack and a minimum of +82 to all Defensive stats. You will also have a total +3 Prayer bonus, which is uncommon for most equipment in the game.
At 70 Defence (and 60 Ranged used to unlock the set itself), you can wear Crystal Armour. This armour set, similar to Void Equipment, can be used for multiple combat styles and has a set effect that will help increase your DPS depending on your weapon.
Earning by converting Crystal Armour Seeds into the different gear items (Helm, Body, Legs), wearing the full set will give you an increased 30% accuracy and 15% damage when using Crystal weaponry.
For Ranged progression, this makes using the Crystal Bow or the Bow of Faerdhinen a prime choice for this set.
Both the Crystal Bow and the Bowfa come with an increased Ranged distance and are often used for endurance-based and other PvM scenarios where you need high Defensive bonuses but don’t want to trade off DPS, such as the Fight Caves, the Inferno, and Raids.
Often considered some of the best Ranged weapons in Old School RuneScape, they are worth considering if you have the spare gp to create the entire Crystal Armour set, along with a bow to go with it.
The Dragon Hunter Crossbow can also be used at 70 Ranged.
One of two Dragonbane weapons currently in Old School RuneScape will give you an increased 30% accuracy and 25% damage when fighting against draconic creatures, making it excellent for Vorkath or the Chambers of Xeric.
The Armadyl Crossbow is also the next step-up from the Dragon Crossbow. It is unlocked at 70 Ranged and can fire dragon ammunition.
This incredibly strong crossbow comes with a +100 Ranged Attack bonus and has a special attack that will increase your accuracy and chance to trigger an enchanted bolt effect, making it excellent against bosses with a high defense.
The Toxic Blowpipe can be used starting at 75 Ranged, and it is considered one of the most effective weapons in Old School RuneScape.
Using any kind of darts as ammunition, it is a versatile Ranged weapon that can be used for casual Slayer, high-level bossing, and everything in between.
The Toxic Blowpipe also has a special attack that will heal you depending on how much damage is dealt, making it ideal for endurance challenges.
Furthermore, if you use the Toxic Blowpipe while having the Serpentine Helm equipped, you will guarantee to inflict venom on your target (if they can be venom’d).
As you max your account, you will eventually be able to wear and use the best Ranged equipment in OSRS.
Masori armour can be equipped at 80 Ranged and 30 Defence and provides the best overall offensive Ranged stats for Ranged armour.
Costing around 115m off the Grand Exchange, or earned as a reward from the Tombs of Amascut, the complete set gives you a +82 Ranged Attack, +8 Ranged Strength, and between +50-70 defensive bonuses to all combat styles.
Masori armour also comes with a fortified variant, labeled “Masori Armour (i),” which has the same offensive Ranged bonuses but nearly doubles all of its variant’s defensive stats.
Naturally made using Armadyl Plates on Masori Armour, it is by far the best Ranged armour in the entire game and is sought after by all endgame players.
Another main gear upgrade for max accounts is Zaryte Vambraces, which can be earned as a drop from Nex or bought from the Grand Exchange for around 120m.
They require 80 Ranged and 45 Defence to wear and are considered the best Ranged gloves in Old School RuneScape.
They give you an extra +18 Ranged Attack, +2 Ranged Strength, and +1 Prayer bonus, making them ideal if you want to have as much Ranged DPS as possible.
The Zaryte Crossbow can be equipped at 80 Ranged and is the strongest crossbow in Old School RuneScape. It sells for a crazy 400m or can be earned by using a Nihil Horn (dropped from Nex) on an Armadyl Crossbow.
Not only does it have a +110 Ranged Attack bonus, but it is one of the only weapons in the game that provides defensive bonuses and a +1 Prayer bonus.
What makes the Zaryte Crossbow so strong, on top of its bonuses, is that it has a special attack that doubles your accuracy and automatically triggers the special ability of the enchanted bolts you have equipped.
It also increases the effectiveness of all enchanted bolts’ abilities (i.e., Increasing the max hit of enchanted Diamond bolts from 115% to 126%).
Besides the Zaryte Crossbow, the Twisted Bow has long reigned as the most powerful weapon in the game. Earned as a reward from the Chambers of Xeric and currently selling for a whopping 1.6b on the Grand Exchange, it’s no secret why.
The Twisted Bow, requiring 85 Ranged to use, has a +70 Ranged Attack bonus and a +20 Ranged Strength bonus on top of any Ranged Strength bonuses added from your ammunition.
While that may not sound too impressive, the Twisted Bow also has a passive ability that increases its damage and accuracy based on how high a target’s Magic level is, making it incredibly strong against some of the hardest PvM content in the game (Raids, the Inferno, Corporeal Beast, etc.).
Other Gear to Consider
While upgrading your main Ranged gear is ideal as you progress your account, other Ranged-based items can be invested in to optimize your gear setup further.
Thankfully, most of them do not require any Ranged level to wear, so they can be used at any time.
Dwarf Multicannon
A staple to Old School RuneScape weaponry (and riots), the Dwarf Multicannon is a powerful passive weapon that can be placed and fired at nearby targets.
Able to be used after completing the “Dwarf Cannon” quest, it is incredibly useful to get through Slayer Tasks quickly, provide extra DPS for bosses, and many other scenarios.
Archer’s Ring/ Venator Ring
Two rings in Old School RuneScape provide additional Ranged bonuses. The first is the Archer’s Ring, dropped from Dagannoth Supreme and sold on the G.E for around 4m. While worn, it provides a +4 Ranged Attack and Defence bonus.
The Archer’s Ring can also be imbued through the Nightmare Zone, Soul Wars, or LMS to be turned into an Archer’s Ring (i), which doubles the bonuses to give you +8 Ranged Attack and Defence.
The Venator Ring is one of the four ancient rings that can be worn after completing the “Desert Treasure II—The Fallen Empire” quest.
It was created by combining an Archer’s Icon, a Venator Vestige, three Chromium Ingots, and a Ring Mould. The rings sell on the Grand Exchange for around 45m and provide a +10 Ranged Attack and +2 Ranged Strength bonus.
Barrows Gloves
While not specific to Ranged, Barrows Gloves can be earned after completing the “Recipe for Disaster” quest and provides a +12 bonus to all combat states (aside from Magic, which is a +6).
If you do not wish to invest in something like Zaryte Vambraces, Barrows Gloves are an excellent choice for any combat scenario.
Ava’s Attractor/Accumulator/Assembler
After completing the “Animal Magnetism” quest, you can start to unlock the different Ava’s Devices, all of which provide a small amount of Ranged bonuses.
More importantly, they have a chance to retrieve the ammunition you fired, allowing you to save on ammunition costs and prolong trips that heavily involve Ranged combat.
Dizana’s Quiver/ Blessed Dizana’s Quiver
The most recently released item at the time of this article, the Dizana’s Quiver, is a reward for completing the Fortis Colosseum and can be worn at 75 Ranged.
Not only does the Dizana’s Quiver give a +18 Ranged Attack and +3 Ranged Strength bonus, but it will allow you to store a stack of arrows and bolts at the same time, allowing you to quickly switch between using a bow and crossbow while saving inventory slots.
Dizana’s Quiver can be upgraded to the Blessed Dizana’s Quiver by using it on the Shrine of Ralos with 150k Sunfire Splinters. This will give you an additional +10 Ranged Attack and +1 Ranged Strength while worn.
That is how to upgrade your Ranged gear as you level in Old School RuneScape!
Do you have any input or suggestions for this article? Let us know in the comment section below.
Being the most commonly used combat style in Old School RuneScape, Melee involves getting up close and personal with whatever you’re killing, often while serving in a DPS or tank role.
Arguably being the cheapest form of combat, you don’t have to worry about wasting ammunition or runes, instead focusing on keeping your health and Prayer Points up while taking the brunt of enemy attacks.
Recommended Read: Old School RuneScape – Ranged Gear Progression
Whether starting against Level-2 C
Being the most commonly used combat style in Old School RuneScape, Melee involves getting up close and personal with whatever you’re killing, often while serving in a DPS or tank role.
Arguably being the cheapest form of combat, you don’t have to worry about wasting ammunition or runes, instead focusing on keeping your health and Prayer Points up while taking the brunt of enemy attacks.
Whether starting against Level-2 Cows or going against the bosses of the God Wars Dungeon, you will want to have the best gear possible to have efficient kills. However, the gear you will end up using will often change based on your levels and the type of combat you will be doing.
Melee gear progression in OSRS involves investing in either DPS-based or Tank-based gear. Players typically start with the standard metal armour, before breaking off into Void equipment, Barrows Gear, and Bandos at mid-levels, then finally obtaining Torva or Justiciar equipment when they reach the endgame. This doesn’t include earning a Fire/Infernal Cape, investing in the Fremennik/Ancient Rings, earning Primordial or Guardian boots, and getting a Dragon/Avernic Defender.
When you first complete Tutorial Island and look around at the different gear that people are wearing, the different amounts of gear setups and combinations can be intimidating. However, you will eventually get used to seeing the same types of armour and equipment in the same areas.
The important thing to note about using Melee gear is that they often fall under one of two categories: DPS and tank.
For most PvM and PvP scenarios, players wear DPS-based gear so they can deal as much damage as possible. This can range from completing Slayer Tasks to casual combat training to fighting other players in the Wilderness.
In cases where you are expected to be attacked by multiple enemies/ different attack types, wearing Tank-based gear is recommended.
This can include wearing gear like Justiciar against General Graardor, using Guthan’s to heal against high-level Slayer monsters repeatedly, or even using tank gear to defend against Pkers while training Prayer at the Chaos Altar in the Wilderness.
With that out of the way, we can start to discuss the gear available at different levels and where it could be applied.
Note: When referring to each level bracket, this refers to the average combat level bracket. However this can also be interpreted as a player’s Defence level, as that is the primary designator for what gear you can wear.
Levels 3-40: Fighter’s Torso, Standard Plate, Proselyte Armour
When beginning your combat journey, it is normal to start by going through the standard metal armour available in Old School RuneScape. From levels 1-40 Defence, you can start with Bronze armour, eventually capping out at Rune armour.
Note: The Rune Platebody can only be worn after completing the “Dragon Slayer” quest. However, the Rune Chainbody is still available.
Other than the standard metal armour, you can also wear Proselyte Armour, available after completing the “Slug Menace” quest.
Despite having relatively low requirements, Proselyte Armor is still used in high-level situations where players wish to increase their Prayer bonus as much as possible (often in Slayer Tasks when using Protection Prayers is a near necessity).
However, what is most notable at 40 Defence is the Fighter’s Torso, the third-best body slot item in terms of Strength bonus. While having decent defensive stats, it comes with a +4 Strength bonus, making it fantastic for DPS scenarios.
Note: While it is possible to wear Inquisitor’s armour with 30 Defence, you will also need 70 Strength to equip it, so it is not normally used until you reach a higher combat level.
In this combat bracket, weapons and other equipment slots are limited to regular Scimitars and kiteshields, but that quickly changes as you level up.
From combat levels 40-70, you soon unlock a few gear items that will continue to be used at higher levels.
Arguably, the most versatile at this bracket is Void Equipment, which greatly boosts accuracy and damage across all three combat styles. There is also a way to get Elite Void Equipment, increasing your DPS even further.
Starting at 60 Defence, you will also be able to wear both Obsidian and Dragon armour.
While some Dragon armour is considered useful (specifically the Boots, Platelegs/Plateskirt, Dragon Med Helm), Obsidian gear boosts your Strength skill, making it popular amongst Pure accounts.
More specifically, when you wear the Obsidian Helm, Platebody, and Legs, you have an increased 10% accuracy and damage when using Obsidian Weapons.
Once you reach 45 Defence and have completed the “Fremennik Trials” quest, you can wear the Fremennik Helms. For melee, the Warrior and Berserker Helm give additional bonuses to Attack and Strength.
This improves at 55 Defence when you unlock the Helm of Neitiznot after completing the “Fremennik Isles” quest.
For weapons, players around this bracket will start using the Dragon Scimitar (after finishing “Monkey Madness I”), the Abyssal Whip (with 70 Attack), and the different Slayer Weapons available at 55 Slayer.
With 65 Attack, you can also use the Viggora’s Chainmace, which is a popular item for players doing intense PvM activities in the Wilderness.
Levels 70-100: Barrows, Bandos, Fire Cape, Cerberus Boots
The combat level bracket of 70-100 is somewhat considered the “mid-game” of Old School RuneScape. At this time, you are getting more familiar with higher-level PvM activities.
You likely have base 70 or 80 combat stats and might even be close to earning your Quest Cape.
This is also the bracket where many better money-making methods become available, often through killing certain Slayer Monsters/Bosses or having non-combat skills become a high enough level to complete other skilling activities.
Therefore, it is safe to assume that most of the gear you wore during the previous brackets can be sold/upgraded to better your Melee progression.
If you haven’t done so, now is a good time to get a Fire Cape by completing the Fight Cave in TzHaar City.
While the Fire Cape doesn’t have any requirements to wear, fighting through 63 waves of powerful monsters, not including Jad at the very end, will require some combat experience and a decent gear setup.
The Fire Cape is the second-best Melee-based cape in Old School RuneScape. It provides excellent defensive stats and a +4 Strength bonus.
Once you reach 70 Defence, you can wear Barrows equipment. Originating from the six Barrows Brothers (and their associated minigame), each set has their own defensive bonuses and quirks that are worth using.
More specifically, Dharok’s and Torag’s armour is considered very tanky, while Verac’s armour provides decent defensive stats but an increase in Prayer bonus. Guthan’s armour is often used for its healing-set effect against targets that require you to heal often.
Even though they are considered mid-tier armour, Barrows gear is still used in plenty of high-level PvM activities, including at the God Wars Dungeon, the Corporeal Beast, and for Raids.
There is also a way to earn the armour yourself if you don’t want to buy from the Grand Exchange directly, or if you are an Ironman account.
The Bandos Chestplate is a major step up from the Fighter’s Torso. The BCP, along with the Bandos Tassets, is some of the best Melee armour in Old School RuneScape, and it is available to equip at 65 Defence.
Dropped from General Graardor and his minions in the God Wars Dungeon, the Bandos Chestplate and Bandos Tassets often sell for around 30m a piece.
However, they provide a significant increase in defensive bonuses, giving a base +160 all-around melee defensive and +6 Strength when worn together.
While you can still use Dragon/ Bandos Boots at this bracket, you can also consider getting Primordial Boots or Guardian Boots, which each provide the best-in-slot Melee Strength and Prayer bonus in the entire game, respectively.
Primordial Boots require 75 Strength and Defence to equip and can sell for around 34m on the Grand Exchange. Guardian Boots only require 75 Defence to wear and usually sell for around 5m.
As for your helm slot, you may consider upgrading to a Neitiznot Faceguard or even investing in a Serpentine Helm.
The Neitiznot Faceguard requires 70 Defence and completion of the “Fremennik Exiles” quest. However, it provides the highest Melee Strength bonus of any helmet in the game, at +6.
The Serpentine Helm, requiring 75 Defence to wear, is unique in that it comes with several additional properties.
When charged with Zulrah Scales, it will not only make you immune to poison and venom effects but also have a chance of inflicting venom on your opponent.
This makes it useful for situations where you are fighting multiple enemies at once or if you are going against venom-based bosses like Zulrah or Vorkath.
To upgrade your weapon and off-hand slot in this bracket, you should work to unlock the Dragon Defender and invest in a strong accuracy-based weapon like a Ghrazi Rapier or Zamorakian Spear/Hasta.
The Dragon Defender is relatively easy to obtain and is one of the best off-hand items you can use when fighting in a DPS role. Excelling in providing additional Strength bonuses, it can be used in nearly every combat scenario.
While using a weapon like an Abyssal Whip is still viable in this bracket, you can save to obtain a Ghrazi Rapier or Zamorakian Spear/Hasta if you want to take things further.
The Ghrazi Rapier requires 80 Attack to wield, but it is one of the most accurate weapons in the game, allowing you to take on most enemies by yourself.
As for the Zamorakian Spear/Hasta, while it is often used in more niche scenarios, it can be handy when fighting against opponents who are vulnerable to the Stab attack style (the latter is also a lot cheaper than the former, going for around 15m on the Grand Exchange as opposed to 55m).
Once you reach the endgame of Old School RuneScape, you will find yourself taking on the toughest bosses in the game and possibly doing intense PvP activities where having the best gear is essential.
By this point, you may have earned the Quest Cape, you are well experienced with most bossing/Raiding activities, and you are starting to finalize your bank with all the essential gear you desire.
The best melee armour in Old School RuneScape is Torva armour, earned as a drop from Nex in the God Wars Dungeon.
Requiring 80 Defence to wear, Torva armour provides the strongest Strength bonuses in the entire game, providing a minimum +250 defensive bonus to all combat styles (besides Magic) and +18 Strength.
Also the most expensive armour in Old School RuneScape, the complete set (Helm, Platebody, Platelegs) can cost over 1b (yes, 1 billion) on the Grand Exchange.
Aside from Torva, Justiciar armour is also well-suited for players taking on PvM content. Requiring 75 Defence to equip, it even surpasses Torva armour in terms of defensive bonuses, giving a minimum of +270 to all defensive stats.
Justiciar is also popular due to its incredible Prayer bonus, which provides a total of +10 Prayer when worn together.
Justiciar armour also comes with a set effect that helps negate damage taken when the full set is worn completely, making it the perfect tank-based set in Old School RuneScape.
Both Torva and Justiciar are considered the best armour sets in OSRS and are always considered when playing endgame content.
The Dragon Defender can also be upgraded to the Avernic Defender by using an Avernic Defender Hilt.
Earned as a drop from the Theatre of Blood or bought from the Grand Exchange for around 65m, this is the best off-hand item for melee DPS, as it provides an additional +8 Strength bonus.
Other than using a defender, for a more tanky approach to melee gear progression, you can invest in a Dragonfire Shield or even an Elysian Spirit Shield.
Each provides some of the best Melee and Ranged defensive bonuses in OSRS. Both shields require 75 Defence to equip, but they are well worth it when trying to fight bosses that are known to hit well through high-defensive gear (e.g., the Corporeal Beast, the GWD bosses).
The best Melee cape is the Infernal Cape, earned by completing the Inferno, the toughest PvM challenge in the game.
After fighting through 69 waves of enemies, including defeating Zuk at the end, you will have a cape that provides base +12 defensive bonuses to all combat styles, including a +8 Strength and +2 Prayer bonus.
Other Items to Consider
While most Melee gear progression involves upgrading your armour/weapon/shield slots, there are other items that you can consider to make the most of your combat gear.
Two Fremennik rings, the Berserker and Warrior Ring, give additional boosts to melee combat. Each is earned as a drop from the Dagannoth Kings on Waterbirth Island.
Giving additional bonuses to Strength and Attack, respectively, they can also be imbued through the Nightmare Zone, LMS, or Soul Wars to double their bonuses to +8 Strength and +8 Attack.
Stepping up from those rings are the Ultor and Bellator Rings, two of the Ancient Rings created with materials from the “Desert Treasure II” bosses.
The Ultor Ring and Bellator Ring are the best-in-slot melee rings in Old School RuneScape. The Ultor Ring provides a +12 Strength bonus, while the Bellator Ring gives a +6 Strength and +20 Slash bonus.
However, they each sell for around 180m and 45m on the Grand Exchange and require completion of the “Desert Treasure II” quest to wear.
When considering which gloves to use for melee combat, Barrows Gloves are an easy choice.
Earned as a reward for completing the “Recipe for Disaster” quest, they provide base +12 defensive bonuses to all combat styles (Magic is +6) and +12 Strength.
Barrows Gloves can also be upgraded into Ferocious Gloves by using a price of Hydra Leather on them. These gloves require 80 Attack and Defence to wear and completion of the “Dragon Slayer II” quest to create.
Instead, they provide +16 offensive melee bonuses and +14 Strength, making them best-in-slot for melee DPS.
For your necklace slot, the Amulet of Fury and Amulet of Torture are the best necklaces for melee combat.
The Amulet of Fury provides all combat styles a +10 offensive bonus and a +15 defensive bonus. It also gives a +8 Strength and +5 Prayer bonus, making it a fantastic item to wear for all-around combat.
The Amulet of Torture, on the other hand, is DPS-based, providing a +15 offensive bonus to melee stats, +10 Strength, and +2 Prayer bonus, making it the best-in-slot necklace for Melee combat.
This is how to progress your Melee gear in Old School RuneScape!
Do you have any input or suggestions for this article? Let us know in the comment section below.
Hearts of Iron 4 has a lot of hidden mechanics that most players have either never seen or never used. The Floating Harbor is one of these unique things that you can ask players with over one thousand hours about and still get confused answers.
Though the Floating Harbor isn’t one of the most useful pieces of equipment in the game, it is still something that can make a huge difference if you play your cards right.
Recommended Read: Hearts of Iron 4 – Navy Guide
The Floating Harbor is
Hearts of Iron 4 has a lot of hidden mechanics that most players have either never seen or never used. The Floating Harbor is one of these unique things that you can ask players with over one thousand hours about and still get confused answers.
Though the Floating Harbor isn’t one of the most useful pieces of equipment in the game, it is still something that can make a huge difference if you play your cards right.
The Floating Harbor is a special piece of equipment that acts as a Supply Hub when landing a Naval Invasion.
To use a Floating Harbor, you need to press the Naval Invasion Order (With Floating Harbor support) button that appears when you select an army and then just go through with a normal Naval Invasion. To press the button, you first need to build at least one Floating Harbor ship.
Before we go into how to use the Floating Harbor, let’s first talk about how to actually get it.
First of all, you’ll need to complete the second naval transport research tech, the Landing Craft. This will improve the capacity for Naval Invasions while also unlocking the Floating Harbor.
Then, open up the Production menu and select to build ships. The Floating Harbor should be at the top, right below Convoys. Set up a production line for it, assign some Naval Dockyards, and wait for at least one to pump out.
What Is a Floating Harbor?
The Floating Harbor is a special ship in HOI4, only available with the No Step Back DLC, that can be used to initiate a special type of Naval Invasion order.
The Floating Harbor will deploy alongside the Naval Invasion, creating a Supply Hub where the troops landed.
This Floating Harbor Supply Hub will last for 30 days, during which your divisions will have full supply and can fight as long as they can, even though they lack a connection to a port or the capital of your country.
Once the 30 days have passed, the Floating Harbor will get destroyed and you will now have to reach a real hub or port to get supplies for the divisions.
How to Use the Floating Harbor in HOI4
To use a Floating Harbor in HOI4, you will need to select an army and press the button right next to the Naval Invasion order, which shows almost the same but has a chest on water sign with an arrow rather than an anchor with an arrow.
Do the exact same thing you would do when launching a naval invasion:
Left-click on the province where you want your troops to leave from.
Right-click on the enemy province where you want your troops to land.
Activate the execution of the plan.
The naval invasion won’t launch unless you have:
50% Naval Supremacy in all sea regions where the troops will have to navigate.
Enough Convoys to carry the troops.
Enough Naval Invasion Capacity.
Once everything is right, your troops will sail to reach their destination, fight enemy divisions, if there are any in the selected provinces, and land.
The Floating Harbor will be visible on the water, right next to the troops, and you can now see a Supply Hub on the map where a port would normally be.
Open the Supply mapmode to see the Floating Harbor Supply Hub and hover over it for more details. There is also a cheesy strategy that you can use to make the Floating Harbor last longer.
How to Prolong a Floating Harbor’s 30-day Timer
If you didn’t know this, you can actually send Naval Invasions in your own territories, as long as they are occupied provinces. This means that you can set up another Floating Harbor Naval Invasion in the territories you currently have your troops.
When those new divisions land alongside your other marines, the Floating Harbor Supply Hub’s 30-day timer will reset, allowing you another extra 30 days to keep your troops supplied.
The only thing that you will lose doing this is Floating Harbors, as you instantly lose one once a Naval Invasion Order with Floating Harbor support has been sent out to fight.
This is one of the best ways to attack countries in territories without ports, since those are usually undefended and easy pickings, allowing you to push back through their country and finally actually capture a port from the inside.
That’s everything you need to know about how to use Floating Harbor in Hearts of Iron 4!
Have any input or suggestions for this guide? Let us know in the comment section below.
Though most players tend to think only about land battles, naval warfare in Hearts of Iron 4 is also extremely important. Knowing how to control the seas is a huge part of the game, as you will otherwise never defeat countries like the United Kingdom or Japan.
However, there are many who have managed to win World War 2 many times and still have no idea how navies work. The main reason why nobody really knows how to use them is because they always get new updates that change how they operate.
Luckily, things seem to have settled down lately and the strategy to win using them is always the same, no matter what country you choose.
So, in this guide, we will talk about everything related to navies in Hearts of Iron 4: research, naval combat, ship types, how to set up a fleet, doctrines, and how to win every battle that your boats will participate in.
We can’t talk about the navies in HOI4 before exploring and explaining the Naval Research category. The first thing you will find when opening the research tree will be a lot of hulls.
Hulls are the base of a ship. They are the base that will be used to put guns, engines, and many other important parts on the ships that you will design.
So, what you unlock here is just a big piece of a larger puzzle that won’t work until you put all the necessary upgrades on it.
The main things that evolve with each technological upgrade for a hull are speed, reliability, and range. The only problem is that their production cost will increase.
The upgrades under the Destroyer hulls that follow them with each upgrade are called Depth Charges, and they help in dealing damage to Submarines.
These will usually be very useful additions to convoy escorts that need to defeat the raiding Submarines destroying your whole supply of Convoys.
Under the Cruiser hull tech, you will find a list of Armor upgrades. Generally, avoid researching these unless you really want to make your Battleships extremely sturdy.
Their speed debuff will usually cause problems for the ships and the rewards are just not worth the cost.
A vital upgrade will be the one under Submarines, which are available around 1940, which lowers the visibility of subs. This will be extremely important, so get them as soon as possible if you use subs often.
Naval Support
The Naval support research category exists purely to make your ships better and naval combat to go smoother for your side.
The Armaments sub-category is the guns that you can put on your ships. All of the hulls you researched beforehand are useless unless you get some good batteries to put on them.
Torpedoes are special upgrades that will allow your ships to deal critical damage to Battleships and Carriers.
The Fire Control tech is extremely valuable, and you should always research it when possible since it just gives a flat bonus to all attack stats for all the fleets in your navy.
Transports will also be vital if you plan on doing naval invasions. Even if you think you’re never going to do them, it’s still a better idea to get the tech than to reach the moment when you need to use them and don’t have the necessary research.
The Mine Warfare upgrades are decent. You’ll likely only need the main line ones that increase mine damage since you don’t really want to waste slots on putting minelaying upgrades on your ships.
How Does Naval Combat Work in HOI4?
In HOI4, naval combat isn’t as common as land battles.
The main reason is that you will have to plan for them accordingly for a long time, and a big confrontation between fleets will usually result in almost total destruction of one of the sides.
Otherwise, you will spend most of the time fighting to destroy Convoys or to protect troops doing a naval landing.
When two enemy fleets find each other, they will start engaging. There are 4 lines where the ships can take their positions:
Screening Group
Battleline
Carrier Group
Submarine Wolfpack
When battle starts, based on their speed and who spotted who, the ships will quickly move to get in position while the battle starts.
The ships will attack each other for a while until one side realizes that it will lose, so they will attempt to retreat.
During the retreat phase, the losing army will lose most of its navy as the pursuing navy will do its best to leave no ship standing.
Screens
The Screening Group, also commonly known as Screens, are made out of Destroyers and Light Cruisers, and their main role is to protect all of the heavy hitters from enemy fire.
Since they’re fast and resistant (with the right design), they go in the front and bear the full force of the enemy fleet.
They usually have enough speed to retreat when they take too much damage, which allows other screens to take their place in the frontlines.
They work very much like a shield for the whole navy since otherwise, the torpedoes used by the enemy fleet would tear through the heavy ships.
There is a stat that tells you exactly how well the screens are doing their job, called Screening Efficiency. The main reason why Screening Efficiency is very important is because it directly lowers the chance that torpedoes will hit your backlines.
A torpedo has a 100% chance of hitting when it fires, which is lowered by the Screening Efficiency. Each Battleline and Cruiser Group ship will need at least 3 screens.
This means that a fleet with 3 Heavy Cruisers and 1 Carrier will need 12 screens to be fully protected from the menace known as torpedoes.
Generally, they are the most important part of any fleet, and since they are easy and quick to produce, most players only concentrate on building them throughout the game. This is usually the strategy for any single-player game since the starting fleet for powerful countries is more than enough.
Usually, the Destroyers exist to take the damage while the Light Cruisers fight the enemy’s screen and try to take it down to get to the weaker backline.
Screens usually use Light Guns, which deal damage to the first non-occupied line in front of them.
Battleline
The Battleline is directly behind the Screening Group and their main role is to deal damage. They aren’t generally made to withstand attacks, and they are very vulnerable to torpedoes, which is why the Screens are so important.
Part of the Battleline are the Battleships and the Heavy Cruisers. Their main role is to deal the most amount of damage to both the Screens and the enemy Battleline, as they can get the largest amount of guns on top of them.
Battleline ships usually use Heavy Guns, which deal damage to the first two non-occupied lines in front of them. This normally means either the Screens and the Battleline or the Battleline and the Carriers.
Carriers
The Carrier Group is the furthest away from the battle, with ships such as the Carriers and Convoys. The purpose of this line is to attack the ships without actually getting hit by the opposing navy.
Since Carriers usually hold a lot of planes, their purpose is to survive while the bombers on top of them deal heavy damage to all the ships that are taking part in the battle.
Because they’re the furthest from the battle, they are protected by both the Screens and the Battleline when it comes to torpedoes, which would deal incredible damage if they managed to get through.
Submarines
The Subs have their own special line, which is under all of the others, that can be attacked using Depth Charges if you first manage to find them.
How to Set Up a Fleet
There is only one correct way to set up your fleet in HOI4, and that is to stack all of your ships into one single, huge task force.
Though the “smarter” way would be to make special fleets that each have its mission, you would generally be a lot better off by just putting all of your ships in a single giant fleet.
Since one battle in HOI4 will instantly decide if you’ve lost all your fleet or not, it’s better to make sure you can always win these kinds of fights.
Otherwise, you will likely get destroyed as a random fleet finds your smaller ones and instantly comes in full force to destroy you.
The only other fleets you might want to set up are convoy raider submarines since they are incredibly annoying and can destroy countries, and minelaying destroyers/subs, just to get an advantage in certain regions where you know you will have to fight at some point.
Otherwise, use a single ship to patrol the waters where you want total supremacy and set all of the deathstack fleet on the Strike Force command. This means that they will instantly join in the fight when someone finds enemy ships in the naval region.
Also, a very important piece of advice, never delete ships! Even if they’re the worst ships in the world, they will be very useful in the huge battle you will have with your main enemy.
Since the main goal of a navy is to win one single game-deciding battle, every ship will count.
In the worst case, you can just refit them to fit your needs better and find a use even for the early hulls pre-WW2.
Naval Doctrines
There are three naval doctrines that you can choose from:
Fleet in Being
Trade Interdiction
Base Strike
The Fleet in Being doctrine focuses on making your ships better in battles. This means that they will get the necessary bonuses to excel in the occasional naval fights that happen in HOI4.
If you don’t have a reason to do something different, always choose this doctrine!
The Trade Interdiction doctrine is useful for harassing enemy countries’ Convoys. If you want to stop their supply of resources and likely ruin their land armies, Trade Interdiction is a really good choice.
However, this should only be chosen if you are a minor country without a real navy.
Never choose Base Strike. It helps you improve Carriers, which aren’t really the ships that win you battles. Just avoid this doctrine at all costs. It’s the equivalent to Mass Assault for ships.
How to Always Win Naval Battles
So, first of all, set up a huge fleet with all of your ships. There’s no other way to do this. Then, make sure to invest in the Fleet in Being doctrine. As specified earlier, this is the only one that will help you win wars.
If you started as a country with a great navy from the start (UK, US, France, Italy, or Japan) then you will only have to produce Destroyers and maybe Light Cruisers the whole game.
This way, you can make sure your huge fleet always has 100% Screen Efficiency and that it is protected in all battles.
Then, set up your fleet in three important naval regions on Strike Force. This will increase your intel in the region and give you naval supremacy, protecting you from any kind of annoying naval invasions.
Once you feel like you have enough intel in the region, you can send one or two destroyers to patrol in the region, trying to find enemy fleets.
This will usually result in them finding someone, moment when your huge fleet will come to destroy anything standing in their way.
Generally, it is best to avoid naval battles since you never know what can happen. The major powers all have huge navies with similar capabilities, and there is no way to predict how the battle will go. It’s basically a 50/50 toss.
Your main goal will always be capitulation, so try to launch naval invasions or just protect yourself from them.
You don’t even need to engage to do this, as the Strike Force command will assure naval supremacy while also generally avoiding battles.
That’s everything you need to know about how navies work in Hearts of Iron 4!
Have any input or suggestions for this guide? Let us know in the comment section below.