I need to be honest with you right from the start – Mewgenics is absolutely unhinged, and I mean that as the highest compliment I can give. Edmund McMillen and Tyler Glaiel have crafted something that sounds completely ridiculous on paper: a tactical RPG mixed with cat breeding simulator wrapped in roguelite mechanics. Yet somehow, this bizarre combination works far better than it has any right to.
After sinking about 35 hours into building mutant cat armies, I’m still discovering new mechanics and laughing at the sheer absurdity of it all. This isn’t your typical strategy game – it’s a weird, gross, surprisingly deep experience that manages to balance juvenile humor with genuinely complex tactical gameplay.
The Core Loop: Breeding Warriors and Watching Them Fight
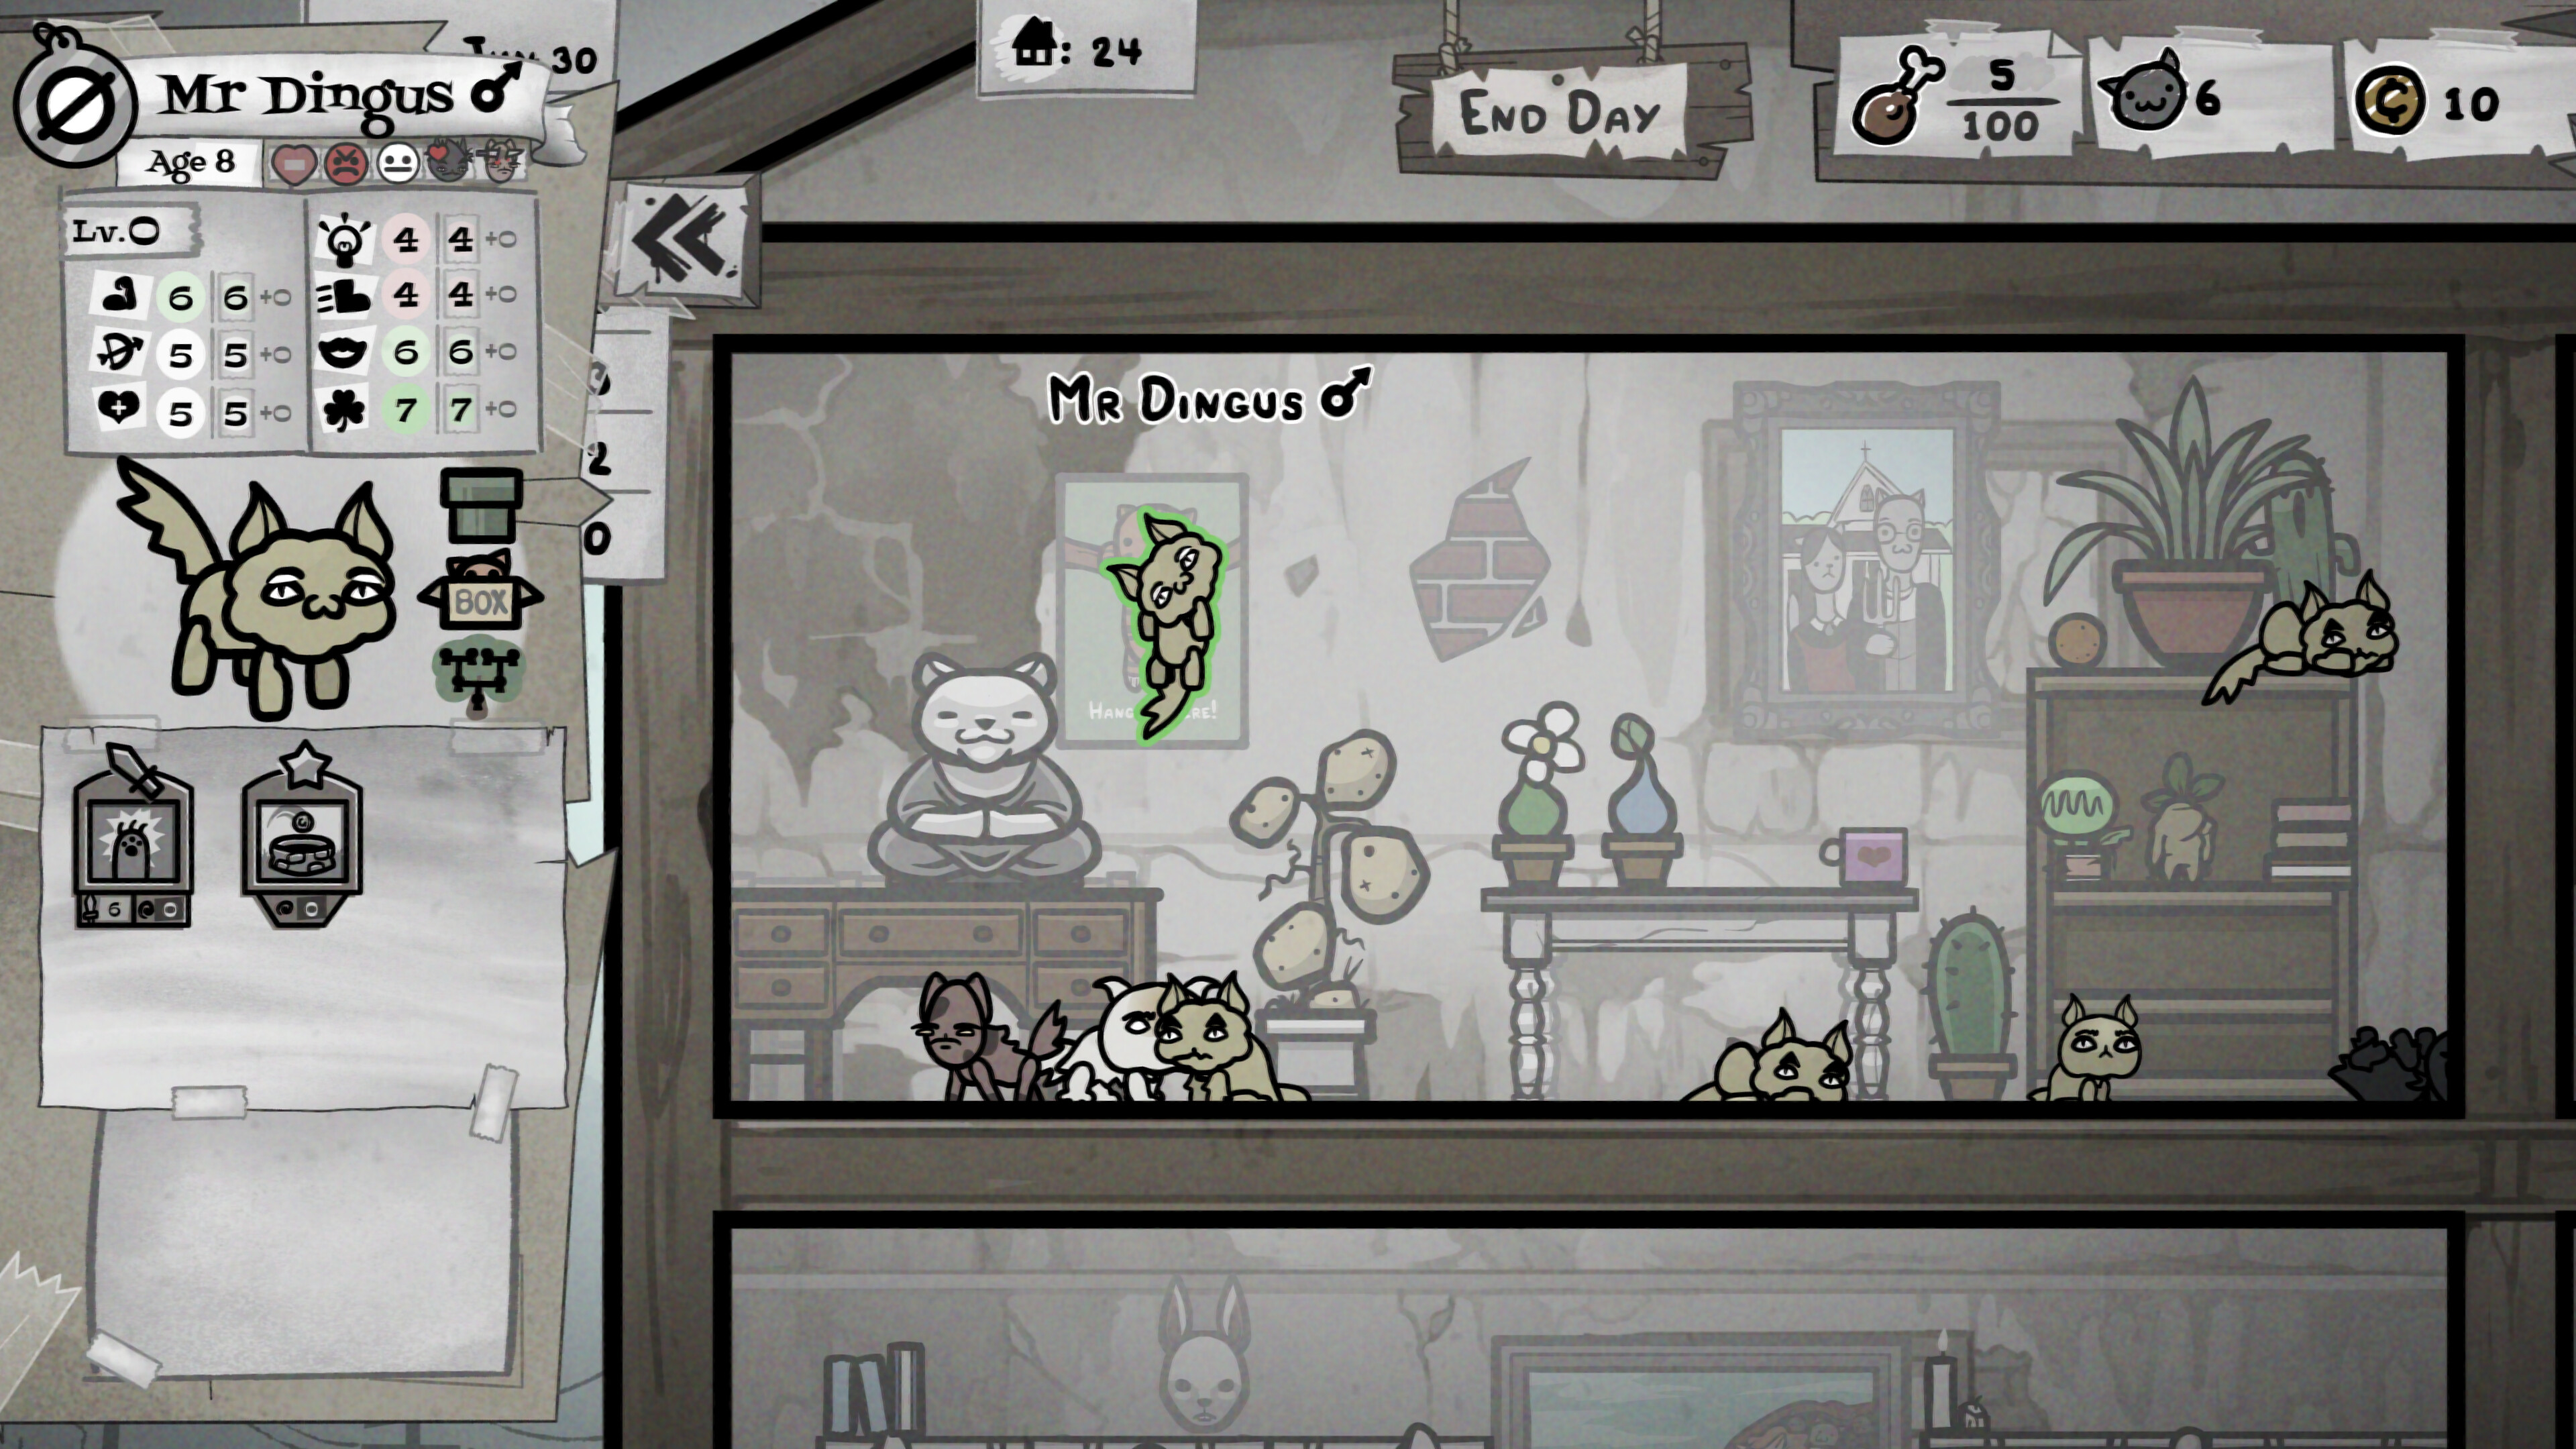
Here’s how Mewgenics works at its most basic level. You manage a house full of cats who breed to produce new generations of fighters. These cats go on turn-based tactical adventures across three acts, battling through areas like alleys, sewers, deserts, and boneyards. Once a cat completes a run, they retire from combat duty and become dedicated to making more kittens. It sounds simple, but there’s massive depth hiding beneath this structure.
Combat happens on 10×10 isometric grids where positioning matters, environmental effects can completely change your strategy, and every action has consequences. Your cats have equipment slots, class-specific abilities determined by collars they wear, passive traits that can fundamentally alter how they function, and stats that influence everything from damage output to how likely they are to succeed at random events.
What sets Mewgenics apart from other tactics games is the sheer freedom it gives you. You can use almost any ability on allies or enemies. Got a skill that confuses a character but buffs their strength? Use it on an enemy to make them attack themselves, or risk using it on your own tank to deal massive damage if the confusion roll fails. Skills that petrify can protect your cats from incoming attacks or lock down dangerous foes. This flexibility creates scenarios I’ve never seen in other tactical RPGs.
The environmental systems add another layer of chaos. Puddles conduct electricity, grass can be frozen into damaging spikes, desert heat prevents natural healing between battles unless you have water-based abilities. I’ve had fights completely turned around by random lightning strikes during storms or rubber tire obstacles bouncing around the battlefield. The game constantly throws curveballs at you, and learning to adapt on the fly is essential.
Breeding Mechanics and Long-Term Progression
Between runs, you’re managing your cat house and hoping the right pairs breed to create superior offspring. You can’t directly control who mates with whom – instead, you influence breeding through furniture that affects house stats like comfort and stimulation. Too little stimulation and cats might fight each other instead of breeding. Make the house too unappealing and quality strays won’t show up at your door.
The randomness here is simultaneously frustrating and delightful. I’ve spent entire evenings trying to breed the perfect tank bloodline, only to end up with a bunch of half-cleric-half-fighter hybrids instead. But sometimes these accidents turn into happy surprises, like when I got a cat with incredible charisma and defensive stats who became an unkillable support unit.
Mutations add even more unpredictability to the breeding process. These genetic quirks provide mixed bonuses and penalties – my favorite was a mouth mutation that gave gills, providing constant health regeneration while wet. Combined with water-based abilities, this became incredibly powerful in certain environments. The game encourages experimentation and embracing the chaos rather than trying to perfectly min-max everything.
One minor frustration I’ve encountered is the cat management interface. Once your house fills up with dozens of cats across multiple generations, sorting through them to find specific traits or stats becomes tedious. I wish there was better filtering to highlight cats I need for particular runs rather than clicking through each one individually. It’s a small complaint in an otherwise excellent system, but it does slow down the pace between adventures.
Combat Depth and Class Combinations
The class system offers incredible variety through collar assignments. Tanks absorb damage and control space, necromancers summon minions and leech life, druids shapeshift into different forms, clerics heal and support. Each class has distinct ability trees that you build through level-ups after every battle, and the random nature of which abilities appear keeps each run feeling fresh.
What really makes combat shine is discovering broken ability combinations. I had a fighter with a passive trait that gave extra turns after killing enemies face a boss that split into multiple smaller units. I watched in amazement as he autonomously took eight consecutive turns, mowing through the entire enemy formation. Another time, I created a necromancer build that could multiply leech effects across the entire battlefield, dealing hundreds of damage per turn to enemies with barely 50 health.
The game actively wants you to break it. With around 1,000 items and countless ability combinations, finding overpowered synergies is part of the fun rather than something to avoid. That said, death is always lurking nearby. Cats can permanently die if their corpses get hit three times while downed, taking their equipped items with them. The brutality keeps you engaged even when you think you’ve created an unstoppable team.
The Edmund McMillen Aesthetic
You can’t talk about Mewgenics without addressing its distinctive style. This game features copious amounts of poop, weird mutations, gross-out humor, and sexual content that some players will find off-putting. It’s the same aesthetic McMillen brought to The Binding of Isaac, just applied to cats instead of crying children in basements.
Personally, I find the humor juvenile but charming in its commitment to being ridiculous. Ability descriptions that just say “he go” for movement, the absurd boss designs, the random events that can give your cats parasites or disorders that make them eat poop – it’s all so deliberately over-the-top that it loops back around to being funny. Your tolerance for this style will significantly impact your enjoyment of Mewgenics.
Verdict: A Weird Masterpiece of Strategic Chaos
Mewgenics isn’t for everyone. The learning curve is steep, the humor is polarizing, and the randomness can feel overwhelming at first. But if you embrace the chaos and dive into its systems, you’ll find one of the most unique tactical RPGs in recent memory.
The combination of meaningful tactical decisions, long-term breeding strategy, and absurd humor creates something special. I’m 35 hours in and still encountering new enemy types, items, and mechanics. McMillen estimates there’s 200 hours of content here, and I absolutely believe him.
This game rewards experimentation, adaptation, and creativity rather than perfect execution of optimal strategies. Every run tells a story – sometimes of triumph, sometimes of hilarious disaster. That’s exactly what makes Mewgenics so compelling. It’s messy, chaotic, occasionally frustrating, and absolutely brilliant.
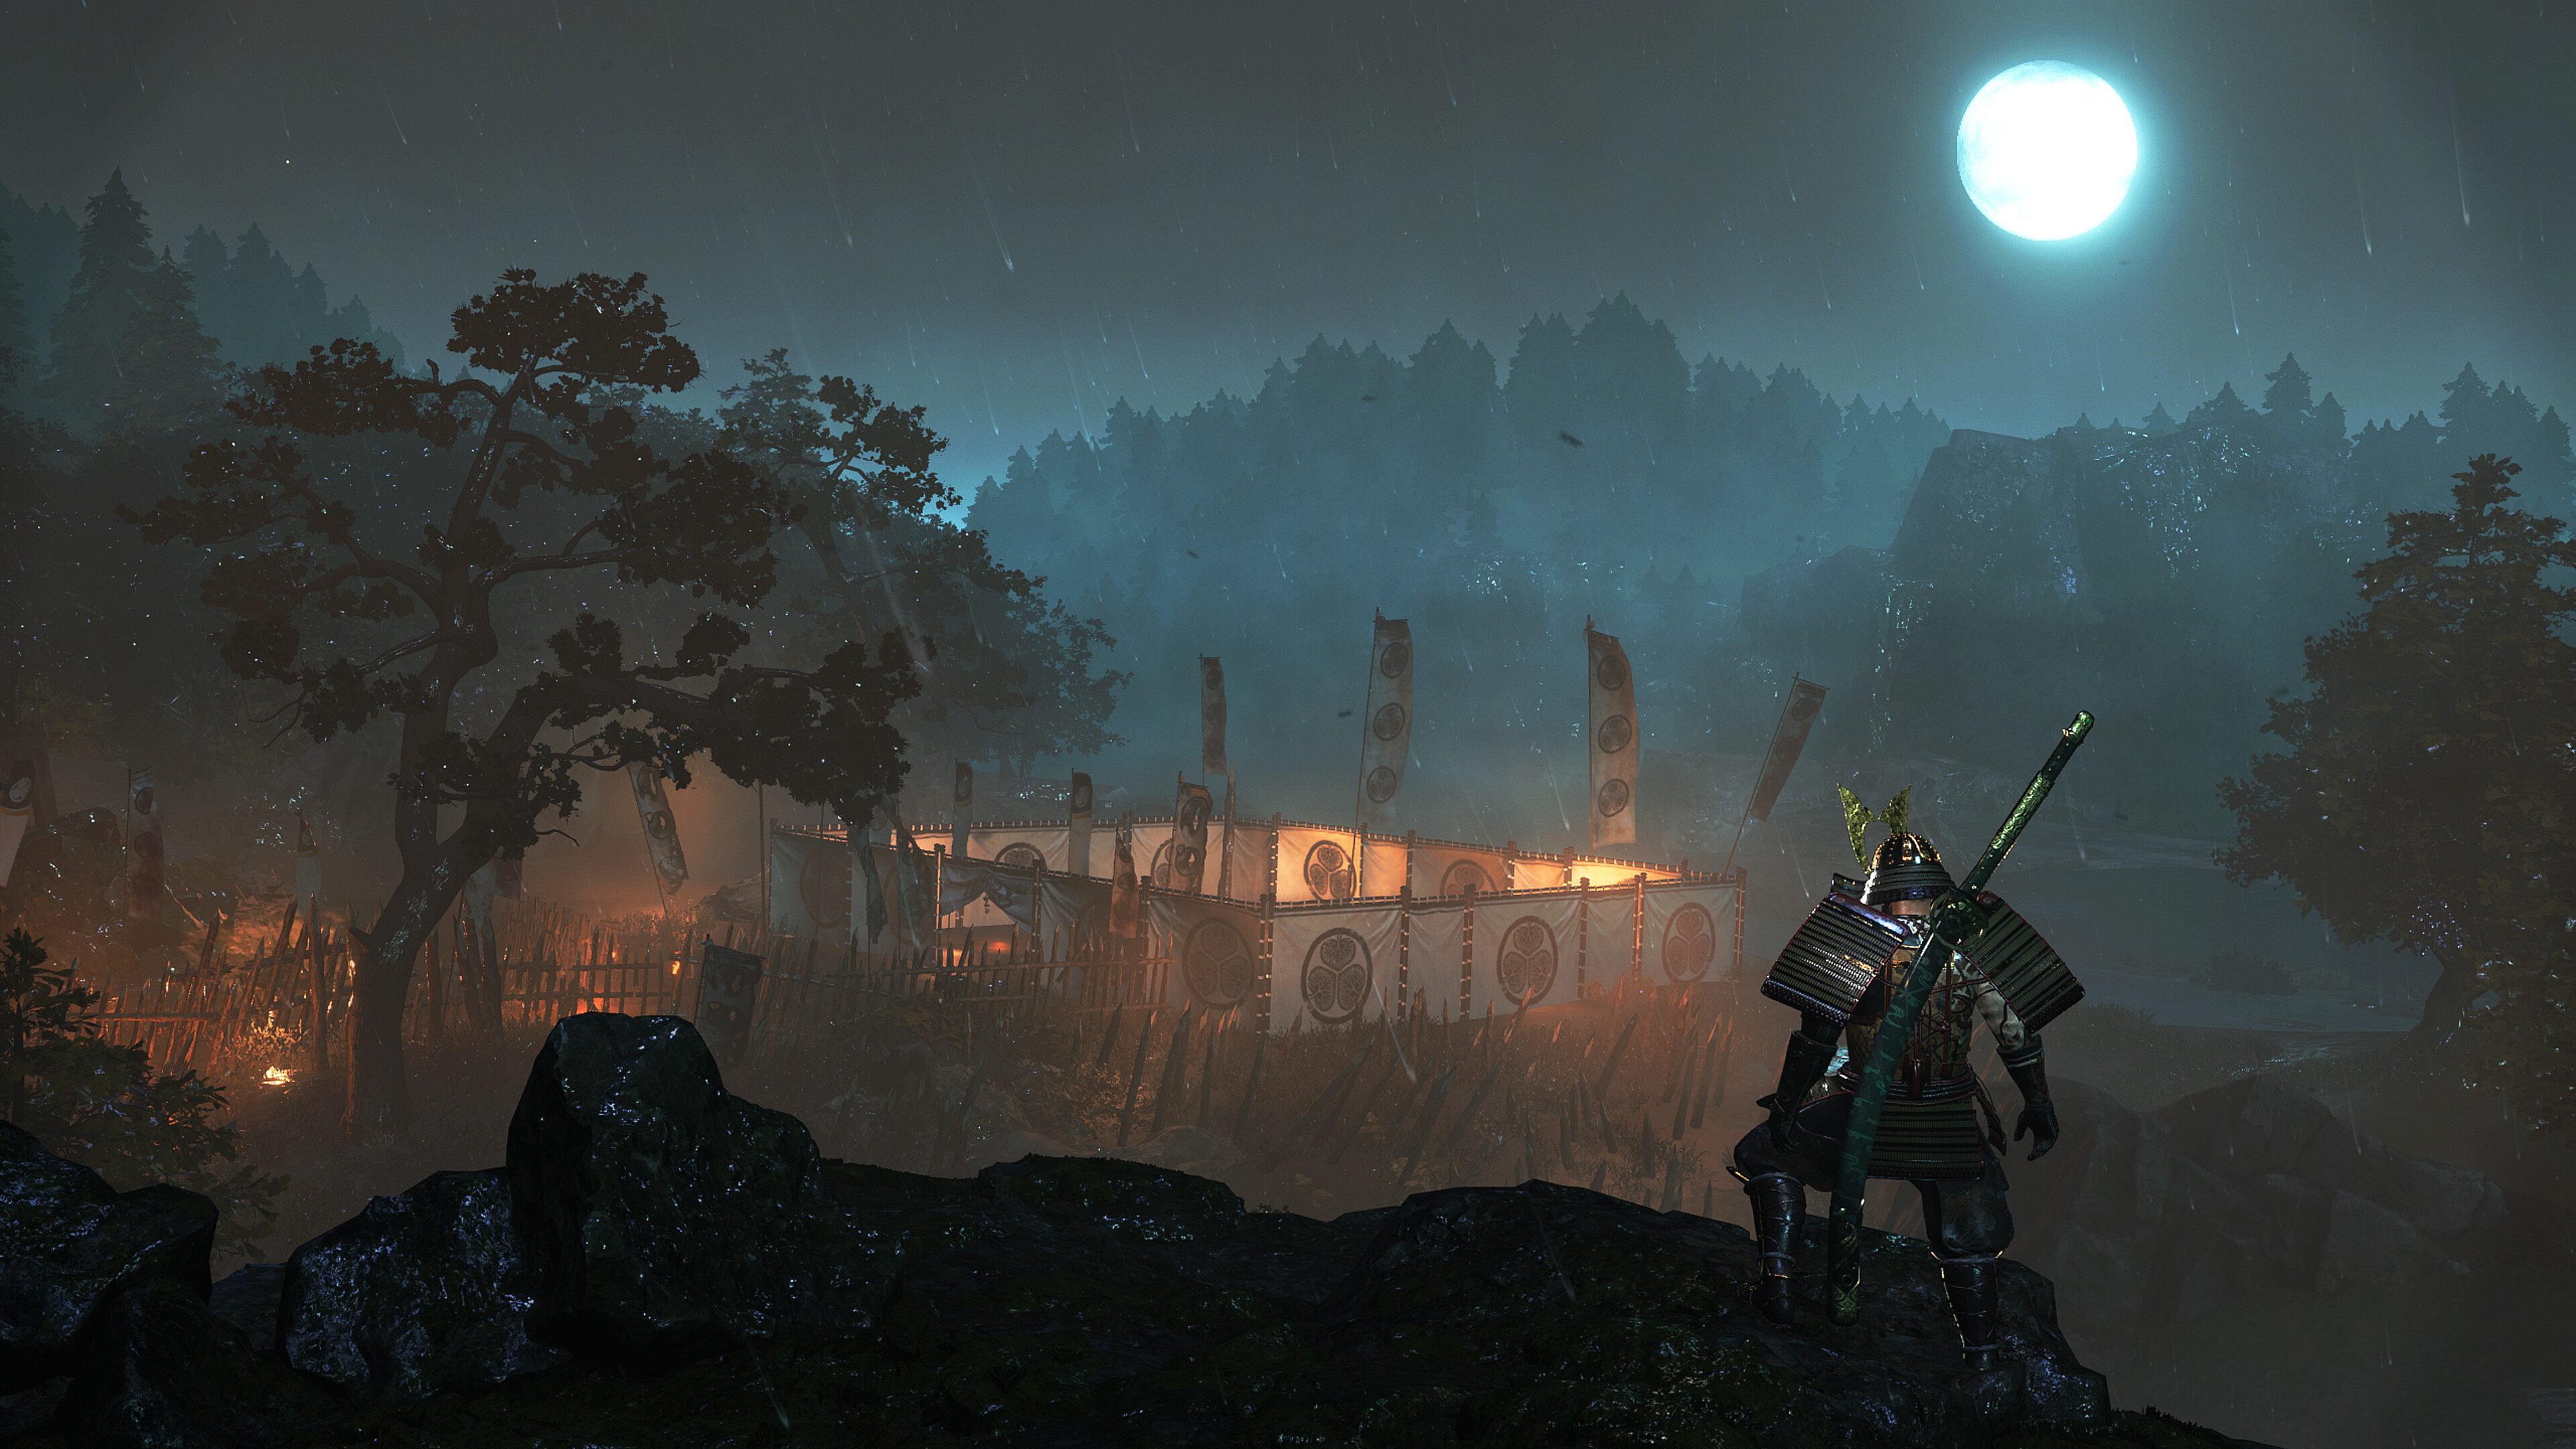
Beating Nioh 3’s main story unlocks Shogun’s Journey, the New Game Plus mode transforming your playthrough with tougher enemies, Divine rarity equipment, Grace sets, and powerful endgame systems designed for build perfection. Understanding what carries over, how Divine gear works, the restoration mechanics using Sands of Recollection and Scarlet Sands, Soul Core transformation options, Sudama Blessing for targeted farming, and preparing for the dramatic difficulty spike separates casual completionists from dedicated endgame grinders. This comprehensive guide explains how to unlock Shogun’s Journey, what transfers to NG+, Divine rarity weapons and Grace sets, all restoration systems, and optimal preparation strategies.
How to Unlock Shogun’s Journey New Game Plus
Shogun’s Journey unlocks automatically after defeating the final boss across all four time periods in Nioh 3. Once you clear the campaign, a pop-up notification confirms Shogun’s Journey is available. Access it anytime by opening your map and pressing L2 to select between Heir’s Journey (your original save) and Shogun’s Journey (New Game Plus).
Your original Heir’s Journey save remains intact and accessible, allowing you to switch freely between difficulties without losing progress. This lets you farm easier content in Heir’s Journey or revisit uncompleted collectibles before diving into Shogun’s Journey’s heightened challenge.
When starting Shogun’s Journey, the game offers to skip the introductory Edo period prologue, jumping directly to Escape from Hitokoto Slope in the Warring States era. This skip saves approximately thirty minutes for players who completed the prologue during their first playthrough and want immediate access to open field exploration.
What Carries Over to New Game Plus
Shogun’s Journey carries over everything meaningful from your first playthrough, ensuring you enter the harder difficulty with all hard-earned progress intact. Your character level, stat distribution, equipment loadout, Soul Cores, Guardian Spirits, unlocked skills, and Amrita all transfer directly.
Exploration Level progress carries over completely, meaning regions where you achieved Exploration Level 4 retain that status in Shogun’s Journey. Fast travel to previously unlocked shrines becomes available immediately, and Kodama you found during Heir’s Journey remain collected, maintaining your increased Elixir count. This eliminates tedious re-exploration for basic collectibles and lets you focus on new challenges.
All equipment including weapons, armor, accessories, and Soul Cores transfers to Shogun’s Journey. Your optimized build from the first playthrough provides the foundation for tackling tougher enemies right from the start. Blacksmith services remain accessible with all previously unlocked features, and your crafting materials carry over for immediate gear upgrades.
Battle Scroll missions unlock as you progress through the story again, with some training missions like Warrior, Ninja, and Onmyo becoming immediately available. However, rewards for these missions change to scale with Shogun’s Journey difficulty, providing Divine gear instead of Exotic rarity.
Certain progress does not carry over, creating fresh challenges. Main story missions must be completed again to unlock subsequent regions. Bodhisattva statues require re-activation by praying at them. NPC-related Myths like Fated Land and Abundant Evil reset and need completion again, though their objectives remain identical.
Divine Rarity Equipment and Grace Sets Explained
Divine rarity represents the new equipment tier exclusive to Shogun’s Journey, surpassing Exotic as the highest loot quality available. Divine weapons and armor feature green text coloring by default and unlock after defeating the final boss, with the first Divine drops occurring during the post-credits loot collection.
The defining feature of Divine equipment centers on randomized Grace effects replacing or supplementing traditional armor set bonuses. Grace sets function similarly to armor sets but activate when equipping multiple pieces sharing the same Grace regardless of specific item names. This flexibility enables mixing different armor pieces and weapons under one Grace, unlocking powerful scaling bonuses impossible through fixed armor sets.
Divine gear features four affixes compared to Exotic’s three, with one affix always being the Grace set bonus. This additional affix slot provides substantial stat improvements alongside the Grace effects. Familiarity caps at 999 points for Divine equipment versus lower caps on inferior rarities, and armor pieces gain defense stat increases as familiarity rises through combat use.
Popular Grace sets include Grace of Tsukuyomi regenerating Onmyo Magic uses on enemy kills, perfect for magic-heavy hybrid builds. Grace of Vaisravana emphasizes Martial Arts damage and Ki pressure, rewarding aggressive Samurai close-range combat. Grace of Amaterasu increases Close Combat Damage and provides bonuses against specific yokai types, benefiting pure physical damage dealers.
Grace sets activate through tiered bonuses based on equipped pieces. Two-piece bonuses grant minor stat increases, four-piece bonuses provide substantial passive effects, and seven-piece bonuses unlock build-defining abilities transforming your combat effectiveness. Building around a single Grace creates focused endgame loadouts outperforming scattered equipment choices.
Divine gear drops from all enemies in Shogun’s Journey but appears more frequently from bosses, Crucible Wraiths, and restored Enemy Bases using Scarlet Sands. The randomized Grace affixes mean farming specific combinations requires dedicated grinding, though Sudama Blessing helps target desired drops.
Restoration System – Sands of Recollection and Scarlet Sands
The restoration system introduces repeatable content by allowing you to reset Enemy Bases, Lesser Crucibles, Master duels, and Myth sidequests after completing them. When you clear an area, a spirit appears offering restoration using Sands of Recollection or Scarlet Sands of Despair as currency.
Sands of Recollection restore content to its base Shogun’s Journey difficulty, enabling you to reclear areas for additional rewards including Divine gear and Amrita. These items drop throughout open field exploration and reward from Battle Scroll missions, making them relatively common for standard farming loops.
Scarlet Sands of Despair create enhanced versions of restored content featuring significantly tougher enemies with increased health, damage output, and aggression. The elevated challenge comes with substantially better rewards including higher-level Divine gear, rare Grace combinations, and increased Soul Fragment drops for enhancement.
The game automatically restores conquered Enemy Bases when strong negative Ki grows rampant from defeating many open field enemies. After praying at a shrine following this message, one previously cleared Enemy Base restores itself without consuming restoration items. This automatic system encourages continuous exploration rather than exhausting all content immediately.
Restored Lesser Crucibles provide the most efficient method for farming specific Soul Cores at high levels. The wave-based combat format guarantees Crucible Wraith encounters dropping their associated cores, and using Scarlet Sands increases drop quality and quantity compared to standard restorations.
Strategic restoration focuses on high-density Enemy Bases containing multiple elite enemies or those guarding rare equipment chests. Restoring these locations repeatedly using Scarlet Sands creates efficient farming routes for Divine gear while maintaining engaging combat challenges.
Soul Core Transformation for Build Optimization
Soul Core Transformation unlocks after beating the main story, allowing you to change special effects on Soul Cores using Soul Fragments at any shrine. Access this feature through Manage Soul Cores, select Soul Core Transformation, and spend fragments to reroll random affixes on cores.
This system eliminates reliance on perfect core drops by letting you manually optimize existing cores. If a powerful Ibaraki Doji core drops with poor affixes, you can transform it repeatedly until receiving desired bonuses like increased Attack, Ki damage, or Anima generation matching your build requirements.
Each transformation attempt consumes Soul Fragments scaled to the core’s rarity and level. Higher rarity cores require more fragments per reroll, encouraging targeted optimization of your most critical cores rather than transforming everything indiscriminately. Farm Soul Fragments by dismantling duplicate cores through Resting Rites at shrines.
The transformation system pairs perfectly with the restoration mechanic. Repeatedly restoring and clearing Lesser Crucibles using Scarlet Sands generates duplicate high-level cores for dismantling into fragments, then transforming your equipped cores until achieving perfect affixes for your build archetype.
Rare-grade Soul Cores with blue coloring become available in Shogun’s Journey, featuring additional special effects compared to standard cores. These rare variants drop from restored content, particularly enhanced restorations using Scarlet Sands, and provide superior base stats before even considering transformations.
Sudama Blessing System for Targeted Farming
Sudama Blessing represents a shrine-based feature unlocked in Shogun’s Journey that increases drop rates for specific equipment categories by spending Ochoko Cups. This targeted farming system eliminates endless grinding for particular Grace sets or weapon types by biasing loot tables toward your desired items.
Access Sudama Blessing at any shrine after entering Shogun’s Journey. The interface displays equipment categories including weapon types, armor slots, and accessory types. Select your target category and spend Ochoko Cups to activate increased drop rates for a limited duration measured by enemy kills rather than real-time.
The blessing’s effectiveness scales with Tsukumo Fragments in your inventory. More fragments compound the drop rate bonus, dramatically improving your chances of receiving specific Divine gear pieces. Farm Tsukumo Fragments by exploring thoroughly and interacting with Tsukumo NPCs scattered throughout regions.
Strategic Sudama Blessing usage focuses on targeting the final missing pieces for Grace set completion. If you need Divine chest armor with Grace of Tsukuyomi to complete your seven-piece set, activate Sudama Blessing for chest armor then farm bosses or restored Enemy Bases until the desired piece drops.
Combine Sudama Blessing with Scarlet Sands restorations for maximum farming efficiency. The enhanced enemies from Scarlet Sands drop higher quality Divine gear, while Sudama Blessing biases those drops toward your specified equipment type, creating targeted loot acquisition impossible through random farming.
Level Sync Feature for Challenge Runs
Level Sync temporarily decreases your character level when accessing Battle Scroll missions, rewarding you with better loot for accepting additional challenge. This optional feature appears when selecting missions from shrines in Shogun’s Journey, allowing you to voluntarily handicap yourself for improved rewards.
The sync scales your level down to the mission’s recommended range, reducing your effective stats to match intended difficulty. Your equipment and skills remain functional, but raw stat advantages from overleveling disappear, forcing you to rely on mechanical execution rather than pure numbers.
Level Sync rewards include increased Divine gear drop rates, higher chances for rare Grace combinations, and bonus Amrita compared to completing missions at your natural level. This creates meaningful incentive for skilled players to engage with content they’ve outleveled rather than trivializing it through stat advantages.
Experienced players use Level Sync for deliberate practice against specific bosses. Syncing down to fight challenging encounters at intended difficulty hones combat skills applicable to even harder content like Scarlet Sands restorations where mechanical mastery determines success over stat advantages.
Difficulty Spike Preparation and Survival Tips
Shogun’s Journey enemies deal approximately fifty percent more damage than Heir’s Journey while possessing thirty percent larger health pools. Even early-game opponents like standard yokai can three-shot your character, demanding refined defensive skills and perfect Ki management compared to the more forgiving first playthrough.
Enemy placements change throughout Shogun’s Journey with additional yokai appearing in previously safe areas. Human enemies sometimes swap for yokai variants, and existing yokai upgrade to stronger versions like Oni-bi becoming Enenra. Bosses appear in unexpected missions, such as Enenra spawning during Crucible Manifested before you’d normally encounter them in Bakumatsu.
Defensive builds incorporating healing effects, damage mitigation, and Life recovery become significantly more valuable alongside pure damage setups. The Grace of Hotei provides health regeneration from talismans and deflects, creating sustain enabling extended encounters. Quick-Change Scrolls transform from optional insurance into mandatory survival tools providing second chances during boss attempts.
Maximize your Exploration Level to 4 in all regions before attempting their Shogun’s Journey story missions. The permanent stat bonuses from complete exploration compound with Divine gear, providing effective power equivalent to ten or more character levels. Combined with increased Elixir counts from Kodama, this preparation makes borderline impossible encounters manageable.
Focus builds around single Grace sets reaching seven-piece bonuses rather than mixing partial sets. The power spike from complete Grace activation far exceeds scattered two-piece bonuses from multiple sets. Farm Divine gear systematically using Sudama Blessing until achieving full seven-piece Grace, then tackle the most challenging content.
Summon co-op help liberally during early Shogun’s Journey progression until you’ve farmed sufficient Divine gear. The difficulty spike makes solo attempts frustrating before optimizing equipment, and allies provide breathing room to learn enhanced enemy patterns without constant death penalties.
FAQ
How do I unlock Shogun’s Journey New Game Plus?
Shogun’s Journey unlocks automatically after defeating the final boss and completing Nioh 3’s main story across all four time periods. A pop-up notification confirms availability. Access it anytime by opening your map and pressing L2 to select Shogun’s Journey. Your original Heir’s Journey save remains intact, allowing free switching between difficulties.
What carries over to New Game Plus in Nioh 3?
Everything meaningful carries over including character level, stats, equipment, Soul Cores, Guardian Spirits, unlocked skills, Amrita, Exploration Level progress, collected Kodama, and fast travel to shrines. Blacksmith services and crafting materials transfer completely. Main story missions must be replayed to unlock regions, and some Myths reset, but your build and progression remain intact.
What is Divine rarity and how do Grace sets work?
Divine rarity is the highest equipment tier exclusive to Shogun’s Journey, surpassing Exotic gear with green text coloring. Divine equipment features randomized Grace effects that activate when equipping multiple pieces sharing the same Grace, regardless of specific item names. Graces provide tiered bonuses at 2-piece, 4-piece, and 7-piece thresholds. Divine gear has four affixes versus Exotic’s three and caps familiarity at 999 points.
How does the restoration system work with Sands of Recollection?
The restoration system lets you reset Enemy Bases, Lesser Crucibles, Master duels, and Myths after completion using Sands of Recollection or Scarlet Sands of Despair. Sands of Recollection restore content to base Shogun’s Journey difficulty, while Scarlet Sands create enhanced versions with tougher enemies and better rewards. These items drop from exploration and Battle Scroll missions. The game also automatically restores Enemy Bases when defeating many open field enemies.
What is Sudama Blessing and how does it help farming?
Sudama Blessing is a shrine feature in Shogun’s Journey that increases drop rates for specific equipment categories by spending Ochoko Cups. Select your desired weapon type, armor slot, or accessory, activate the blessing, then farm enemies to receive more drops in that category. Effectiveness scales with Tsukumo Fragments in your inventory. Combine with Scarlet Sands restorations for maximum farming efficiency when targeting specific Divine Grace pieces.
Diablo Immortal offers a complete gaming experience accessible to free-to-play players, though the path to competitive power differs dramatically from paying players. Understanding realistic expectations, optimizing your limited resources, and focusing on the right progression systems allows you to enjoy all content and compete effectively without spending money.
This comprehensive free-to-play guide establishes realistic power level expectations, reveals the most efficient resource allocation strategies, provides a complete daily and weekly optimization checklist, explains which systems to prioritize over others, and offers psychological strategies for maintaining enjoyment despite the temptation of premium shortcuts.
Setting Realistic Free-to-Play Expectations
Understanding what’s achievable as a free-to-play player prevents frustration from unrealistic goals while helping you appreciate the substantial content available without spending money. The free-to-play experience differs from paying players in progression speed rather than content access.
All story content, dungeons, raids, and PvP modes remain fully accessible to free players without restrictions. You can experience every piece of content Diablo Immortal offers regardless of spending, with the only differences involving how quickly you progress and your competitive ceiling in top-tier PvP. Casual and mid-tier content remains completely viable for optimized free-to-play characters.
Power progression as a free-to-play player follows a slower but steady trajectory that reaches competitive levels for most content within 3-6 months of consistent play. While paying players accelerate past you initially, the gear and Paragon systems that dominate mid-game progression are equally accessible to everyone. You’ll lag behind whales permanently in legendary gem quality, but other systems allow closing substantial power gaps.
Legendary gems represent the primary bottleneck for free-to-play progression, with five-star gem acquisition requiring months of Fading Ember accumulation or extraordinary luck from free crests. Accept that you’ll primarily use two-star gems with occasional five-star acquisitions rather than the multiple rank 10 five-star gems that paying players obtain. This limitation matters most in top-tier PvP where gem disparities become insurmountable.
The time investment required for competitive free-to-play progression involves 2-4 hours of daily play focusing on efficient activities rather than aimless grinding. Casual players who log in occasionally will struggle to keep pace with server progression, while those maintaining consistent daily engagement reach and maintain competitive power levels. The game rewards regular participation more than occasional marathon sessions.
Social advantages available to free players include joining active clans and Warbands that provide group content access and community support unavailable to isolated players. Many successful free-to-play players leverage social connections to access difficult content and receive occasional material donations from generous clan members. Building relationships provides intangible value beyond pure progression.
Mental approach matters significantly for free-to-play sustainability, as constantly comparing yourself to paying players breeds resentment and dissatisfaction. Focus on your personal progression rather than relative standing against whales who’ve spent thousands of dollars. The journey from level 1 to competitive endgame power provides hundreds of hours of engaging gameplay regardless of how you compare to top spenders.
Daily Activity Optimization for Maximum Efficiency
Establishing an efficient daily routine maximizes your progression by ensuring you never miss time-limited rewards that compound dramatically over weeks and months. Smart free-to-play players optimize their limited playtime by prioritizing high-value activities.
Battle Pass objectives should be your first daily priority, as they provide legendary crests, materials, and experience for minimal time investment. Completing all daily objectives takes approximately 30 minutes and provides rewards worth far more than equivalent time spent in other activities. The legendary crests from Battle Pass represent your primary source of free crested Elder Rift runs.
Bounties offer daily gold and experience with guaranteed rewards for completing simple objectives throughout the game world. While individual bounty rewards seem modest, the accumulated value over months funds significant portions of your upgrade expenses. Never skip daily bounties as the time invested provides excellent returns compared to farming activities with random reward structures.
Codex tracking should guide your farming route selection, as completing Codex pages provides one-time bonuses worth pursuing when convenient. You shouldn’t detour excessively to force Codex completions, but choosing farming zones with multiple incomplete pages generates bonus rewards without dedicated grinding. Check your Codex progress daily to identify nearly complete pages.
Shadow or Immortal faction activities provide unique currencies unavailable through other means, making faction participation mandatory for accessing faction-exclusive rewards. These daily activities take 15-30 minutes and reward materials that accelerate progression substantially. Join a faction immediately upon unlocking the system and maintain consistent daily participation.
Elder Rifts should consume any remaining daily playtime after completing time-limited activities, as they provide consistent experience, gold, and gear upgrades. Running rifts at appropriate difficulties generates steady progression across multiple systems simultaneously. Use your free Rare Crests during daily rift runs to maintain a chance at legendary gem drops.
Hidden Lair hunting during your farming routes provides bonus gold and equipment from quick mini-dungeons that spawn randomly throughout the world. Developing awareness of common spawn locations allows checking them naturally during other activities without dedicated searching. The brief time investment for checking potential spawns provides worthwhile returns when lairs actually appear.
Warband activities become available based on your Warband’s schedule, providing enhanced rewards for group content completion. Coordinating with your Warband to ensure you can participate in scheduled activities prevents missing valuable rewards. Even if your Warband schedule doesn’t perfectly match your availability, finding a Warband with compatible timing dramatically improves your progression.
Weekly Lockout Priorities and Time-Limited Content
Weekly activities provide disproportionate rewards compared to their time investment, making them absolutely mandatory for competitive free-to-play progression. Missing weekly lockouts means permanently losing rewards you can never recover.
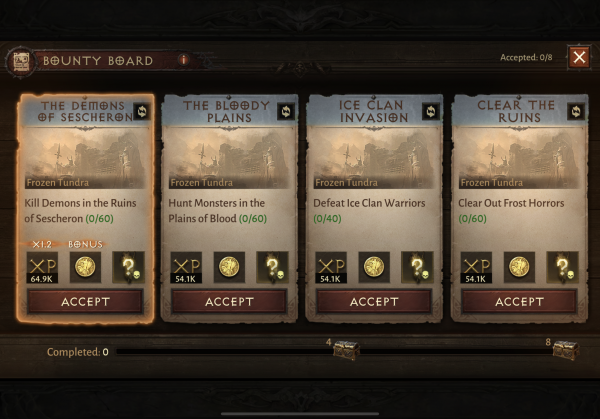
Helliquary raid bosses represent the highest priority weekly activity, providing materials to upgrade your Helliquary that permanently increases your Combat Rating. Each boss can be defeated once weekly for full rewards, with the accumulated materials over months adding thousands of Combat Rating points. Never miss weekly boss kills regardless of other obligations.
Finding consistent raid groups through your clan or server chat ensures you can complete weekly bosses reliably without scrambling for groups each week. Many clans schedule weekly boss runs at specific times, allowing you to plan your schedule around guaranteed group availability. Joining a raid-focused clan dramatically improves your consistency with weekly completions.
Challenge Rift completion provides weekly rewards scaled to your performance tier, with even poor performances generating worthwhile materials. The time investment rarely exceeds 15 minutes while the rewards justify participation regardless of your leaderboard placement. Complete Challenge Rift early each week to avoid last-minute rushes that might conflict with unexpected obligations.
Warband weekly activities provide substantial rewards for coordinated group content that resets every seven days. These activities require teamwork and coordination but reward materials unavailable through solo play. Prioritize Warband weekly content over less efficient daily activities when time is limited.
PvP weekly rewards accumulate based on your total battleground participation regardless of win rate, making even casual PvP engagement worthwhile. A few battleground matches weekly provide materials that supplement your PvE progression while exposing you to different gameplay. The rewards justify participation even if you dislike PvP.
Special events often run on weekly schedules with unique rewards available only during the active period. Staying informed about current and upcoming events allows you to prioritize them appropriately during their limited availability. Missing event rewards means losing unique items or materials you might never obtain otherwise.
Market Board listing strategies benefit from weekly price cycles, with weekends typically seeing higher supply and lower prices as more players farm and list items. Timing your purchases for weekend market crashes and sales for weekday demand spikes maximizes your Platinum efficiency. Track prices over several weeks to identify patterns specific to your server.
Resource Allocation Strategy for Free-to-Play Players
Limited resource income as a free-to-play player demands careful allocation decisions that maximize impact per resource spent. Wasting precious materials on low-value upgrades sets your progression back weeks or months.
Gold should be reserved exclusively for mandatory upgrades like equipment enhancement, gem socketing, and essential reforges that dramatically improve your gear. Avoid frivolous spending on cosmetics, unnecessary reforges chasing perfect stats, or vendor purchases you can farm naturally. Every gold piece saved accelerates your ability to afford meaningful upgrades.
Equipment enhancement should focus on set pieces you’re confident will remain in your build long-term rather than spreading enhancements across gear you’ll replace while farming. Concentrating enhancement investment on permanent equipment prevents wasting materials on temporary gear. Wait until you’ve completed your primary set before heavily enhancing individual pieces.
Legendary gem upgrade priorities should emphasize two-star gems over one-star alternatives, as two-star gems provide dramatically better scaling while remaining accessible to free players. Only upgrade one-star gems to minimum ranks required for awakening thresholds, reserving serious Gem Power investment for two-star and eventual five-star acquisitions.
Fading Ember spending should target guaranteed two-star gem purchases rather than gambling on random one-star gems from the basic vendor option. The guaranteed acquisition provides better value than random chances, though the higher cost requires patience to accumulate sufficient Ember. Save your Ember for specific gems your build needs rather than buying whatever’s available immediately.
Eternal Legendary Crests obtained through Battle Pass and events should be saved for highest difficulty Elder Rifts you can comfortably clear. Using premium crests on low-difficulty rifts wastes their potential for better gem quality from harder content. Group with other players using crests to multiply your effective returns through shared gem drops.
Normal gem upgrades provide meaningful stat increases that free players sometimes neglect while focusing on legendary gems. The materials for normal gem upgrades come naturally through salvaging unwanted gems, making this progression system essentially free beyond time investment. Maintain normal gem upgrades alongside legendary gem progression.
Reforge attempts should target equipment with egregiously bad secondary stats rather than chasing marginal improvements on already functional gear. The exponentially increasing costs for repeated reforges make perfection prohibitively expensive. Accept good enough stat distributions and move to optimizing other equipment pieces.
Legendary Gem Strategy for Free-to-Play Progression
Legendary gems create the largest power gap between free and paying players, requiring careful strategy to compete effectively with limited gem resources.
One-star gem selection should prioritize universally strong options like Everlasting Torment and Berserker’s Eye that provide consistent value for all classes. These gems form your baseline power while you slowly accumulate two-star alternatives. Only upgrade one-star gems to rank 5 for awakening requirements unless you’re extremely confident you’ll use them long-term.
Two-star gem focus represents your primary progression path as a free-to-play player, with gems like Phoenix Ashes and Frozen Heart providing competitive power without requiring extraordinary luck or spending. Acquiring complete two-star gem sets takes 2-4 months of consistent Fading Ember farming but provides power sufficient for all content except top-tier competitive PvP.
Five-star gem acquisition happens slowly through Fading Ember purchases of Seeping Bile or occasional lucky drops from free crests. Expect acquiring one five-star gem every 2-3 months as a free player, making each acquisition a significant milestone. Prioritize Seeping Bile from the Fading Ember vendor when it rotates into availability, as it provides the most accessible five-star option.
Rank priorities for five-star gems should target rank 3-5 initially rather than pushing for rank 10, as the exponential cost increases make high ranks impractical for free players. A rank 3 five-star gem provides substantial power and enables awakening bonuses without requiring months of dedicated Gem Power accumulation. Spread your investment across multiple five-star gems at moderate ranks rather than maxing one gem.
Group crested runs multiply your effective Fading Ember income by allowing you to benefit from other players’ Eternal Legendary Crest investments. Find dedicated farming groups through your clan where players take turns using crests or coordinate to ensure everyone uses crests simultaneously. The multiplied Ember gains dramatically accelerate your gem acquisition timeline.
Gem Power management requires discipline to avoid wasting this precious resource on suboptimal gems you’ll eventually replace. Create a clear upgrade plan identifying which gems you’re targeting for rank increases and stick to that plan rather than impulsively upgrading whatever gems you happen to acquire. The focused approach reaches meaningful power thresholds faster than scattered investment.
Market Board gem sales provide Platinum income when you receive valuable unbound legendary gems you don’t need. Even two-star gems sell for reasonable Platinum amounts that fund future purchases. List unneeded gems immediately rather than hoarding them, as the Platinum gains provide more flexibility than unused gems gathering dust.
Competing in PvP as a Free-to-Play Player
PvP creates the starkest divide between free and paying players, though free-to-play players can compete effectively at moderate tiers through skill and optimization.
Realistic PvP expectations as a free player involve competing successfully in casual and low-to-mid ranked battlegrounds while accepting that top-tier Legend rank remains dominated by heavily invested players. The gem disparity becomes insurmountable at the highest competitive levels, but 80% of PvP content remains accessible to optimized free players.
Class selection impacts your PvP viability as a free player, with tankier classes like Barbarian and Crusader competing more effectively than damage dealers who need premium gems to match paying player burst damage. The survivability and utility of tank classes matters more than raw power, allowing skill and positioning to overcome some gear disadvantages.
Build optimization for free-to-play PvP should emphasize two-star defensive gems like Phoenix Ashes and Frozen Heart that provide survivability and utility rather than competing on pure damage. You cannot out-damage whales with five-star offensive gems, but you can outlast and outplay them through superior mechanics and teamwork.
Team coordination allows free players to contribute meaningfully by focusing on objectives, protecting teammates, and enabling carries rather than attempting to solo carry matches. Communicate with your team through pings and chat to coordinate pushes and defense. Your value comes from playing your role effectively rather than dominating kill counts.
Objective focus over kill hunting plays to free player strengths by rewarding tactical awareness over raw power. Controlling objectives generates more points than kills, allowing skilled free players to contribute equally to whales who only chase kills. Develop strong map awareness and positioning to maximize your objective impact.
Ranked progression as a free player should target Gold or Platinum ranks as realistic goals, with Diamond requiring exceptional skill and optimization. Don’t feel discouraged by inability to reach Legend, as 95% of players never reach that tier regardless of spending. Enjoy the competitive matches at your appropriate skill tier rather than obsessing over unattainable goals.
Faction warfare through Shadow activities provides PvP content where coordination and numbers matter more than individual power. The large-scale battles dilute individual power disparities through sheer participant counts. Contribute to your faction’s success through consistent participation rather than attempting to hard-carry.
Psychological Strategies for Long-Term Free-to-Play Enjoyment
Maintaining satisfaction as a free player requires mental approaches that emphasize personal progression over competitive standing against paying players.
Progress tracking through screenshots or spreadsheets allows appreciating your advancement over time rather than fixating on your current power relative to top players. Documenting your Combat Rating, Paragon level, and gem collection at monthly intervals reveals substantial progression that feels invisible during daily grinding. Celebrating personal milestones provides motivation independent of competitive standing.
Goal setting should focus on achievable objectives like completing sets, reaching specific Paragon levels, or acquiring particular gems rather than competing against whales. Breaking long-term progression into smaller milestones creates regular achievements that maintain engagement. Adjust goals based on your available playtime rather than comparing to no-life grinders.
Community engagement through active clan participation provides social fulfillment beyond pure power progression, with friendships and shared experiences creating value independent of competitive viability. Many players continue enjoying Diablo Immortal primarily for their social connections rather than progression treadmills. Invest in building relationships with clan members who share your approach to the game.
Content focus should emphasize activities you personally enjoy rather than forcing yourself through optimal but unenjoyable grinds. If you hate PvP, accept slightly slower progression by skipping it rather than burning out through miserable forced participation. Sustainable long-term play requires enjoying your daily routine.
Spending temptation management involves recognizing that small purchases rarely provide meaningful competitive advantages while larger spending commitments create slippery slopes toward excessive investment. If you’re tempted to spend, wait 24-48 hours to ensure it’s a considered decision rather than impulse. Most spending urges pass with time.
Comparison avoidance with top spenders prevents the resentment and dissatisfaction that kills free-to-play enjoyment. Recognize that whales exist in every free-to-play game and their spending funds the servers you play on free. Your progression path differs from theirs without being inferior.
Break scheduling prevents burnout from excessive grinding, with regular days off allowing mental recovery and preventing the game from feeling like obligation. Diablo Immortal remains available whenever you return, making breaks cost nothing beyond slightly slower progression. Your enjoyment matters more than maximizing every possible daily reward.
Common Free-to-Play Mistakes That Waste Months
Free-to-play players frequently sabotage their progression through preventable errors that compound over months into devastating time losses.
The most damaging mistake involves heavily investing in one-star legendary gems early in progression, wasting Gem Power that could fund competitive two-star gem ranks. New free players see cheap one-star upgrade costs and max them immediately, only realizing months later that those resources would have been better spent elsewhere. Resist the temptation of easy early power for sustainable long-term progression.
Another critical error involves using Eternal Legendary Crests on low-difficulty Elder Rifts, receiving poor quality gems that don’t justify the crest expenditure. Free crests are precious and limited, making each use a significant decision. Wait until you can clear high-difficulty rifts before using premium crests to maximize returns.
Many free players spread equipment enhancement investments across gear they’re actively trying to replace while farming sets. This wastes gold and materials on temporary items that quickly become obsolete. Focus enhancement resources on set pieces you’re confident will remain in your build long-term.
Some free players ignore daily activities in favor of activities with potentially higher but inconsistent returns, creating unstable progression that falls behind consistent daily participants. Skipping Battle Pass objectives or bounties because they seem boring costs you the accumulated rewards that compound into substantial advantages. Consistency beats occasional excellence in free-to-play progression.
Neglecting to join active Warbands and clans isolates you from the social systems that provide substantial free rewards and group content access. Solo free players progress significantly slower than equally skilled players leveraging social features. Invest time finding compatible social groups rather than suffering alone.
Spending Platinum on convenience items or cosmetics rather than impactful Market Board purchases wastes the limited premium currency free players can earn. Every Platinum spent on non-essential items delays your ability to afford game-changing gem or gear purchases. Maintain strict Platinum discipline regardless of tempting cosmetics.
Finally, some free players quit prematurely after comparing themselves to paying players and deciding they can never compete. The comparison ignores that 90% of content remains completely accessible to free players with reasonable time investment. Don’t let whale comparisons rob you of hundreds of hours of enjoyable progression.
FAQ: Free-to-Play Progression and Viability
Can you really compete as free-to-play in Diablo Immortal?
Yes, free-to-play players can compete effectively in all PvE content and casual-to-moderate PvP with 3-6 months of consistent progression. Top-tier competitive PvP remains dominated by heavy spenders, but 90% of game content is fully accessible to optimized free players who invest time intelligently.
How long until a free-to-play player reaches competitive power?
Expect 3-6 months of consistent daily play to reach competitive power for most content, with the exact timeline depending on your efficiency and time investment. Server Paragon catch-up mechanics help newer players reach viable power faster than this timeline suggests for established servers.
What’s the most important system for free-to-play players to focus on?
Two-star legendary gems provide the most impactful progression for free players, followed by equipment set completion and Paragon leveling. These systems offer the best returns on time invested while remaining fully accessible without spending. Prioritize two-star gems over chasing rare five-star alternatives.
Is the Battle Pass worth buying as a mostly free-to-play player?
The Battle Pass represents the best value purchase in Diablo Immortal, providing rewards worth far more than the cost compared to any other spending option. If you’re willing to spend small amounts, Battle Pass should be your only purchase. However, the free track still provides worthwhile rewards for completely free players.
How much playtime does competitive free-to-play require?
Maintaining competitive free-to-play power requires 2-4 hours of daily play focusing on efficient activities. Casual players logging in occasionally will struggle to keep pace, while this time investment allows reaching and maintaining server average power. Quality of playtime matters more than pure quantity.
Can free players participate in Shadow War and faction content?
Yes, all faction content remains fully accessible to free players without restrictions. Shadow War success depends more on coordination and numbers than individual power, allowing free players to contribute meaningfully. Join an active faction immediately upon unlocking the system.
Should free players avoid PvP entirely?
No, free players should participate in casual PvP for the unique rewards and Battle Pass objectives while accepting they won’t reach top-tier competitive rankings. Low-to-mid ranked PvP remains accessible to free players who optimize their builds and play skillfully. Avoiding PvP entirely sacrifices valuable rewards.
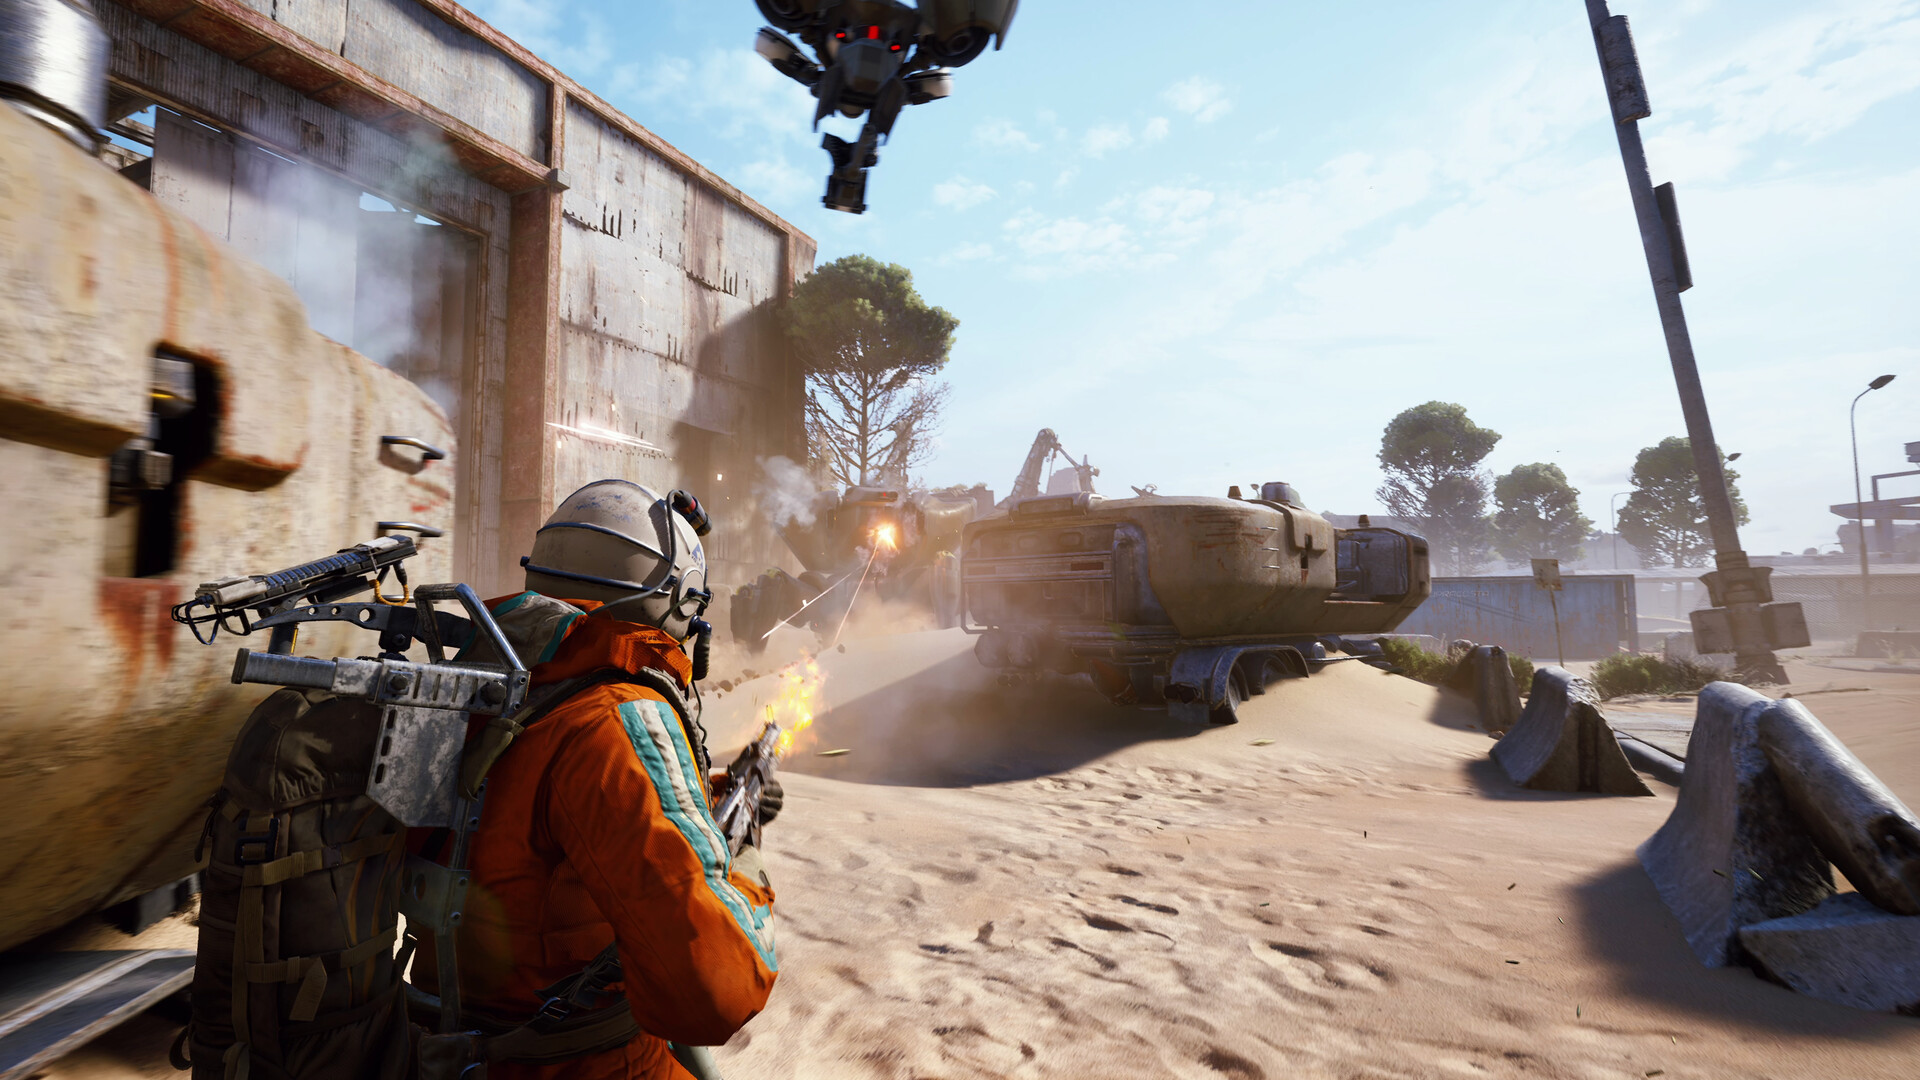
Starting Arc Raiders feels like getting thrown into chaos without a tutorial. You’re facing hostile machines called ARCs, aggressive enemy Raiders, harsh map conditions, and permanent death penalties where losing your gear means starting completely over. The extraction shooter genre demands knowledge that traditional shooters never teach, from managing free loadouts and understanding the Safe Pocket system to mastering extraction mechanics that determine whether you keep everything or lose it all. This comprehensive beginner’s guide breaks down the fifteen most critical concepts new Raiders must learn to transform from struggling newcomer into confident survivor who extracts successfully with valuable loot.
Understanding the Arc Raiders Core Gameplay Loop
Every Arc Raiders session follows the same fundamental cycle that defines extraction shooter gameplay. You start in Speranza, your underground hub where you prepare loadouts, upgrade equipment, and manage inventory between raids. When ready, you deploy topside into one of five available maps with either a custom loadout you’ve crafted or the always-available free loadout option.
Once on the surface, your objectives revolve around three interconnected activities that drive progression. Looting containers, defeated enemies, and special locations yields materials for crafting, weapons for combat, and blueprints that unlock new gear. Combat occurs against both ARC machines with predictable patrol patterns and other human players whose behavior remains completely unpredictable. Quest completion advances storylines while rewarding experience points, unique items, and currency.
The extraction phase separates successful Raiders from dead ones. You must physically reach an extraction point, activate the console, and survive until the timer completes before you can leave with accumulated loot. Dying at any point means losing everything except items stored in your Safe Pocket. This risk-reward tension creates the signature extraction shooter pressure where greed constantly battles survival instinct.
Understanding this loop immediately clarifies what matters versus what doesn’t. Killing enemies matters only if they block access to valuable loot or threaten extraction. Beautiful map details mean nothing if you don’t reach the exit. Fancy weapons become meaningless when you die before extracting them. Success in Arc Raiders measures by one metric alone: did you extract with more value than you risked bringing?
Mastering Free Loadouts for Zero-Risk Learning
Free loadouts represent Arc Raiders’ most underutilized beginner tool, providing complete gear sets at zero cost that completely eliminate financial risk. Every player can deploy with a free loadout containing one primary weapon, ammunition, bandages for healing, a shield recharger, and various utility items or grenades. Since these items cost nothing, failed raids using free loadouts only waste time rather than precious crafting materials.
The strategic value extends beyond simple risk elimination. Free loadouts let you scout unfamiliar maps without consequence, learning building layouts and loot spawn locations that inform future custom loadout runs. You can complete early quest objectives that don’t require specific gear, earning experience and rewards without touching your crafted inventory. Testing different weapon types helps identify personal preferences before investing materials into permanent versions.
Successfully extracting with free loadout items transforms them into genuine gear additions you didn’t craft. Breaking down extracted free weapons at your Refiner generates crafting materials that accelerate early progression. The free loadout augment specifically deserves immediate attention, as you can trade this augment at vendors for superior options like Looting Mk.2 that expands your carrying capacity dramatically.
The psychological benefit matters as much as the material savings. New players who fear losing crafted gear often play too conservatively, missing learning opportunities because they refuse to take necessary risks. Free loadouts eliminate this fear completely, encouraging aggressive exploration and combat engagement that builds essential skills faster than cautious avoidance ever could.
The Safe Pocket System and Extraction Insurance
Your Safe Pocket functions as extraction insurance that protects your most valuable items from death penalties. This special inventory section, accessible through your standard inventory interface, preserves its contents even when you die during a raid. Understanding Safe Pocket mechanics and proper usage transforms how you approach high-risk situations where survival becomes uncertain.
Base Raiders start with one Safe Pocket slot that expands through augment choices and skill tree progression. The Looting Mk.2 augment, obtained by trading free loadout augments at vendors, grants one additional Safe Pocket slot for a total of two. Additional skill tree investments can further expand this critical storage, though each slot requires significant point investment.
Priority items for Safe Pocket protection follow a clear hierarchy based on replacement difficulty. Rare blueprints you haven’t learned yet should always occupy Safe Pocket slots, as duplicate blueprint drops remain uncommon and represent significant progression gates. Epic and legendary equipment pieces justify protection due to expensive crafting costs and rare material requirements. High-value trinkets that sell for thousands of coins deserve Safe Pocket storage on loot-focused runs.
The tactical timing of Safe Pocket management separates experienced Raiders from beginners. Don’t fill Safe Pockets immediately upon finding valuable items. Instead, keep them partially empty during early raid phases, then transfer your best discoveries into protected storage once you’ve accumulated enough loot to justify extraction. This approach maintains inventory flexibility while ensuring your most profitable finds survive even catastrophic late-raid deaths.
Movement Mechanics That Keep You Alive
Arc Raiders rewards mobility mastery with survival advantages unavailable to players who ignore movement optimization. The holster mechanic represents the single most important movement technique new players overlook. Pressing your holster key, typically ‘5’ or Triangle/Y on controllers, puts away your weapon and increases sprint speed dramatically compared to running with guns drawn.
Holstering provides maximum movement speed that matters during multiple critical scenarios. When rotating between buildings across open terrain, holstered sprinting minimizes exposure time to distant snipers. Reaching extraction points during the final countdown often requires full-speed movement that armed sprinting cannot match. Escaping pursuit from faster ARC enemies like Leapers demands holstered running combined with tactical dodge rolls.
The dodge roll mechanic offers both offensive and defensive utility beyond simple evasion. Rolling immediately upon landing after falls completely negates fall damage regardless of height, transforming vertical shortcuts into viable escape routes. During firefights, properly-timed rolls break enemy tracking and create momentary invulnerability frames that can mean survival during reload sequences. Against certain ARC enemies like Pops that explode on contact, dodge rolls provide the only reliable avoidance method.
Stamina management underlies all movement decisions and separates skilled Raiders from exhausted targets. Your stamina bar depletes during sprinting, vaulting obstacles, dodging, and performing melee attacks. Empty stamina forces slow walking that leaves you vulnerable to both machines and players. Learning to monitor stamina levels and allowing partial regeneration before committing to movement prevents the dangerous situation where you need escape speed but lack the stamina to achieve it.
Sound Design and Audio Awareness
Sound provides your most reliable intelligence source in Arc Raiders, broadcasting enemy positions and activities far beyond visual range. Everything generates distinctive audio signatures that trained ears recognize instantly. Footsteps reveal player movement direction and proximity, with different surfaces producing unique sounds. Looting interactions create specific noises that advertise exactly what nearby Raiders are doing. Gunfire broadcasts weapon types, engagement distances, and combat intensity.
The audio detection works bidirectionally, meaning enemies hear your actions just as clearly as you hear theirs. Every container you open announces your presence to nearby threats. Sprinting creates louder footsteps that carry further than careful walking. Breaching locks or using tools generates sustained noise that functions like firing a flare saying “I’m here, come fight me.” Understanding which actions produce what sounds lets you choose between speed and stealth based on tactical necessity.
Environmental audio cues provide critical situational awareness beyond direct threat detection. ARC machines emit mechanical sounds that identify specific enemy types before visual contact. Snitches create a distinctive hover tone that warns of potential reinforcement calls. Leapers produce heavy metallic impacts when landing from jumps. Learning these audio signatures lets you identify threats and plan responses before enemies enter visual range.
Skill tree investments directly influence your audio profile through perks that reduce noise generation. Gentle Pressure reduces looting sounds, letting you search containers more safely. Agile Croucher allows faster crouched movement for stealth approaches. These skills compound with tactical awareness, creating Raiders who move through maps like ghosts while less-prepared opponents broadcast their positions constantly.
Combat Fundamentals: When to Fight and When to Run
New players consistently make the same fatal mistake in Arc Raiders by treating every encounter as mandatory combat. The extraction shooter genre fundamentally differs from traditional shooters where kills determine success. In Arc Raiders, combat represents risk rather than reward, with every engagement potentially ending your raid through death or resource depletion that prevents reaching extraction.
The decision framework for combat engagement requires evaluating three critical factors before opening fire. First, does this enemy actively threaten my extraction or access to critical loot? ARC machines blocking your path to valuable containers warrant elimination, while distant patrols you can avoid don’t. Second, do I have sufficient resources to win this fight and still reach extraction safely? Burning through all your ammunition and healing supplies defeating one squad leaves you defenseless against subsequent threats. Third, what’s the risk-reward ratio of this engagement compared to simply avoiding it? Sometimes the smartest play involves circling around rather than fighting through.
ARC combat specifically rewards understanding enemy behavior patterns and weaknesses. Ticks ambush from ceilings and walls but die quickly to focused fire. Snitches call reinforcements if they spot you, making them priority elimination targets before engaging other machines. Leapers telegraph their devastating jump attacks with audio cues, allowing preemptive positioning. Bombardiers coordinate with Spotter drones, requiring you to eliminate spotters first or constantly relocate to avoid mortar strikes.
Player-versus-player engagements demand entirely different tactics than fighting predictable machines. Human opponents use cover effectively, flank aggressively, and coordinate with teammates. The first shot advantage matters enormously, rewarding Raiders who maintain situational awareness and spot enemies first. Positioning beats aim in most firefights, as superior cover and angles let even average shooters win against skilled opponents caught in the open. When uncertain about winning a player encounter, retreat represents the correct choice more often than new players realize.
Essential Skill Tree Priorities for New Raiders
The Arc Raiders skill tree offers 45 unique skills across three distinct branches with a total of 75 available skill points at character cap. Unlike most games where you eventually unlock everything, this point limitation forces meaningful specialization decisions. Your first 20-30 skill points fundamentally shape your Raider’s capabilities more than any equipment choices, making early skill selection critically important.
The Mobility tree provides the highest immediate impact for new players struggling with basic survival. Marathon Runner reduces stamina consumption during movement, effectively extending how far you can sprint before exhaustion. Youthful Lungs increases maximum stamina capacity, creating a larger buffer before depletion. Together, these skills transform your operational range, letting you cover ground faster and escape danger more reliably than opponents using default values.
Advanced mobility skills become force multipliers once you’ve mastered basic movement. Effortless Roll dramatically reduces dodge roll stamina costs, allowing multiple consecutive rolls during combat without exhaustion. Vault on Vaults on Vaults eliminates vaulting stamina costs completely, transforming vertical obstacles from stamina drains into free movement options. Calming Stroll enables stamina regeneration while walking rather than only while standing still, creating sustainable long-distance travel pace.
The Survival tree offers specialized utility that compounds over time rather than providing immediate combat advantages. Agile Croucher increases crouch movement speed for stealth approaches. In-Round Crafting enables field crafting during raids, letting you create bandages or grenades from scavenged materials. Looter’s Luck potentially reveals twice as many items from containers, dramatically accelerating material acquisition for Raiders focused on economic progression over combat.
Conditioning skills deserve investment once you’ve established core mobility and survival foundations. Used to the Weight reduces movement penalties from heavier shields, letting you wear protective equipment without sacrificing mobility. Loaded Arms and Broad Shoulders increase carrying capacity, allowing larger loot hauls per successful extraction. Survivor Stamina accelerates stamina regeneration when critically hurt, creating clutch survival moments during desperate escapes.
Map Navigation and Extraction Planning
Arc Raiders features five distinct maps with Dam Battlegrounds, Buried City, Spaceport, Blue Gate, and Stella Montis each presenting unique terrain challenges and loot distribution patterns. New players often approach maps randomly, wandering aimlessly until they stumble into valuable loot or deadly encounters. Successful Raiders instead develop systematic navigation strategies that maximize efficiency while minimizing risk exposure.
Pre-raid planning determines extraction success more than any mid-raid decision. Before deploying, identify your intended extraction point based on spawn location and loot route. Visualize the path from spawn to target loot areas to chosen extraction, noting open terrain sections where you’re vulnerable and building clusters offering cover. This mental preparation prevents the common beginner mistake of collecting valuable loot deep in the map interior then realizing extraction points are impossibly distant.
Building-dense maps like Buried City and Stella Montis favor close-quarters combat loadouts and offer numerous shelter options during environmental hazards. The extensive indoor spaces protect from aerial ARC threats while creating intense player-versus-player encounters around every corner. These maps reward Raiders who master interior combat and door-checking discipline, as careless entry often results in ambush deaths.
Open-terrain maps like Dam Battlegrounds require different tactical approaches emphasizing long sightlines and exposed movement phases. The sparse building distribution forces longer outdoor exposure periods, making route timing and sprint efficiency critical. These maps favor long-range weapon loadouts that let you engage threats before they close distance, while close-range specialists struggle crossing open ground against prepared defenders.
Extraction points operate on timers that create strategic pressure as raids progress. Some extraction methods like Raider Hatches require special keys purchased from vendors or crafted at your workshop. These silent extraction options don’t broadcast your position through dramatic effects, making them ideal when carrying heavy loot and wanting to avoid late-raid combat. Standard extraction elevators announce your presence to nearby Raiders, often triggering final desperate battles as multiple squads converge on the same exit.
Looting Efficiency and Container Priorities
Looting in Arc Raiders involves more complexity than simply opening every container you encounter. Different container types contain different loot tables, with understanding these distributions dramatically improving resource gathering efficiency. Residential containers spawn trinkets, keys, and valuable trade goods rather than weapons or materials. Industrial locations provide mechanical components, crafting materials, and tool-related items. Military sites concentrate weapons, ammunition, and combat equipment.
The XP generation system rewards opening containers regardless of whether you take items, creating an interesting optimization opportunity. Even with a completely full backpack, opening containers grants experience toward your next skill point. Experienced Raiders develop patterns where they open everything they pass, quickly scanning contents then moving on if nothing exceptional appears. This approach maximizes skill point acquisition rate while maintaining movement efficiency.
Security lockers represent premium loot opportunities that most new players cannot access until level 36 in the Survive skill tree. These purple-tier containers consistently deliver rare blueprints and high-value equipment, making the security locker access skill one of the most important mid-game unlocks. Once you’ve invested the points to reach this skill, prioritizing security locker routes dramatically accelerates blueprint collection compared to random container farming.
Inventory management during raids separates successful extractors from overburdened Raiders who die before reaching exits. Your carrying capacity directly impacts movement speed and stamina regeneration, with heavier loads creating compounding penalties. Smart Raiders constantly evaluate item values, dropping lower-tier materials when discovering superior replacements. The merge stack function, available in your stash after raids, consolidates partially-filled item stacks into complete stacks to free inventory space.
Night raids increase blueprint spawn chances across all container types, making them essential for efficient blueprint farming despite reduced visibility and navigation challenges. The darkness creates genuine difficulty seeing distant landmarks and identifying threats at range, but the reward premium justifies these complications for Raiders focused on expanding their crafting options. Bringing flashlights helps but attracts certain ARC enemy types, creating tactical trade-offs between visibility and stealth.
Workshop and Crafting Progression Strategy
Your workshop in Speranza houses seven specialized workbenches that gate access to increasingly powerful equipment through a tiered upgrade system. Each workbench progresses through three levels, with higher tiers requiring rare materials dropped from specific ARC enemies and successful extractions. New players often attempt upgrading everything simultaneously, spreading resources too thin and delaying access to the gear they actually need.
Strategic workbench progression focuses upgrade investments on benches that unlock your preferred playstyle equipment. The Gunsmith controls weapon crafting and modification capabilities, making it a universal priority regardless of your tactical preferences. Upgrading the Gunsmith unlocks weapon modification slots that transform adequate guns into exceptional performers through damage boosts, handling improvements, and magazine expansions.
The Refiner becomes invaluable once upgraded past tier one, allowing material conversion that multiplies your crafting capacity through transformation rather than farming. The tier two Refiner converts five metal parts into one mechanical component, providing reliable access to intermediate materials without requiring dangerous high-tier zone farming. This conversion path means abundant basic materials can become scarce specialized components through workshop processing.
Blueprint learning happens automatically when you extract with unlearned blueprints in your inventory or Safe Pocket. The blueprint consumption mechanic means you can only learn each blueprint once, with duplicate blueprints becoming tradeable commodities worth 5,000 coins each. This creates interesting economic decisions where you must evaluate whether keeping a duplicate for potential trading opportunities provides more value than immediate coin conversion.
Gear maintenance represents an ongoing resource drain that new players often underestimate. Weapons and equipment degrade through use, eventually breaking if not repaired at your workshop. Repair costs scale with item rarity and durability loss, making legendary gear extremely expensive to maintain compared to common alternatives. Smart Raiders balance equipment quality against maintenance costs, sometimes deliberately using lower-tier gear for routine farming runs to preserve expensive items for critical missions.
Augment System and Loadout Customization
Augments function as modular equipment pieces that dramatically alter your Raider’s capabilities beyond base stats. These items occupy specific slots in your loadout, with choices fundamentally changing how you approach raids. Understanding augment categories and their strategic applications transforms generic Raiders into specialized operators optimized for specific mission profiles.
Combat augments enhance offensive and defensive capabilities through direct stat modifications. Shield augments increase maximum shield capacity at the cost of movement speed penalties, creating trade-offs between survivability and mobility. Weapon-focused augments might improve reload speeds, reduce recoil patterns, or increase ammunition reserves. These combat enhancements matter most for Raiders who frequently engage in firefights rather than avoiding combat.
Tactical augments provide utility advantages that improve situational flexibility. Gadget slot augments unlock additional equipment capacity, letting you carry more grenades, mines, or specialized tools. Movement augments reduce stamina costs for specific actions or increase overall movement speed. Information augments might improve radar range or highlight nearby containers, trading combat power for intelligence gathering capability.
Looting augments specifically cater to Raiders focused on economic progression over combat dominance. The Looting Mk.2 augment grants an additional Safe Pocket slot, essentially providing extraction insurance for twice as many valuable items. Carrying capacity augments increase maximum weight limits, allowing larger loot hauls per successful raid. Speed looting augments reduce container interaction times, letting you gather resources faster while remaining vulnerable for shorter periods.
The augment selection process demands matching your choices to intended raid objectives rather than defaulting to perceived “best” options. High-risk boss hunting missions justify combat-focused augments that maximize survival and damage output. Routine material farming runs benefit from looting augments that accelerate resource gathering. Experimental playstyle testing works best with flexible tactical augments that don’t commit you to specific combat or looting strategies.
Quest System and Guided Progression
The Arc Raiders quest system provides structured progression paths that guide new players through increasingly complex challenges while teaching essential mechanics. Vendors in Speranza offer both repeatable daily quests and longer storyline missions that unlock as you advance. Understanding quest types and prioritizing appropriately accelerates your progression significantly compared to purely freeform raiding.
Story quests advance the game’s narrative while introducing you to important game systems and map locations. These missions often reward unique items unavailable through normal looting, alongside experience bonuses that accelerate skill point acquisition. Early story quests specifically teach fundamental mechanics like extraction procedures, ARC combat basics, and workshop usage through practical application rather than tutorial text.
Vendor quests from NPCs like Shani, Celeste, and others provide repeatable income sources that generate steady material and currency flow. These missions typically request specific items or task you with eliminating certain enemy types, creating clear short-term objectives that structure your raids. Completing vendor quests builds reputation that unlocks additional purchasing options and more lucrative quest offerings.
Quest progress sharing within squads creates interesting optimization opportunities. When grouped with other Raiders, quest objectives count for all team members simultaneously, meaning one player can complete gathering tasks while others focus on combat or security. This division of labor dramatically accelerates quest completion rates compared to solo attempts where one person must handle everything.
The quest reward system sometimes provides temporary gear loans that let you test equipment before committing resources to permanent versions. These temporary items function identically to crafted versions but disappear after the specified duration expires. Smart Raiders use these loan periods to evaluate whether specific weapons or augments suit their playstyle before investing scarce blueprints and materials into permanent crafting.
Scrappy the Rooster: Your Passive Resource Generator
Scrappy the Rooster represents Arc Raiders’ most underutilized progression system for new players who don’t understand this passive resource generation mechanic. This companion animal, housed in your Speranza quarters, automatically collects basic crafting materials while you’re actively playing topside or in raids. Understanding and maximizing Scrappy’s efficiency creates steady material income that compounds over your playtime.
The collection system activates only during active gameplay rather than offline periods. Scrappy generates materials continuously while you’re deployed on raids, accumulating resources that appear in your stash when you return to Speranza. This means longer raid durations produce proportionally more Scrappy materials, creating interesting timing considerations for players balancing extraction safety against maximum material generation.
Scrappy’s output consists exclusively of common-tier basic materials like metal parts, rubber parts, plastic parts, chemicals, and fabric. These fundamentals might seem unimpressive compared to rare drops from elite enemies, but they form the foundation of your entire crafting economy. Every weapon repair requires basic materials. Converting materials at the Refiner demands abundant common resources. Ammunition crafting consumes basics in huge quantities.
Upgrading Scrappy through workshop investments increases both generation rates and material variety. Higher upgrade tiers let Scrappy collect more materials per time period while potentially adding uncommon resources to the collection pool. These upgrades represent excellent long-term investments that pay dividends across your entire Arc Raiders career through passive income that requires zero active farming effort.
The psychological benefit of Scrappy’s passive generation matters as much as the material value. Knowing you’re constantly accumulating basic materials removes pressure to farm these resources actively, freeing you to focus raids on blueprint hunting, boss elimination, and other activities that demand active participation. This mental shift transforms how you approach raid objectives, emphasizing high-value activities rather than grinding basics that Scrappy handles automatically.
Common Beginner Mistakes and How to Avoid Them
New Arc Raiders players consistently repeat the same mistakes that experienced Raiders learned to avoid through painful trial and error. Recognizing these patterns and implementing corrections accelerates your learning curve dramatically compared to discovering every pitfall personally.
The greed mistake represents the most common extraction failure among beginners. You’ve accumulated valuable loot, your inventory bulges with rare materials, and you spot one more container in the distance. The temptation to grab that final piece of loot overwhelms rational risk assessment, leading you into dangerous territory where you die and lose everything. Successful Raiders develop iron discipline, establishing personal extraction thresholds where accumulated value triggers immediate extraction regardless of remaining opportunities.
Fighting every encounter creates the second major beginner error. Traditional shooter instincts encourage engaging every enemy for elimination satisfaction, but Arc Raiders punishes this aggression through resource depletion and injury accumulation. Each fight consumes ammunition, healing supplies, and time that could be spent looting or moving toward extraction. Smart Raiders evaluate combat necessity, avoiding fights that don’t directly advance their raid objectives or threaten their survival.
Ignoring map awareness until too late results in countless beginner deaths where players wander into hostile situations without escape routes. Always maintain mental tracking of your position relative to extraction points, noting how long reaching safety would require. When gunfire erupts nearby, immediately evaluate whether you’re between hostile Raiders and their likely extraction paths, as this position creates guaranteed combat you cannot avoid.
Resource hoarding in your stash prevents utilizing the crafting systems that drive progression. New players accumulate massive material stockpiles, afraid to craft weapons or equipment they might lose. This mentality creates a self-fulfilling prophecy where you never use good gear, therefore never extract successfully, therefore never accumulate more resources. Breaking this cycle requires accepting that losing gear is inevitable and that using quality equipment increases extraction success rates that more than compensate for occasional losses.
Solo versus Squad Play Considerations
Arc Raiders accommodates both solo Raiders and three-player squads, with each approach offering distinct advantages and challenges. The matchmaking system generally pairs solo players against other solos while matching squads against squads, though population limitations sometimes create mixed lobbies during off-peak hours.
Solo play rewards stealth, patience, and tactical awareness over raw combat power. You control your own risk tolerance, deciding when to engage or avoid without coordinating with teammates. Sound becomes even more critical when operating alone, as you lack teammates to watch your flanks or provide covering fire. Solo Raiders excel at quiet loot runs where they avoid combat entirely, moving through maps like ghosts who accumulate valuable materials without alerting other players.
The psychological pressure of solo extraction differs fundamentally from squad play. Every decision rests solely on your judgment, with no teammates to bail you out of mistakes or provide second opinions on engagement choices. This independence teaches personal responsibility and decision-making faster than squad play where you can rely on teammates to compensate for errors
Squad play transforms Arc Raiders into a cooperative tactical experience where communication and coordination multiply effectiveness. Three-player teams can split responsibilities, with designated scouts, combat specialists, and looters each focusing on their strengths. During combat, squads overwhelm solo players through numerical superiority and crossfire setups impossible to counter alone.
The resurrection system in squad play provides powerful forgiveness mechanics unavailable to solo Raiders. Downed teammates can be revived by squadmates, preventing permanent death as long as one team member survives. This safety net encourages more aggressive gameplay compared to solo caution, though it creates strategic vulnerabilities where entire squads wipe because they refused to abandon downed members.
FAQ
Q: How long does a typical Arc Raiders raid last? A: Most raids run 15-25 minutes depending on playstyle. Aggressive loot runs can extract in 10 minutes, while thorough exploration easily extends to 30+ minutes before extraction timers force departure.
Q: Can I lose items stored in my workshop stash? A: No, your Speranza stash remains completely safe regardless of raid outcomes. Only items you carry into raids risk loss through death, making stash management a core safety strategy.
Q: What happens if I don’t extract before the raid timer expires? A: You’ll die automatically and lose all carried items except Safe Pocket contents. Always monitor the raid timer and plan extraction with buffer time for unexpected delays.
Q: Are free loadouts worth using past the beginner phase? A: Absolutely. Experienced Raiders use free loadouts for quest completion, low-risk scouting, and testing unfamiliar maps without risking crafted gear. The zero-cost aspect remains valuable regardless of progression.
Q: How do I know which extraction points are still available? A: Your map displays active extraction points with specific icons. These locations gradually close as the raid progresses, so checking your map regularly prevents surprises when your planned exit disappears.
Q: Can other players steal items from my corpse after killing me? A: Yes, your death creates a lootable corpse containing everything except Safe Pocket items. Other Raiders can take your weapons, materials, and equipment, making every PvP death potentially expensive.
Q: What’s the fastest way to earn coins for workshop upgrades? A: Sell high-value trinkets, epic/legendary items you won’t use, and duplicate blueprints at 5,000 coins each. Focus loot runs on residential areas for maximum trinket spawns.
Q: Do skill points reset when I complete an Expedition? A: Yes, Expeditions provide a full character reset including skill trees. However, you gain permanent bonuses like extra skill points and stash space that carry across all future characters.
Q: How do I unlock new maps? A: Most maps are available immediately, though Stella Montis required a community event completion. Future expansions may introduce additional map unlock requirements.
Q: Is Arc Raiders playable offline or single-player? A: No, Arc Raiders requires an internet connection and operates as an online-only extraction shooter. Every raid occurs on shared servers with other players and ARC enemies.
Funcom has pulled back the curtain on Dune: Awakening’s Chapter 3 update, and it’s shaping up to be the survival MMO’s most substantial free content drop since launch. If you’ve been grinding away on Arrakis and felt like the endgame needed more meat on its bones, this one’s for you.
What’s Actually Coming in Chapter 3
The centerpiece of this update is a complete rebuild of the Landsraad system – not just a few tweaks, but a ground-up reconstruction. According to Creative Director Joel Bylos, this rework specifically targets player feedback about progression stalling after hitting tier 6. Nobody wants to reach endgame only to find there’s nowhere left to go.
Here’s what makes Chapter 3 different. The new Specialization system gives you actual choices about how to advance your character. These progression trees work alongside a new Augmentation system, creating multiple paths forward instead of one linear grind. Faction ranks have been extended too, so solo players and group enthusiasts alike will find meaningful rewards waiting for them.
The overland map expands with eight new locations scattered across Arrakis. Among these additions are repeatable Testing Stations featuring boss encounters with scaling difficulty – basically, the harder you push, the better the loot gets. One particularly intriguing new location is the Smugglers Run, which reportedly functions as a race map, offering a fresh take on mission design.
Combat gets some attention with the introduction of Dual Blades and the Pyrocket weapon. The Rapier receives a complete rework too, suggesting Funcom isn’t afraid to revisit existing systems when they’re not hitting the mark. For story-focused players, Chapter 3 picks up immediately after Chapter 2’s cliffhanger, delivering several hours of narrative-driven survival gameplay complete with new cinematics and fully-voiced dialogue.
Raiders of the Broken Lands DLC
Alongside the free update, Funcom is launching the Raiders of the Broken Lands DLC pack for $9.99 (included in the $24.99 Season Pass). This smuggler-themed content drop brings 73 building pieces and 17 decorations – a direct response to player requests for more construction options. You’ll also get stillsuit sets, light and heavy armor variants, weapon skins, swatches, and emotes. Everything’s purely cosmetic, so there’s no pay-to-win shenanigans happening here.
Perfect Timing for New Players
If you’ve been on the fence about trying Dune: Awakening, the Steam Winter Sale runs from December 18 through January 5 with a 35% discount – the deepest price cut since the game launched back in June. That’s solid timing considering Chapter 3 drops early in 2026.
The game will also be available on a Public Test Client before the official release, though story content will be held back to avoid spoilers. Console players on PlayStation and Xbox won’t see the game until sometime in 2026, but PC players can jump in right now.
Looking further down the road, Funcom has hinted at potential private server support with customization options, though they’re still working out the details internally. Chapter 4 is already on the horizon, with the developers positioning Chapter 3 as laying essential groundwork for future content.
Despite facing challenges – including layoffs in October and declining player counts – Funcom seems committed to addressing community feedback. Whether Chapter 3 can reverse the engagement drop and bring lapsed players back to Arrakis remains to be seen, but the scope of these changes suggests they’re taking endgame criticisms seriously.
Winter has arrived in the Rust Belt with Arc Raiders’ Cold Snap update, transforming familiar extraction zones into frozen battlefields where the weather itself becomes your deadliest enemy. Released on December 16, 2025, this major content drop introduces the Snowfall map condition, the lethal Frostbite mechanic, and the game’s first Expedition Departure Window. Whether you’re a veteran Raider or just starting your topside adventures, mastering these winter survival mechanics separates successful extractions from frozen corpses left in the snow.
What is Arc Raiders Cold Snap Update
Cold Snap marks Arc Raiders’ second major content update since the October 30, 2025 launch, following the North Line expansion that introduced Stella Montis. Unlike previous updates that added new maps or enemies, Cold Snap focuses entirely on environmental challenges that force Raiders to adapt their strategies across existing locations.
The centerpiece feature transforms four core maps with the Snowfall condition, coating Dam Battlegrounds, Buried City, Spaceport, and Blue Gate in deep snow. This isn’t just a visual refresh. The weather system introduces genuine survival pressure through reduced visibility, trackable footprints, and the health-draining Frostbite effect that punishes prolonged outdoor exposure.
Cold Snap runs as a limited-time event from December 16 until January 13, 2026, giving Raiders roughly four weeks to experience winter warfare before spring returns to the Rust Belt. The update also includes the Flickering Flames community event, new seasonal quests, and exclusive cosmetic rewards tied to winter-themed progression systems.
Understanding Frostbite Mechanics
Frostbite represents Arc Raiders’ first environmental damage mechanic that bypasses traditional armor and shields. From full health, frostbite damage takes approximately one minute and 15 seconds to down a Raider, allowing roughly three and a quarter minutes of total outdoor exposure before you collapse into the snow.
The damage begins the moment you step outside into snowfall conditions. Your screen accumulates frost effects around the edges, your character visibly shivers, and audio cues signal your declining condition. The damage rate remains constant regardless of your gear quality or upgrades, making even fully-equipped squads vulnerable to careless outdoor positioning.
Visual and Audio Warning Signs
Your character provides multiple feedback signals when Frostbite builds up. When actively building up frostbite, your character shivers, and if weapons are holstered, they hold their hands uncomfortably in front of them. These animations help you monitor your condition without relying solely on the health bar.
The most critical audio cue comes when entering shelter. Your character makes a sigh of relief when stepping inside, confirming you’ve found protection even in unexpected locations. Some overhangs and partially covered areas that don’t look like proper shelter still provide full protection from the cold.
Recovery and Safe Zones
Moving indoors immediately stops Frostbite damage progression, but the condition doesn’t clear instantly. It takes between 30 seconds and one minute inside for frostbite build-up to vanish completely. Ducking inside briefly gives you a buffer, but stepping back outside too quickly means you’ll start taking damage again sooner than if you waited for full recovery.
All you need to do to get rid of Frostbite is get inside any building, even a relatively open field depot will do. Buildings, underground spaces, and enclosed structures all qualify as safe zones. The game’s interior detection works consistently, though some areas with partial roofing require testing to confirm protection.
Cold Snap Map Changes and Strategies
The Snowfall condition rotates across four maps, with only one location affected at any given time. Snowfall is available for Dam Battlegrounds, Buried City, Spaceport, and Blue Gate, each presenting unique survival challenges based on their building density and open space ratios.
Map-Specific Survival Considerations
Dam Battlegrounds features extensive open areas with limited shelter options, making route planning absolutely critical. The sparse building distribution forces longer outdoor exposure periods, demanding precise timing and abundant healing supplies. Veterans recommend memorizing building locations before attempting Cold Snap runs on this map.
Buried City provides the most forgiving Snowfall experience with numerous indoor spaces and shorter distances between structures. The underground sections offer extended shelter periods, though increased building density also concentrates PvP encounters as multiple squads seek the same warm spots.
Spaceport and Blue Gate strike a balance between open terrain and shelter availability. These maps reward Raiders who master movement timing between buildings, offering tactical advantages to teams that coordinate their pushes and withdrawals based on Frostbite timers.
Footprint Tracking and Stealth
Snowfall introduces permanent footprint trails that reveal player movement patterns across the map. Other Raiders can follow your tracks to ambush positions or predict extraction routes. Smart teams use this mechanic offensively by backtracking along enemy prints, while defensive players avoid straight paths and use buildings to break trail continuity.
The reduced visibility from heavy snowfall partially offsets the tracking disadvantage. Blizzard conditions cut sight lines dramatically, making close-range ambushes more viable than long-distance engagements. This environmental shift favors shotguns, SMGs, and other close-quarters weapons over traditional sniper loadouts.
Optimal Loadouts for Cold Snap Survival
Surviving Snowfall maps requires complete loadout restructuring compared to standard raids. You still want to take a lot more bandages than you would normally, as you’ll easily use up a few if you do take damage from the cold. The constant health drain demands healing-focused gear choices that might seem excessive for regular conditions.
Essential Healing Items
Bandages become your primary survival tool, with experienced Raiders carrying triple their normal supply. Stack at least 10-15 bandages for solo players, with squad members each bringing similar quantities to support wounded teammates. The sustained chip damage from both Frostbite and combat quickly depletes standard healing reserves.
Adrenaline shots provide emergency health restoration during active firefights where you can’t afford healing delays. The instant health boost counters accumulated Frostbite damage while maintaining combat readiness. Priority-target these items in Supply Containers when looting Snowfall maps.
Med Kits offer efficient bulk healing during safe indoor periods, letting you top off health between building-to-building movements. The slower application time makes them unsuitable for outdoor use, but they preserve faster healing items for emergency situations.
Weapon Selection for Close-Quarters Combat
The reduced visibility and forced indoor positioning fundamentally change weapon effectiveness hierarchies. Close-range specialists dominate Cold Snap engagements, with shotguns and SMGs providing lethal firepower in building interiors where most combat occurs.
Assault rifles remain viable for Raiders comfortable with medium-range engagements between shelters. The versatility helps when transitioning between outdoor movement and indoor defense, though dedicated close-range weapons generally perform better in confined spaces.
Long-range sniper builds struggle in Snowfall conditions unless paired with close-range secondary weapons. The blizzard visibility limits effective engagement distances, while Frostbite punishes stationary outdoor positioning that sniper gameplay requires.
Augment Choices for Temperature Survival
Passive healing augments provide sustained health regeneration that partially offsets Frostbite damage. Use passive healing augments like Tactical MK.3, Combat MK.2, or Combat MK.3 to offset some of the damage. These augments won’t fully prevent Frostbite kills but extend outdoor survival time significantly.
Movement speed augments help minimize time between buildings, reducing total Frostbite exposure during rotations. The faster you move between shelters, the less healing you consume and the more supplies remain for actual combat encounters.
Expedition Departure Window Explained
The Expedition Window opened on December 17 and lasts until December 22, giving Raiders six days to decide whether to send their current character on the Expedition in exchange for powerful permanent bonuses. This voluntary prestige system represents Arc Raiders’ alternative to mandatory seasonal wipes common in other extraction shooters.
What Gets Reset
Departing on the Expedition triggers a comprehensive character reset. Your Skill Tree, Level, Stash, Workshop, Crafting Abilities, and Blueprints all reset when you restart. Everything tied to your current Raider’s progression disappears, creating a genuinely fresh start experience.
The only elements preserved across Expeditions are account-wide cosmetics, titles, and earned visual customization options. Your collection of weapon skins, character outfits, and badges carries over to every new Raider you create.
Permanent Rewards and Bonuses
The Expedition system grants substantial rewards that justify the progression loss. Your next Raider can earn up to five skill points based on the total value of your Stash and Coins at the time of departure, with one million Coins worth of value equaling one extra skill point. These permanent skill points apply to every future Raider you create, compounding across multiple Expedition cycles.
Stash space expansions provide another permanent benefit, increasing maximum storage capacity for all subsequent characters. The exact quantity increases based on your Expedition completion level, with higher contribution tiers unlocking more slots.
Temporary Account Buffs
Beyond permanent unlocks, departing Raiders receive temporary account-wide buffs that dramatically accelerate early progression. These include increased XP gain, extra Scrappy materials, increased weapon repairs, and more stash space. The buffs remain active until the next Expedition Departure Window opens, typically eight weeks later.
Account buffs will increase in power for your next three expeditions but only one departure is allowed per Expedition Window. This stacking system rewards consistent participation while preventing exploitation through repeated resets within single cycles.
Flickering Flames Event and Candleberries
The Flickering Flames event runs concurrent with Cold Snap, introducing seasonal collectibles and themed rewards. This community-driven progression system operates similarly to battle pass mechanics, with tiered rewards unlocking as players complete objectives.
Candleberry Collection Mechanics
Candleberries spawn exclusively outdoors on Snowfall maps, creating tension between resource gathering and Frostbite survival. These seasonal items appear in natural areas, requiring deliberate exploration beyond standard loot routes. The collection challenge forces Raiders to balance lucrative gathering runs against the health drain from extended outdoor exposure.
Successfully extracted Candleberries contribute toward the Candleberry Banquet Project, a communal goal where individual contributions aggregate into server-wide progress. Higher completion percentages unlock better rewards for all participants, encouraging cooperative resource gathering even in the competitive extraction shooter environment.
Crafting and Utility Items
Collected Candleberries unlock crafting recipes for various consumables and utility items. These craftable goods provide unique benefits, with some items potentially offering Frostbite resistance or enhanced healing effects specifically designed for winter survival. The exact item roster expands as community progress unlocks higher project tiers.
The Flickering Flames progression track includes 25 tiers of rewards, distributing gear, cosmetic items, and Raider Tokens throughout the unlock sequence. Players gain experience toward this track through any normal gameplay activities, not exclusively Cold Snap participation, allowing those who dislike Snowfall conditions to still earn winter event rewards.
Goalie Raider Deck and Premium Content
The Cold Snap update includes the second Raider Deck since Arc Raiders’ launch, the Goalie Raider Deck, accessible from December 26. This premium progression track offers exclusive cosmetic options and additional Raider Tokens for players willing to invest in expanded customization.
The Raider Deck system functions as Arc Raiders’ seasonal battle pass equivalent, with free and premium tiers offering different reward structures. Free players access basic rewards through standard gameplay, while premium purchasers unlock enhanced cosmetics and accelerated token acquisition.
Raider Tokens serve as the universal currency for in-game cosmetic purchases, letting players select specific items from rotating shop inventories rather than relying purely on random unlock progression. The token system ensures even premium Deck buyers retain meaningful choices about their cosmetic investments.
Skill Tree Reset Feature
Update 1.7.0 added Skill Tree Reset functionality on December 6, allowing Raiders to respec their builds without completing an Expedition. This feature addresses longstanding community requests for build experimentation flexibility, though it generated controversy regarding its implementation timing relative to the Expedition system.
The skill reset option removes one major Expedition incentive by providing build flexibility without the progression wipe. Players who primarily wanted respec capability can now achieve that goal without sacrificing their accumulated gear and blueprints. This change shifts Expedition appeal toward permanent skill point bonuses and cosmetic rewards rather than practical build adjustment needs.
Advanced Cold Snap Tactics
Mastering Cold Snap conditions requires thinking beyond basic survival instincts. Treat time outdoors as a limited resource and always know where your next shelter is before leaving cover. This mentality shift transforms how you approach every aspect of raid gameplay.
Building Control and Territory Management
Indoor spaces become premium real estate during Snowfall events. Controlling buildings provides healing zones, ambush positions, and extraction staging areas simultaneously. Smart squads fortify key structures along high-traffic routes, creating chokepoints that funnel enemy Raiders into prepared killzones.
The Frostbite pressure forces opponents to seek shelter predictably, making building defense significantly more effective than in standard conditions. Teams can camp shelter entrances knowing wounded Raiders must eventually enter to survive, turning every doorway into a potential elimination opportunity.
Timing Pushes and Rotations
Coordinating squad movements between buildings maximizes outdoor efficiency while minimizing Frostbite exposure. Designate a single team member to scout the next shelter position while others provide cover, then move as a group when the path clears. This staggered approach reduces time spent vulnerable in the open.
Monitor teammate Frostbite levels constantly, adjusting push timing based on the squad member with lowest health. Forcing weakened Raiders to maintain pace with healthy teammates invites needless deaths from environmental damage alone.
Loot Priority Adjustments
Cold Snap map conditions almost certainly increase loot value as an incentive for visiting and exploring the hazards. High-tier containers spawn more frequently during Snowfall events, rewarding Raiders brave enough to endure the harsh conditions with premium gear and valuable trade goods.
Prioritize healing items when looting during Cold Snap runs. Even finding legendary weapons matters little if you lack bandages to survive long enough to extract them. Fill inventory slots with medical supplies first, then pursue high-value items once survival needs are secured.
FAQ
Q: Does Frostbite damage ignore armor and shields? A: Yes, Frostbite bypasses all defensive equipment and deals direct health damage regardless of your gear quality or augment choices.
Q: Can I play Cold Snap maps without the Snowfall condition? A: No, when a map has the Cold Snap condition active, all instances of that location feature Snowfall and Frostbite. You must select a different map to avoid winter mechanics.
Q: How long can I survive outside before Frostbite kills me? A: From full health with no other damage, you can survive approximately three and a quarter minutes outdoors before Frostbite downs you.
Q: Do flamethrowers provide warmth against Frostbite? A: Yes, teammates using flamethrowers can prevent Frostbite buildup on nearby Raiders without causing friendly fire damage, though this is situational and risky during combat.
Q: Will missing the December Expedition Window cost me rewards? A: No, if you miss this window, your Expedition Project progress saves automatically. You can complete contributions and depart during the next cycle in approximately two months.
Q: Are Expedition rewards worth wiping my progression? A: This depends on your playstyle. The permanent skill points and stash space compound across multiple characters, making Expeditions increasingly valuable for long-term players.
Q: Can I still earn Flickering Flames rewards without playing Cold Snap maps? A: Yes, Flickering Flames progression works through any gameplay activities, not exclusively Snowfall runs. You can earn rewards on standard maps.
Q: How do I know if I’m in a safe zone from Frostbite? A: Listen for your character’s sigh of relief when entering shelter. This audio cue confirms you’ve found protection from the cold.
Q: Does the Goalie Raider Deck require real money? A: The Goalie Deck is premium content requiring purchase, though exact pricing wasn’t confirmed in the update notes.
Q: Can I reset my skill tree without doing an Expedition now? A: Yes, the December 6 update added standalone skill tree reset functionality accessible without completing an Expedition departure.
There’s something magical about gathering friends around a screen to punch through waves of enemies together. Marvel Cosmic Invasion understands this perfectly, delivering a beat ’em up that feels like it belongs in the golden age of arcade cabinets – except now you’ve got 15 Marvel heroes to choose from instead of feeding quarters into a machine.
Tribute Games, the masterminds behind TMNT: Shredder’s Revenge, have crafted another side-scrolling brawler that’s bursting with personality. From the moment you select your tag-team duo and dive into the campaign, it’s clear this isn’t just another licensed cash-grab. This is a carefully designed celebration of Marvel’s cosmic corner, wrapped in some of the most beautiful pixel art you’ll see this year.
A Roster That Actually Feels Different
The character selection screen is where Marvel Cosmic Invasion first shows its ambition. Sure, you’ve got your expected heavy hitters – Spider-Man, Iron Man, Captain America, Wolverine – but then things get interesting. She-Hulk functions as a full-blown grappler instead of just being “female Hulk.” Cosmic Ghost Rider brings his own bizarre flavor. Beta Ray Bill and Phyla-Vell might make casual fans scratch their heads, but their inclusion adds genuine depth to the roster.
What impressed me most wasn’t just the quantity of characters, but how distinct each one feels. Captain America’s shield throw ricochets across the screen, juggling enemies in the air and creating combo opportunities that feel uniquely his. Wolverine plays like an absolute berserker, latching onto enemies with his claws and tearing them apart. She-Hulk’s wrestling-focused moveset was a genuine surprise – her grabs and throws create a completely different rhythm compared to traditional brawlers.
The flying characters (roughly half the roster) add another dimension to combat. Storm, Iron Man, Nova, and others can dominate aerial space, while grounded fighters like Captain America and Venom excel at controlling the floor. Some heroes block and parry, others dodge. These aren’t just cosmetic differences – they fundamentally change how you approach each encounter. Though I’ll admit, blocking feels way more useful than dodging since a well-timed block triggers a parry. The dodge mechanics could use some love.
Tag-Team Mechanics Add Surprising Depth
Here’s where Marvel Cosmic Invasion distinguishes itself from the pack. You don’t just pick one character – you select two heroes who fight as a tag-team. At any moment, you can swap between them or call your benched hero in for an assist attack. Each character maintains their own health bar and Focus gauge (used for special attacks), creating strategic layers beyond “mash buttons until everything dies.”
The assist system opens up creative combo possibilities. Launch an enemy into the air with Captain America, swap to Wolverine mid-flight, then call Cap back in for his special while Wolverine continues the assault. With four players each controlling two heroes, battles become absolute chaos in the best possible way. Enemy feet might not touch the ground once your team gets rolling. It’s the kind of over-the-top action that makes you grin like an idiot.
Though I should mention – some characters feel significantly stronger than others. Phyla-Vell’s special hits basically the entire screen, while Venom’s requires you to be uncomfortably close to enemies. These balance quirks aren’t game-breaking, but they’re noticeable when you’re experimenting with the full roster.
Campaign and Content: Gorgeous But Brief
The campaign takes you through iconic Marvel locations rendered in stunning pixel art. From New York to Wakanda to literal cosmic realms like Valhalla, the visual variety is impressive. Tribute’s pixel artists deserve serious recognition – some backgrounds are almost distractingly beautiful. You’ll spot references to the Daily Bugle, witness the bug invasion happening in real-time behind your brawls, and encounter famous Marvel villains as bosses (some of whom join your roster afterward).
But here’s the reality check: the campaign lasts about 3-4 hours. That’s not a typo. For a $30 game, it feels surprisingly short, even by beat ’em up standards. Completionists might squeeze 15-20 hours by leveling every character, completing mission-specific challenges, and unlocking all the cosmetic rewards, but the core content is lean.
Arcade mode offers traditional beat ’em up structure with gameplay modifiers to increase difficulty, which helps with replayability. You can crank enemy counts to four-player levels while playing solo, double enemy health, or enable various other challenges. These modifiers add longevity for players who want to push the combat system to its limits, though the unlockables (palette swaps, music tracks, lore entries) aren’t particularly exciting rewards.
The levels themselves, while gorgeous, lack mechanical variety. You’re mostly walking left to right, fighting enemy waves, then facing a boss. No vehicle sections, no interesting traversal gimmicks – just straightforward brawling. Some boss fights feature clever gimmicks, but others feel disappointingly basic. The final boss, oddly enough, ranks among the least memorable despite being your climactic encounter.
The Verdict on This Cosmic Brawl
Marvel Cosmic Invasion nails what matters most in a beat ’em up: the moment-to-moment combat feels fantastic, especially with friends. The tag-team system adds genuine depth, the roster variety encourages experimentation (105 possible two-character combinations!), and the pixel art presentation is consistently gorgeous. Tee Lopes’ soundtrack provides an appropriately heroic backdrop, even if no individual track became an earworm for me.
The brevity stings, though. This feels like the foundation for something greater, and hints throughout the story suggest DLC might be coming (following the Shredder’s Revenge model). But right now, at launch, you’re getting a polished but compact experience that might leave you wanting more content to justify that price tag.
If you’re a Marvel fan who loves classic beat ’em ups, this is an easy recommendation, especially if you’ve got co-op partners ready to assemble. Just know you’re getting quality over quantity – a short but sweet cosmic adventure that respects your time while delivering genuine fun. Sometimes that’s exactly what you need.