REANIMAL is the terrifying new horror adventure from Tarsier Studios – the team that brought you Little Nightmares. Released on February 13, 2026, the game follows two orphaned siblings fighting to survive and rescue their friends from grotesque monsters across a dark, post-war world. If you’re stuck, overwhelmed, or just want to make sure you don’t miss anything, this complete REANIMAL walkthrough covers all 9 chapters, key puzzle solutions, enemy encounters, and essential tips to get you through to the end.
A full playthrough takes 3 to 6 hours. Coffins and Hidden Statues are missable and must be collected in a single playthrough – they cannot be obtained via Chapter Select. Keep that in mind before you start.
Before You Start: Essential Controls and Tips
REANIMAL is best played with a controller, even on PC. The two controls you’ll use the most are crouch (LT on Xbox / L2 on PlayStation) and sprint (RT / R2). To interact with objects or pick up items, press Y (Xbox) or Triangle (PlayStation). In solo play, press LB / L1 to command your AI companion to interact with nearby levers and co-op objects.
The game has automatic checkpoints, so if an enemy catches you, you’ll respawn close to where you died. You can also manually load your last checkpoint from the pause menu at any time.
There are 110 total collectibles across the game – 47 secrets, 18 masks, 20 posters, 5 hidden statues, 5 critters, 5 coffins, 10 rest spots, and more. Explore every corner of each chapter before moving on.
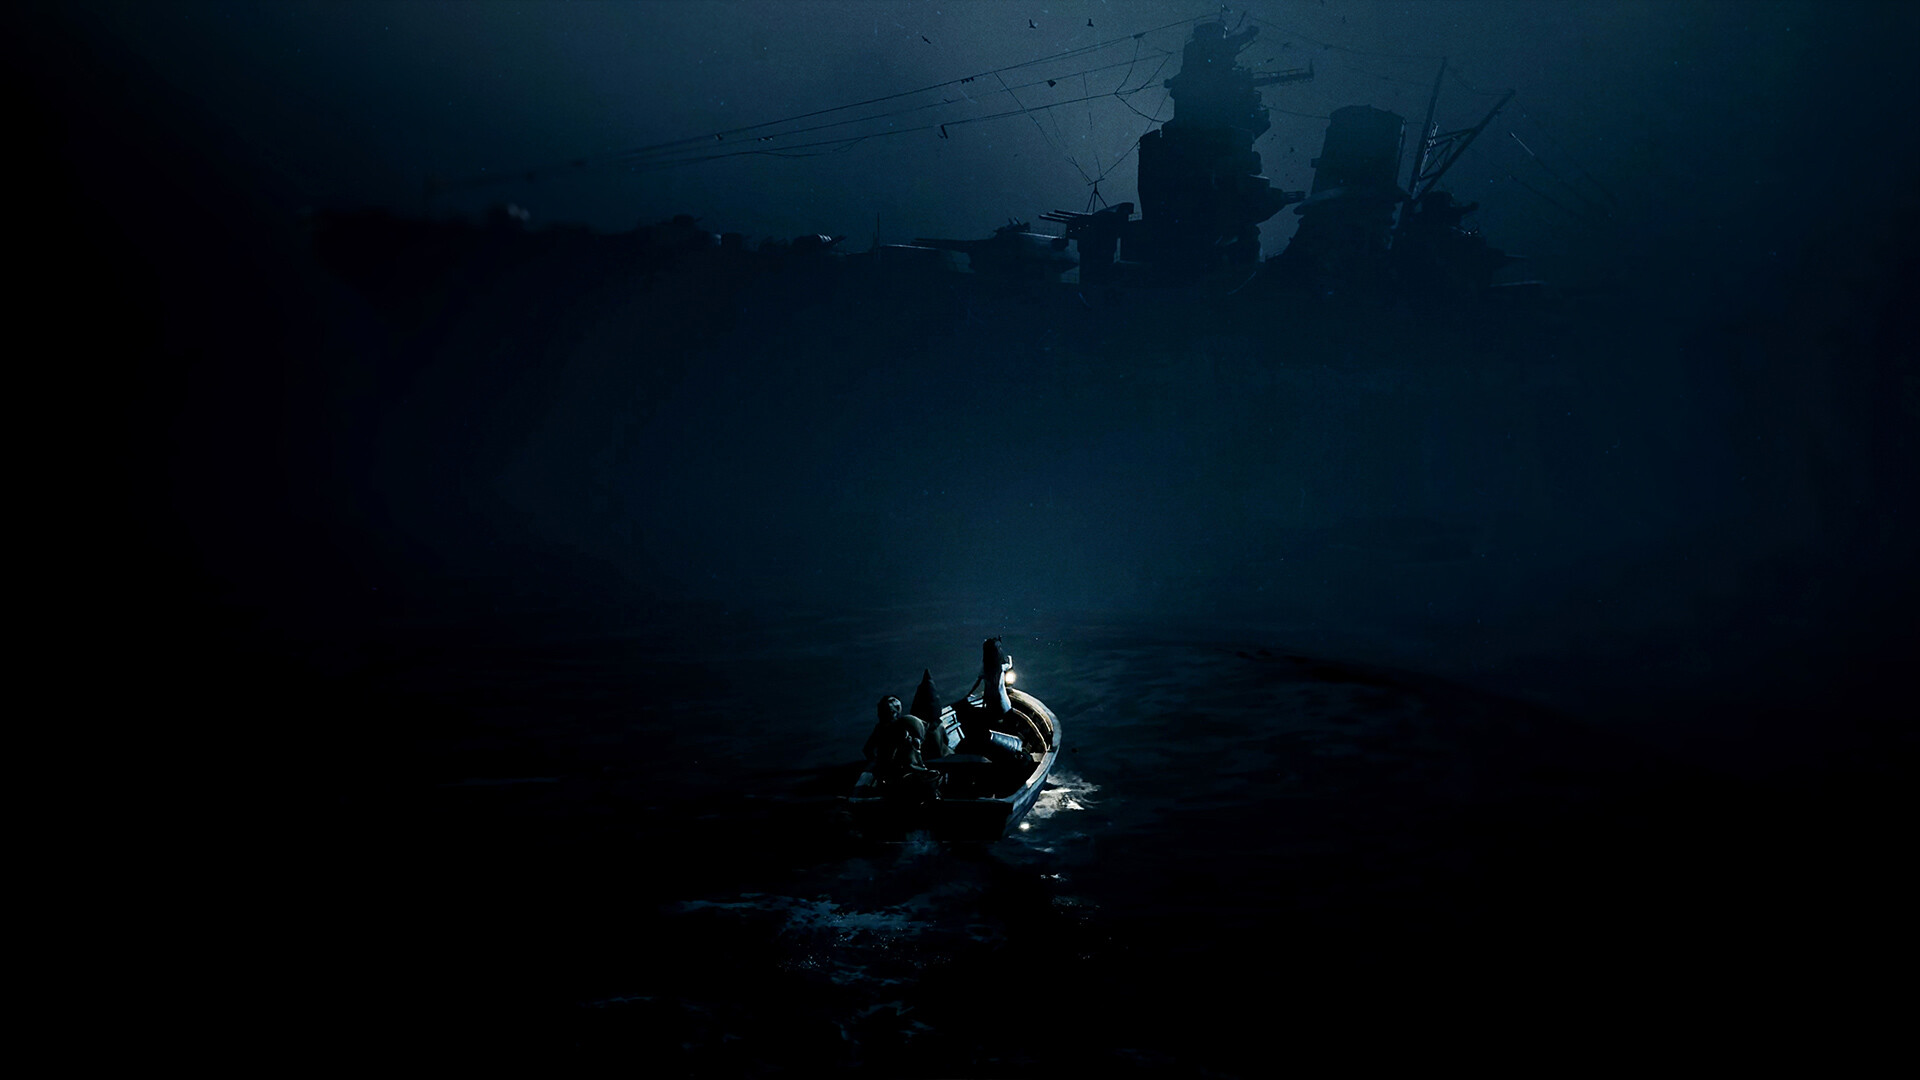
Chapter 1: Dead in the Water
The game opens with you controlling the brother on a small wooden boat in the middle of a dark lake. Hold RT (or R2) to move forward and follow the red-glowing buoys. A short cutscene plays when you reach the buoy surrounded by seagulls – your sister is pulled from the water, and she’ll be your companion from this point forward.
Continue following the buoy path, steering around sea mines as you go. When you reach the beach, open the chest in the back-left corner to find a key and use it to unlock the door on the right. Head through the sewage tunnel until you hit a section with a fan blade and a switch. Use the switch to stop the fan, then sprint through before it starts again. If your partner doesn’t make it in time, use the switch on the other side to help them through.
Key Enemy – Sniffer
Sniffer is the first major enemy you’ll encounter in the train yard. This creature hunts primarily by sound, so crouch to stay quiet and move slowly around it. When it leaves the area, follow it outside and use stacked briefcases as cover. Proceed through the abandoned train carriages, pull the lever at the end, and sprint back out through the left door. Climb the ladder and keep running to reach the chapter’s end.
The chapter closes when the two orphans escape but are forced to watch a friend get taken. Push forward and don’t look back.
Chapter 2: The Cleaning House
After a bus ride, you arrive at a forest town. The moment you step in, the floor gives way. Lock the car trunk on your left, climb over it, and squeeze through. Open the shutter and work with your sibling to push it. Inside, go through the crack in the wall behind the counter.
This chapter involves a lot of environmental puzzle-solving and stealth. The town is full of mannequins – push them down and use one of their heads to smash through a glass window to create new paths. Move through the cinema and the cleaning house, always looking for alternate routes through cracks, vents, and crawl spaces.
Key Event: The Ice Cream Truck Chase
One of the game’s most intense sequences happens here. You find a saw in a tree stump – work with your partner to cut down a tree and use it as a bridge. When the ice cream truck starts chasing you, run down the path and make the jump to safety. Your third companion is captured by the monster inside the truck. Chapter 2 ends when the truck eventually falls off a cliff onto the beach below.
Chapter 3: After the Flood
You’re back on the familiar beach from Chapter 1, but things have changed. Now armed with a crowbar, you can pry open a fence door on the right that was previously locked. Follow the path, climb the ladder, and enter. Collect the wheel inside and attach it to the right side of a mechanism outside to open the gate.
You’ll need a second wheel – head into the building on the right through a gap in a bathroom wall. Collect a plunger from the dead monster inside, use it on the fourth toilet from the left to get a key, and use the key to access a locked door leading to the second wheel. Retrieve it quickly and avoid the enemies on your way back.
Once both wheels are attached, work with your partner to push the cart down the track. The chapter revisits early locations with new access routes unlocked by your crowbar.
Chapter 4: No Shelter
After the bus ride away from the pig farm, you arrive at a run-down clock tower. Before entering, grab the poster off the pylon on your left – it’s easy to miss. Climb the stairs, then hoist your partner up the ladder to check inside the front door. Your actual route is to the right.
Climb the ladder and approach the large broken clock outside. Push the minute hand all the way to the right. This moves the hour hand and opens a gap in the clock face on the right side. Boost your partner up and through the broken glass to access the clock tower.
The Spider Kids and the King
Inside the clock tower, you’ll find children turned to stone. Pull the crowbar from one of the petrified children and use it to pry open closet doors to progress. These spider kid enemies attack in groups – defeat them using your crowbar. The trickiest encounter is the King, who sits on a throne but quickly hides when you enter the room. Clear out his followers and watch the upper-right corner of the room behind the throne – the King tries to slip away quietly. Take him out fast before he escapes. Missing him means reloading the checkpoint.
After the throne room, head upstairs, cross the theater room with the pig hanging on a rope, and continue through the chapter. There are sleeping enemies in one corridor – crouch, don’t step on them, and pry the back door open with the crowbar without waking anyone up.
Coffin 4 is hidden behind a secret door in this chapter – hug the left wall after pushing a bookcase across a gap and look for the hidden entrance.
Chapter 5: Down in a Hole
The chapter starts with you hanging from a rope. Work your way down and through the underground section. This chapter leans heavily into dark, tight corridors where sound-sensitive enemies patrol.
Move slowly and crouch often. Use distractions – throwing objects past enemies is a great way to redirect their attention. The minecart sequence introduces a new traversal mechanic; use the flashlight to spot the hidden path on the left side after this section.
The flooded basement area contains a mask behind a broken wall near the boat dock – you need to solve the water valve puzzle to access it. This chapter also contains one of the five coffins, found in the dark tunnel section.
Chapter 6: Nobody Left Behind
Chapter 6 takes the action onto open water. You’re back on the boat, navigating through mines and hunting down a massive sea monster. Clear sea mines with throwable objects before driving through them. Use the cannon on shore to take down the large bird monster – load the cannon with a shell, then aim and pull both levers when the creature is in range. It takes two shots.
After sinking the sea monster, head to the shipwreck by following the buoys. Climb the anchor to board the ship. Inside, insert an eye you find into the whale’s eye socket – it moves and clears your path forward. Don’t forget to pick up the diving masks as they count as collectibles.
Before driving into the dark tunnel at the end of the chapter, turn right and explore the path between the cliffs to find a hidden statue. This chapter also has a distance-driving achievement – if you’re tracking it, drive around the open water longer before docking for the final time.
The chapter ends when you follow the sheep and climb over the wall.
Chapter 7: The Spoils
This is where REANIMAL’s story deepens significantly. The atmosphere gets heavier and the enemies more unpredictable. Move carefully and use cover consistently. This chapter contains the final hidden statue – but you can only find the last mask tied to it if you’ve lit all the candles on the previous statues in a single playthrough.
Keep tracking your collectibles before exiting each room. The chapter also introduces the corrupted farm animal enemies, which patrol in aggressive groups. Separate them from their herd using distractions before engaging.
Chapter 8: Into the Abyss
The second-to-last chapter ramps up the pressure. Enemy patrols are denser and the environments are more maze-like. One of the five coffins is hidden here – look carefully in side rooms before progressing forward.
The long-range enemies with laser sights appear more frequently in this chapter. Keep walls and cover between you and their line of sight. You’ll also encounter explosive soldier-type enemies – listen for a beeping audio cue before they charge, and trigger them from a safe distance using thrown objects.
This chapter is the last chance to grab any coffins or hidden statues you may have missed from earlier chapters. If you’ve collected all five coffins across Chapters 3, 5, 6, 7, and 8 – you’re on track for the secret ending.
Chapter 9: The End
The final chapter brings both endings into play. If you collected all five coffins in a single playthrough, the secret ending will unlock here, revealing the deeper truth behind the nightmare world and the siblings’ connection to it. If you didn’t collect all five coffins, you’ll get the standard ending – the siblings escape the nightmare together, but questions linger.
Take your time in this final chapter. There’s no rush, and making sure you’ve grabbed any remaining collectibles here will lock in your completion percentage. The true ending is emotionally striking and well worth the effort of the coffin hunt.
REANIMAL Tips to Remember Throughout the Game
Getting through REANIMAL is a lot easier if you keep a few key principles in mind from the start. Crouch early and crouch often – enemies in this game are highly reactive to noise and movement, and crouching breaks their line of sight faster than running ever will. Use tall grass and stacked objects strategically to stay hidden during patrol zones.
In co-op, stay close to your partner at all times. The shared camera means that if you drift too far apart, the game will force you back together or create problems with visibility. And before leaving any chapter, take one last pass through the area – many collectibles are tucked in side rooms or behind destructible walls, and several are chapter-exclusive.
Finally, always back up your save at the start of each chapter if you’re going for the secret ending. This gives you a recovery point if you miss a coffin.
REANIMAL Chapter List at a Glance
Here’s a quick reference for all 9 chapters and what to watch for in each:
Chapter 1 – Dead in the Water: Boat intro, train yard, escape Sniffer
Chapter 3 – After the Flood: Beach revisited, two-wheel cart puzzle
Chapter 4 – No Shelter: Clock tower, spider kids, the King boss
Chapter 5 – Down in a Hole: Underground tunnels, minecarts, water valve puzzle
Chapter 6 – Nobody Left Behind: Open water, sea monster, shipwreck
Chapter 7 – The Spoils: Deep lore, farm animal enemies, final hidden statue
Chapter 8 – Into the Abyss: Dense patrols, explosive enemies, final coffin
Chapter 9 – The End: Both endings – standard and secret
Frequently Asked Questions (FAQ)
How many chapters does REANIMAL have? REANIMAL has 9 chapters in total. A full playthrough takes around 3 to 6 hours depending on how much you explore.
How do I get the secret ending in REANIMAL? You must find all 5 coffins in a single playthrough. The coffins are found in Chapters 3, 5, 6, 7, and 8. Collecting them via Chapter Select after the fact will not count toward the secret ending.
Can you play REANIMAL solo? Yes. REANIMAL supports solo play with an AI companion controlling the second character. You can also play online co-op or local split-screen co-op with two players.
Does REANIMAL have crossplay? Yes, REANIMAL supports crossplay across PC, PlayStation 5, and Xbox Series X/S.
What are the missable collectibles in REANIMAL? The 5 coffins and 5 hidden statues are missable and must be found in a single playthrough. All other collectibles can be obtained via Chapter Select.
How long is REANIMAL? The main story takes roughly 3 to 5 hours. A 100% completionist run with all collectibles takes around 6 to 10 hours. Speedruns can be done in about 2 hours.
Is REANIMAL related to Little Nightmares? REANIMAL is made by Tarsier Studios, the same developer behind Little Nightmares 1 and 2. It shares similar mechanics and tone but is a separate game set in a different world.
Looking for more help? Check out our REANIMAL secret ending guide (coming tomorrow), all collectible locations, and our full enemy breakdown for everything you need to conquer this haunting adventure.
Time manipulation stands as Code Vein 2’s most innovative mechanic, fundamentally distinguishing it from both its predecessor and other games in the genre. Lou’s ability to shift between past and present timelines creates unique gameplay opportunities, narrative branches, and meaningful consequences that ripple throughout your entire playthrough. Understanding how time travel works and making informed decisions during critical moments dramatically impacts your experience.
This comprehensive guide explains the time travel mechanics, documents all major story choices between timelines, details their consequences, and provides strategic recommendations for navigating this complex system. Whether you’re planning your first playthrough or optimizing a specific ending route, you’ll find the information you need to master temporal manipulation.
How Time Travel Mechanics Work
Lou’s time manipulation ability becomes available early in the story after the Cathedral District prologue. Once unlocked, you can shift between past and present versions of most major areas by interacting with Temporal Anchors scattered throughout the world. These glowing crystalline structures serve as the interface for timeline transitions and appear in consistent locations across both time periods.
Shifting timelines is instant and can be done freely without resource costs or penalties. You maintain your current health, Ichor, and all resources when transitioning between eras. Your position in the world remains identical, meaning you appear in the same physical location regardless of which timeline you occupy. This creates interesting navigation puzzles where paths exist in one era but not the other.
The past timeline generally represents the world before a catastrophic event reshaped everything. Areas appear cleaner, more intact, and populated with different enemy types. NPCs exist in the past who have long since died in the present. Items and treasures often differ between timelines, encouraging thorough exploration of both versions of each area.
The present timeline shows the world after centuries of decay and transformation. Ruined structures, overgrown vegetation, and environmental hazards dominate the landscape. Some areas are only accessible in the present after erosion or destruction created new pathways. Different enemies inhabit present areas, often representing corrupted or evolved versions of past creatures.
Certain story sequences force you into specific timelines until you complete key objectives. During these locked sequences, Temporal Anchors become inactive and display a message indicating why timeline shifts are currently unavailable. These restrictions ensure you experience critical narrative moments in their intended timeline without accidentally skipping important content.
Environmental changes between timelines create most of the game’s navigation puzzles. A collapsed bridge in the present might be intact in the past, allowing you to cross and access areas otherwise unreachable. A locked door in the past might have decayed in the present, creating an opening. Water levels, structural integrity, and obstacle placement all vary between eras.
Major Story Choices and Their Consequences
Code Vein 2 presents several critical decision points where you must choose between acting in the past or present timeline. These choices permanently alter the world state, affect character survival, determine available quests, and ultimately influence which ending you receive. The game rarely clearly signals when you’re making a major decision, requiring careful attention during dialogue sequences.
The Cathedral District Decision – Saving the Priest
Your first major timeline choice occurs during the Cathedral District storyline after defeating the area boss. Lou asks whether you want to travel to the past and prevent the priest’s corruption or remain in the present and deal with the consequences that already occurred. This decision affects the entire Cathedral questline and your relationship with Selene.
Choosing to save the priest in the past prevents his corruption and keeps him alive throughout the story. He becomes a vendor selling holy-themed items and Forma unavailable elsewhere. Selene’s questline takes a different path focused on redemption rather than revenge. You receive the Blessed Chalice key item allowing access to the Sanctuary’s hidden chambers in both timelines. This choice leads toward the Redemption ending path.
Choosing to accept the present timeline leaves the priest corrupted and eventually forces you to kill him. Selene’s questline focuses on avenging past wrongs and coming to terms with loss. You receive different rewards including the Vengeful Blood Forma and access to the Corrupted Sanctum area exclusive to this path. This choice contributes toward the Acceptance ending path.
The consequences extend beyond immediate rewards. Saving the priest affects dialogue with multiple NPCs throughout the game who reference his survival. The Cathedral District itself changes with additional pilgrims appearing and different ambient dialogue. Enemy placements shift slightly in both timelines based on this decision.
The Ashen Wasteland Decision – Industrial Catastrophe
The Ashen Wasteland presents a choice about preventing an industrial disaster that transformed a thriving mining community into a toxic hellscape. After learning what caused the catastrophe, Lou asks whether you want to travel back and stop it or leave history unchanged.
Preventing the disaster saves hundreds of lives and transforms the Ashen Wasteland into a functional mining town in the present. The area becomes a hub with multiple vendors, side quests, and friendly NPCs. You gain access to the Deep Mines area containing unique resources and equipment. Raven’s questline becomes available only with this choice since she survives the disaster. This choice is required for the Hopeful ending path.
Allowing the disaster to occur leaves the Wasteland as a toxic ruin filled with hostile mutated enemies. You find powerful items among the ruins unavailable in the saved version. The boss encounter changes to a massive amalgamation of corrupted workers instead of the human opponents in the saved timeline. You receive the Toxic Resistance Forma and unique poison-themed weapons. This choice contributes toward the Sacrifice ending path.
Gameplay differences are substantial between these outcomes. The saved Wasteland provides safe exploration with merchants and quest givers. The ruined Wasteland offers challenging combat encounters and valuable loot but no safe areas. Your choice fundamentally changes how you interact with this entire region for the rest of the playthrough.
The Forgotten Archive Decision – Preserving Knowledge
Deep within the Forgotten Archive, you discover records of forbidden research that could revolutionize Revenant understanding but also led to horrific experiments. Lou presents the choice between destroying this knowledge in the past or preserving it despite the consequences.
Destroying the research prevents the experiments from ever occurring. Dozens of test subjects never suffer and die, but the knowledge is lost forever. Mikael’s questline focuses on rediscovering lost wisdom through ethical means. You receive the Scholar’s Blessing Forma and access to the Ethical Research Wing containing safe study materials. This choice contributes toward the Mercy ending path.
Preserving the research allows the experiments to proceed, causing immense suffering but advancing Revenant science significantly. You gain access to forbidden Forma unavailable through any other means including the powerful but morally questionable Bloodforge abilities. Mikael’s questline explores the ethics of using knowledge gained through suffering. The Experimentation Chambers become accessible with unique bosses and rewards. This choice contributes toward the Progress ending path.
The narrative weight of this decision is enormous. Multiple NPCs throughout the game reference the experiments with dialogue varying dramatically based on whether they occurred. Your companion’s opinions of you shift based on this choice, with some approving preservation while others condemn it.
The Royal Tombs Decision – Dynastic Succession
The Royal Tombs area culminates in discovering information about a succession crisis that led to civil war and the eventual collapse of civilization. You can travel to the past and influence which heir takes the throne, fundamentally altering historical trajectory.
Supporting the Elder Heir leads to a more militaristic society that eventually fell to external invasion. The present timeline shows fortified ruins and military equipment scattered everywhere. You gain access to the Barracks area with soldier-themed items and weapons. Josee’s questline takes a martial honor path. This choice contributes toward the Strength ending.
Supporting the Younger Heir leads to a scholastic society focused on research that eventually destroyed itself through hubris. The present shows laboratories and libraries in ruins. You access the Academy area with magic-focused items and Forma. The narrative takes a more philosophical tone. This choice contributes toward the Wisdom ending.
Supporting neither heir and allowing the succession crisis to unfold naturally maintains the timeline as is. This neutral choice provides balanced rewards from both paths but locks you out of certain exclusive items. It’s required for achieving the True Ending where you transcend the cycle of past and present entirely.
The Volcanic Ruins Decision – Ancient Weapon
In the Volcanic Ruins, you discover an ancient superweapon that could have prevented the apocalypse if activated in the past. Lou asks whether you want to go back and activate it, potentially preventing the catastrophe that created the current world but erasing everyone currently alive including yourself.
Activating the weapon prevents the apocalypse entirely. The game enters an alternate present where society never fell and Revenants never existed. You explore a completely different version of areas you’ve already visited, now showing thriving civilization. This choice leads directly to the Paradox ending where you sacrifice yourself and everyone you know to save a world you’ll never experience.
Refusing to activate the weapon maintains the current timeline and all the people within it. You receive dialogue acknowledging that while the current world is harsh, the lives within it have value and meaning. This choice is required for most other endings and represents accepting the world as it is rather than trying to rewrite fundamental history.
This decision represents the game’s most philosophically complex choice. The game presents both options as valid with different moral frameworks supporting each. Your choice reveals whether you prioritize theoretical greater good or loyalty to the people and world you’ve actually experienced.
Timeline-Specific Areas and Content
Certain areas only exist in one timeline or change so dramatically between eras that they function as different locations. Understanding these timeline-exclusive zones is essential for complete exploration and finding all items.
Past-Only Areas
The Golden Plaza exists only in the past, showing the city’s commercial district in its prime. This bustling marketplace contains unique vendors selling rare items and Forma. Several side quests originate here that become unavailable if you don’t complete them before progressing too far in the story. The area contains the highest density of friendly NPCs in the entire game.
The Royal Gardens appear only in the past, featuring elaborate hedge mazes and decorative fountains. This peaceful area contains numerous hidden chests and serves as the starting point for several companion quests. A powerful optional boss guards the garden’s heart, accessible only in the past timeline.
The Military Academy functions exclusively in the past, providing access to combat trials and training challenges. Completing these trials rewards unique combat-focused Forma and weapon upgrades. The academy’s armory contains equipment unavailable anywhere else in the game.
Present-Only Areas
The Corrupted Depths exist only in the present, representing areas that sank or became exposed through geological changes. These underground zones contain ancient treasures and powerful enemies. The deepest sections hold optional superbosses that drop some of the game’s best equipment.
The Overgrown Canopy appears only in the present after centuries of plant growth created a jungle above the ruined city. This vertical area emphasizes platforming and exploration through massive tree branches. Unique nature-themed items and Forma are scattered throughout.
The Shattered Bridge segments only become traversable in the present after partial collapse created new pathways. These dangerous areas feature environmental hazards and tough enemies but reward exploration with valuable loot.
Dramatically Changed Areas
The Cathedral District differs substantially between timelines. The past version shows an active, holy site with priests and pilgrims. The present version is a corrupted ruin filled with undead and abominations. Enemy types, item locations, and even the layout shift between eras.
The Ashen Wasteland transforms completely based on your earlier choice. One version is a functional mining town while the other is a toxic hellscape. These represent the most extreme timeline variation in the game.
The Theater of Echoes changes from a prestigious performance venue in the past to a haunted ruin in the present. Different bosses appear in each timeline, both thematically appropriate to their era. The past boss is a corrupted performer while the present boss is an amalgamation of all who died there.
Strategic Timeline Usage for Optimization
Experienced players can exploit timeline mechanics to optimize their playthroughs in ways the game doesn’t explicitly advertise. Understanding these strategies provides significant advantages during challenging content.
Item Duplication Through Timeline Hopping
Some items appear in both timelines in the same physical location. Collecting an item in the past, shifting to the present, and collecting it again effectively duplicates that resource. This works for certain upgrade materials and consumables but not for unique equipment or Forma. The game intentionally allows this for common materials to reduce grinding.
Key farmable locations include the Cathedral District’s sanctum where Titanite Shards appear in both eras, the Wasteland mining tunnels containing ore deposits in both timelines, and various healing item caches throughout the world. Efficient players can quickly accumulate upgrade materials by systematically collecting duplicates.
Enemy Avoidance and Strategic Routing
Tough enemy encounters in one timeline might not exist in the other, allowing you to bypass dangerous areas. If a particularly nasty enemy blocks your path in the present, shifting to the past might show that location empty or populated with easier foes. This creates multiple valid routes through each area.
Speedrunners extensively use timeline hopping to skip difficult combat sections. Understanding which enemies exist in which timeline enables you to optimize your path through areas based on your build’s strengths and weaknesses.
Boss Strategy Through Timeline Mechanics
Certain bosses change behavior or even identity based on which timeline you fight them in. Learning both versions allows you to choose the more favorable matchup for your build. Some bosses are significantly easier in one timeline than the other.
The Theater of Echoes boss exemplifies this perfectly. The past version emphasizes melee combat and can be trivialized by magic builds maintaining distance. The present version focuses on ranged attacks and summons, making it easier for mobile melee builds to rush down and interrupt.
Quest Optimization and Timeline Management
Some quests require you to complete objectives in both timelines sequentially. Understanding the optimal order prevents backtracking and saves time. Always examine quest descriptions carefully for timeline-specific requirements.
Companion quests frequently demand timeline hopping to progress. Lou’s questline naturally involves extensive timeline manipulation. Raven’s quest requires preventing certain events in the past then dealing with their consequences in the present. Efficient quest completion demands strategic timeline planning.
Timeline Choices and Ending Requirements
Code Vein 2 features six main endings plus a hidden true ending. Each ending has specific requirements tied to your timeline choices throughout the game. Understanding these requirements allows you to plan your playthrough toward your desired conclusion.
Redemption Ending Requirements
This ending requires choosing to save NPCs and prevent disasters in most major timeline decisions. You must save the Cathedral priest, prevent the Wasteland disaster, destroy the forbidden research, and generally prioritize mercy over progress. Complete all companion quests with choices emphasizing second chances and forgiveness.
The Redemption ending shows a future where the cycle of suffering breaks through compassion and sacrifice. Characters you saved appear in the epilogue building a better world. This ending emphasizes that changing the past can heal the present when done with care and wisdom.
Acceptance Ending Requirements
This ending requires accepting the present timeline as it exists without attempting to change major historical events. Don’t save the priest, allow the Wasteland disaster, and generally refuse to meddle with established history. Complete companion quests with choices emphasizing moving forward rather than dwelling on past regrets.
The Acceptance ending shows characters finding peace with their circumstances and building meaning despite tragedy. The epilogue emphasizes that the present has value even when born from suffering, and those living now deserve life regardless of how they came to exist.
Hopeful Ending Requirements
This ending requires actively improving the timeline through strategic interventions. Save the Wasteland, preserve beneficial knowledge while destroying harmful research, and make choices that maximize survival. Complete most side quests successfully with positive outcomes.
The Hopeful ending demonstrates that careful application of time manipulation can genuinely improve the world. The epilogue shows flourishing communities built on the foundation of your interventions, suggesting that changing the past isn’t inherently wrong when done thoughtfully.
Sacrifice Ending Requirements
This ending requires accepting personal loss to achieve broader goals. Allow some NPCs to die if their deaths serve greater purposes, preserve dangerous knowledge for its potential benefits, and make pragmatic rather than emotional choices. Complete companion quests with outcomes that prioritize collective good over individual happiness.
The Sacrifice ending shows a harsh but functional world built on difficult compromises. The epilogue acknowledges that progress sometimes demands painful costs, and those who accept this burden carry heavy responsibility.
Paradox Ending Requirements
This ending requires activating the ancient weapon in the Volcanic Ruins, erasing the current timeline entirely. You must pursue this specific path while making choices that question the fundamental validity of the current world. This ending locks you out of all others.
The Paradox ending shows the alternate timeline where the apocalypse never occurred. You witness a thriving world briefly before fading from existence, never having been born in this new history. The epilogue questions whether this constitutes victory or tragic loss.
True Ending Requirements
The hidden True Ending requires completing all companion quests, discovering all major timeline secrets, and making balanced choices that don’t favor any single ending path too heavily. You must support neither heir in the Royal Tombs decision specifically. Collect all Temporal Fragments hidden throughout both timelines.
The True Ending transcends the binary of past versus present, revealing deeper truths about the nature of time and existence in the Code Vein universe. This ending provides the most narrative closure and requires the most thorough playthrough to achieve.
Timeline Secrets and Hidden Content
Beyond major story choices, numerous secrets tie specifically to timeline manipulation mechanics. Finding these secrets requires careful observation and experimentation with timeline shifts.
Temporal Fragments
Temporal Fragments are collectibles that only appear when you fulfill specific conditions in both timelines. For example, lighting a brazier in the past might cause a fragment to appear in that location in the present. Collecting all fragments is required for the True Ending and unlocks powerful rewards.
Each major area contains three to five Temporal Fragments. Some require solving environmental puzzles across timelines. Others appear after defeating specific enemies in both eras. A few demand completing side quests with particular outcomes. Dedicated collectors should explore every area thoroughly in both timelines.
Ghost NPCs and Echoes
Certain locations contain ghost NPCs in the present timeline who represent people you can meet alive in the past. Talking to both versions of these characters reveals additional lore and sometimes triggers side quests. These echoes provide poignant commentary on the passage of time and the weight of history.
The Theater contains the most elaborate ghost sequence where you can witness a performance in the past then see the ghostly reenactment in the present. Watching both versions unlocks the Theatrical Memoria quest with unique rewards.
Timeline Paradoxes
The game contains several intentional paradoxes where your actions in the past create impossible situations in the present. These paradoxes are acknowledged by Lou and other characters as evidence that time manipulation isn’t perfectly understood. Some paradoxes must be created to access certain areas or items.
The Bootstrap Paradox quest involves delivering an item to the past that you originally found in the present, creating a causality loop. Completing this philosophical puzzle rewards unique Forma related to temporal manipulation.
Companion Reactions to Timeline Choices
Your companions express opinions about your timeline decisions that affect your relationships with them. Understanding their preferences helps maintain positive relationships and access their best content.
Lou appreciates choices that use time manipulation thoughtfully rather than recklessly. She approves of saving people when possible but also accepts that some events must remain unchanged. She strongly disapproves of the Paradox ending path.
Josee favors pragmatic choices that accept harsh realities. She approves of allowing disasters to occur if they serve greater purposes. She strongly opposes the Redemption path as naive but respects the Sacrifice ending.
Raven prefers choices that value individual lives over abstract principles. She approves of saving the Wasteland since it preserves her life. She disapproves of preserving dangerous knowledge if it caused suffering.
Mikael supports preservation of knowledge regardless of cost. He approves of keeping the forbidden research but also respects destroying it for ethical reasons. He’s most interested in understanding time mechanics themselves.
Selene values redemption and second chances above pragmatism. She strongly approves of saving the priest and preventing disasters. She disapproves of accepting tragedy as inevitable when alternatives exist.
Frequently Asked Questions
Can I change my major timeline decisions later?
No, major story choices are permanent once made. You can experience different outcomes only through separate playthroughs or New Game Plus.
Does timeline choice affect difficulty?
Not directly, though some timeline versions of areas contain tougher enemies than others. Choose based on story preference rather than difficulty concerns.
Can I miss the True Ending permanently?
Yes, certain choices permanently lock you out of the True Ending. Supporting either heir in the Royal Tombs decision prevents True Ending achievement.
Do I need multiple playthroughs to see all content?
Yes, seeing every timeline variation, ending, and exclusive area requires at least three playthroughs due to mutually exclusive choices.
What carries over to New Game Plus?
Your character level, equipment, Forma, and timeline choice records carry over. Major story decisions reset, allowing you to choose differently.
Which ending is considered canon?
The developers haven’t specified a canon ending, suggesting all outcomes are equally valid within the game’s narrative framework.
Choosing the right weapon in Arc Raiders means the difference between extraction success and losing everything to hostile Raiders or relentless ARC machines. Unlike traditional shooters where you equip your favorite gun every match, this extraction shooter forces you to constantly adapt your arsenal based on what you craft, find, or buy. The December 2025 meta has shifted dramatically after recent balance patches, with some budget weapons now outperforming expensive alternatives. Understanding which guns deliver the best performance relative to their cost separates successful Raiders from those perpetually broke in Speranza.
Understanding the Arc Raiders Weapon Meta
The Arc Raiders weapon meta revolves around three core factors that determine true effectiveness rather than raw damage numbers alone. Performance-to-cost ratio matters most in this extraction shooter because losing your loadout means starting over from scratch. A weapon that costs minimal resources to craft but delivers solid combat results always trumps an expensive gun that performs marginally better.
Performance evaluations consider PvP effectiveness, affordability including crafting costs and blueprint rarity, community response and usage trends, and optimal builds with full upgrades and attachments. The most successful Raiders master weapons that balance power, availability, and versatility across both player-versus-player combat and ARC elimination scenarios.
Ammunition type creates the second crucial consideration. Heavy ammo shreds both ARC machines and players thanks to strong armor penetration, making heavy weapons essential for tackling armored enemies. Medium and light ammo weapons excel at sustained fire but require more shots to penetrate thick plating. Your loadout should typically include one heavy weapon for armor breaking and a complementary secondary for different engagement ranges.
Blueprint accessibility directly impacts your weapon options throughout progression. Common and uncommon weapons require easily-found materials, while epic and legendary firearms demand rare components and advanced workbench levels. The best value weapons find the sweet spot between availability versus damage output and combat effectiveness, letting you rebuild loadouts quickly after unsuccessful raids.
S-Tier Weapons: Meta Defining Powerhouses
These weapons dominate the December 2025 meta through exceptional performance that justifies their acquisition costs. S-tier guns excel across multiple combat scenarios and remain viable from early progression through endgame content.
Ferro: The Budget King
The Ferro is widely considered the best value weapon in the game, a common rarity break-action rifle that punches significantly above its weight class. Despite its basic classification, this single-shot powerhouse delivers devastating damage that strips ARC armor plates instantly and breaks enemy shields with one well-placed round.
You can craft one for just five metal parts and two rubber parts at the Gunsmith, making the Ferro absurdly affordable compared to its combat effectiveness. The weapon fires heavy ammo with exceptional armor penetration, positioning it as your primary tool for ARC elimination throughout your entire raiding career. Against human opponents, the Ferro functions as an opening shot weapon that breaks shields, allowing quick followup eliminations with faster-firing secondaries.
The single-shot reload mechanic represents the Ferro’s only significant weakness. You must play from cover using peek-and-shoot tactics, as extended exposure during the lengthy reload animation invites punishment. Skilled Raiders pair the Ferro with fast-firing pistols like the Anvil, creating a devastating combo where you initiate with armor-breaking heavy rounds then finish with rapid secondary fire.
Anvil: The Pocket Cannon
The Anvil functions as S-tier with hand cannon damage, serving almost like a primary weapon despite occupying your secondary slot. This heavy ammo pistol delivers slow but devastating shots that excel at landing critical hits on ARC weak points. The weapon weighs significantly less than primary rifles while maintaining comparable per-shot damage output.
High-skill players favor the Anvil because it provides heavy-hitting capability without the mobility penalty of carrying two full-size rifles. You can engage targets at surprising distances thanks to excellent accuracy, effectively functioning as a pocket sniper for opportunistic long-range eliminations. The reduced weight compared to primary weapons means more inventory space for valuable loot without sacrificing defensive firepower.
The Anvil’s slow fire rate demands precision rather than spray-and-pray tactics. Each shot must count, making this weapon less forgiving for newer players still developing their aim. Veterans who consistently land headshots find the Anvil invaluable, while less accurate Raiders might prefer faster-firing alternatives that allow correcting misses through volume of fire.
Venator: The Nerfed Giant
The Venator remains arguably the best weapon in Arc Raiders now, a hand cannon that fires two bullets at once for the cost of just one. Recent nerfs reduced its fire rate upgrades from 22/44/60 percent to 13/26/40 percent across all tiers, and its weight increased from 2 to 5 kilograms. Despite these adjustments, the double-shot mechanic maintains devastating close-to-medium range performance.
Known for its high damage output and effectiveness against people and ARC armor plating, the gun’s ability to deal significant damage is especially seen in close to mid-range engagements. The Venator rewards players who position carefully and land deliberate shots rather than relying on spray tactics. Post-nerf handling feels slower, but the power compensation makes every downside acceptable for Raiders who emphasize accuracy and timing.
The weapon still dominates PvP encounters when wielded by skilled players who understand optimal engagement distances. At close range, the dual-projectile system shreds light shields almost instantly, while medium distances allow consistent two-tap eliminations on wounded targets. The increased weight now forces inventory management decisions, as carrying the Venator reduces loot capacity more than pre-patch.
Bettina and Hullcracker: Specialist Dominance
The Bettina is a heavy ammo assault rifle that feels heavy to handle but shreds both players and machines if you can control the recoil. This weapon excels in sustained firefights where you need continuous armor-breaking capability without frequent reloads. The full-auto fire mode makes it more forgiving than single-shot alternatives, though managing vertical climb requires practice or appropriate attachments.
The Hullcracker is almost useless against human players due to slow projectile speed, but it is the single best weapon for deleting high-level ARC bosses instantly. This specialized launcher fires explosive rounds that devastate large mechanical enemies when aimed at critical weak points. Recent balance changes adjusted explosive damage distribution, requiring more precision targeting rather than simple splash damage reliance.
The Hullcracker’s situational nature means you should carry it specifically for boss hunting or ARC-focused raids rather than general-purpose combat. Its extreme effectiveness against Matriarchs and other heavy machines justifies the inventory space when tackling high-tier PvE content. Against other Raiders, however, the slow projectile travel time and limited magazine capacity make the Hullcracker a liability in firefights.
A-Tier Weapons: Reliable Performers
A-tier weapons deliver consistent performance across most situations without quite reaching the meta-defining impact of S-tier options. These guns represent safe choices that won’t disappoint while leaving room for personal preference in playstyle adaptation.
Tempest: The True Assault Rifle
The Tempest is without question the best assault rifle in the game, boasting solid stability, range, and decent damage as a very consistent firearm. Good for quickly bursting someone down, the Tempest excels within a 10-20 meter range and pairs excellently with precision rifles like the Ferro or Renegade for complementary engagement coverage.
The weapon fires medium ammo with manageable recoil patterns, allowing sustained accurate fire during extended engagements. This makes the Tempest ideal for suppressive fire tactics or fighting multiple opponents sequentially. The smooth handling characteristics require less attachment investment compared to heavier alternatives, though you still benefit from recoil control mods.
The only downside with this gun is that it absolutely chews through ammo, so make sure to bring a few stacks; otherwise, you could run out after your first fight. Budget-conscious Raiders should factor ammunition costs into overall loadout expenses. The Tempest demands either significant ammo reserves or aggressive looting during raids to maintain sustained combat capability.
Renegade: Long-Range Specialist
The Renegade is probably the best long-range weapon for taking down enemies currently in Arc Raiders, using medium ammo to drop a light shield player in 4 shots to the head. This makes it especially deadly for players who prefer maintaining distance or poking at enemy Raiders during firefights. The one-bullet-at-a-time reload mechanic allows you to interrupt reloading to continue firing if you don’t need a full magazine.
The Renegade functions as a marksman rifle that bridges the gap between assault rifles and dedicated snipers. You maintain mobility advantages over scoped weapons while still threatening targets at extended ranges. The weapon rewards tap-firing discipline, where controlled single shots prove more effective than sustained automatic fire.
Against ARC enemies, the Renegade’s medium ammo provides adequate but not exceptional armor penetration. You’ll eliminate light and medium machines efficiently but struggle against heavily armored targets compared to heavy ammo alternatives. The weapon shines brightest in PvP-focused loadouts where player elimination takes priority over machine farming.
Il Toro: The Building Clearer
Il Toro is one of two shotguns in Arc Raiders and there’s a good reason you see this weapon on everyone in maps like Stella Montis, hitting like a truck with remarkably long range for a scattergun. Where the Il Toro really shines is when you are peak fighting someone, fantastic for quickly peaking out of cover, firing a round, and swiftly ducking back before your opponent fires.
The pump-action mechanism delivers 67.5 damage per shot at close range, enough to erase lightly-armored Raiders instantly at arm’s length. The weapon dominates tight building interiors where engagement distances favor shotgun effectiveness over rifle precision. Maps with dense structures like Stella Montis transform the Il Toro into a constant threat around every doorway.
The heavier weight compared to other shotguns and slower pump speed create tactical considerations for loadout building. You sacrifice some mobility for raw stopping power, making the Il Toro less suitable for open-field combat. Against armored ARC units, the weapon underperforms dramatically compared to high-penetration alternatives.
B-Tier Weapons: Situational Choices
B-tier weapons excel in specific scenarios or playstyles but lack the universal reliability of higher-ranked options. These guns can absolutely secure victories with appropriate tactics, though they demand more from the wielder to maximize effectiveness.
Osprey: Scoped Precision
Osprey is the long-range sniper rifle for both PvP and PvE, hitting extremely hard per shot with a built-in scope that lets you punish anyone who peeks. The integrated magnification distinguishes the Osprey from other precision weapons, providing guaranteed long-distance capability without requiring attachment investment.
The weapon weighs 7 kilograms compared to the Ferro’s 12, offering better mobility while maintaining competitive damage per shot. This weight advantage matters significantly when your loadout includes multiple weapons and you need inventory capacity for high-value loot. The forced scope usage creates the primary weakness, as you cannot utilize iron sights for close-range defensive shooting.
Against ARC enemies, the Osprey’s moderate armor penetration means the Ferro remains superior for machine elimination despite the Osprey’s other advantages. You’ll find the weapon most valuable in PvP-heavy raids where eliminating distant Raiders takes priority over farming mechanical opponents. The fixed magnification lacks zoom variability, limiting tactical flexibility compared to variable optics.
Vulcano: Shotgun Alternative
Vulcano represents S-tier shotgun choice according to several community assessments, offering a lighter alternative to the Il Toro with different handling characteristics. The weapon delivers comparable close-range devastation while potentially providing faster follow-up shots depending on your preference between pump-action and semi-automatic mechanisms.
Shotguns like Vulcano and Il Toro are excellent in tight spaces thanks to their burst damage but struggle in open areas due to low range and weak penetration. This fundamental limitation means shotgun viability fluctuates dramatically based on map selection and your intended playstyle. Raiders focusing on building control and interior defense find shotguns invaluable, while those preferring open-field mobility should prioritize rifles.
The choice between Vulcano and Il Toro often comes down to personal handling preferences rather than objective superiority. Both weapons accomplish the same tactical role with slightly different firing mechanics. Experiment with each to determine which shotgun pattern better matches your peek-and-shoot rhythm during building combat.
Weapon Crafting and Blueprint Farming
Building your ideal arsenal requires understanding Arc Raiders’ crafting economy and blueprint acquisition methods. With 68 unique blueprints scattered across the wasteland, knowing where to hunt and how to farm efficiently can make the difference between struggling with basic gear and dominating raids with legendary weapons.
Essential Crafting Materials
Weapons demand three material tiers with increasing rarity. Metal parts, rubber parts, plastic parts, chemicals, and fabric represent common resources that Scrappy (your passive collection rooster) generates automatically between raids. These basic materials craft starter weapons and common ammunition types without requiring dangerous farming runs.
Mechanical components occupy the middle tier, requiring either direct looting from industrial zones or crafting at your Refiner station. You can craft a mechanical component using 7 metal parts and 3 rubber parts in Refiner, providing a reliable conversion path when you accumulate excess basic materials. Dam Battlegrounds locations like Water Treatment Control and Scrap Yard, along with Blue Gate areas like Adorned Wreckage and Checkpoint contain mechanical components.
Advanced materials like ARC circuitry, mod components, and complex gun parts demand significant blueprint investment and workbench upgrades. These resources unlock epic and legendary weapon crafting but require successful extractions from high-risk zones. Budget your advanced materials carefully, saving them for weapons you’ll actually use rather than crafting everything available.
Blueprint Locations and Farming Routes
Security lockers require level 36 in the Survive skill tree but offer the highest blueprint drop rates in the game, with these purple-tier containers consistently delivering rare blueprints while most players ignore them completely. Unlocking security locker access should be a priority skill investment for Raiders focused on expanding their crafting repertoire quickly.
The best results for blueprint farming come from medium or high loot value residential and commercial areas during night raids, with the Blue Gate Village area appearing as the best option. Night raids provide increased blueprint spawn chances across all container types, making them essential for efficient farming despite the reduced visibility and navigation challenges darkness creates.
One of the best blueprint farming spots is tucked beneath the raised highway where it ends in Dam Battlegrounds, between Raider Outpost East and East Broken Bridge, with a raider cache spawn in a small gap there accessible via zipline from the ground or dropping from the highway above. Learning specific high-value spawn locations lets you create efficient looting routes that maximize blueprint acquisition per time invested.
Workshop Progression Strategy
Your workshop houses seven specialized workbenches that require strategic upgrade sequencing. The Workshop operates as your personal tech tree, where you must systematically upgrade each workbench through three levels, unlocking increasingly powerful blueprints and recipes. Attempting to upgrade everything simultaneously spreads resources too thin and delays accessing the gear you actually need.
Prioritize Gunsmith upgrades early to unlock weapon modification capabilities and advanced firearm blueprints. Upgrades are done at the Gunsmith bench, improving damage, handling, and magazine size using mechanical components, metal parts, and other ARC materials. Weapon upgrades often provide better performance improvements than crafting new weapons, making your favorite guns stronger rather than constantly chasing new blueprints.
The Refiner becomes invaluable once upgraded, allowing material conversion that multiplies your crafting capacity. The Refiner allows you to convert 5 metal parts into 1 mechanical component, making material management significantly easier in the long term. This conversion path means you can transform abundant basic materials into scarce intermediate components without requiring dangerous high-tier zone farming.
Weapon Attachments and Modifications
Weapon modifications transform adequate guns into exceptional performers through targeted stat improvements. Common and uncommon attachments always give only upsides with no downsides to using them, making these low-tier modifications absolutely worth equipping whenever available. Higher rarity attachments introduce trade-offs that require careful evaluation.
Must-Have Attachment Types
Extended magazines represent the single most impactful attachment category across all weapons. The base magazine sizes in Arc Raiders are deliberately small to create tension, with extended shotgun mag III being the undisputed king by adding 6 shells to the Vulcano’s 4-shell capacity for a 150 percent increase in firepower. For assault rifles and SMGs, extended magazines add enough rounds to eliminate multiple targets before reloading becomes necessary.
Silencers and magazines are the only attachments with no downsides, regardless of rarity, making them universally beneficial equipment that never hurts your weapon performance. Suppressors prove especially valuable for stealth-focused Raiders who want to eliminate ARC scouts or isolated enemy players without broadcasting their position to the entire map.
Compensators and muzzle brakes control recoil through different mechanisms. Compensators decrease dispersion (the potential window of where bullets will fly) with per-shot dispersion more important for semi-auto or burst-fire weapons, while max shot dispersion matters more for full-auto ones. Muzzle brakes work better with guns that have strong recoil, though compensators are generally recommended over brakes since you can reduce recoil with stocks or grips.
Weapon-Specific Attachment Strategies
Assault rifles like the Arpeggio excel with compensator III and extended medium mag III for sustained engagements, while shotguns such as the Il Toro benefit from shotgun choke III (40 percent dispersion reduction) and shotgun silencer for close-quarters stealth. Matching attachments to weapon strengths amplifies what your gun already does well rather than attempting to compensate for fundamental weaknesses.
Sniper rifles like the Osprey maximize effectiveness with extended barrel (25 percent bullet velocity increase) and silencer III, enhancing their long-range capabilities while maintaining stealth for multiple-shot engagements. The velocity boost ensures your projectiles reach distant targets before they can react to your firing position.
Full-auto weapons like the Tempest, Bobcat, and Stitcher demand recoil management as their primary attachment consideration. These guns work better with muzzle brake II immediately for handling both vertical and horizontal recoil, with tier 2 attachments often providing better value than tier 3 due to lower material costs and avoiding durability penalties.
Attachment Rarity Economics
Tier 2 attachments often provide the best economic value, with muzzle brake II giving 20 percent vertical and horizontal recoil reduction using mechanical components, while muzzle brake III gives 25 percent reduction using rare mod components and increasing durability burn rate. The minimal performance jump from tier 2 to tier 3 rarely justifies the massive material cost increase and accelerated weapon degradation.
When you die in Arc Raiders, you lose your loot, so low risk runs should use tier 1 mods, medium risk farming should use tier 2 mods with mechanical components, and only high risk boss hunting justifies equipping S-tier and A-tier mod component gear. Match your attachment investment to mission stakes, avoiding wasteful material loss during routine farming runs.
Common green attachments frequently outperform their rarity suggests. Uncommon green attachments are often the sweet spot, providing best value with strong benefits and fewer nasty drawbacks than blue rare parts, as legendary sounding upgrades are not always automatic improvements. Test different attachment tiers during safe raids to discover which modifications actually improve your performance rather than automatically equipping the highest rarity available.
Loadout Building Fundamentals
Successful Arc Raiders loadouts balance multiple competing priorities rather than simply equipping your two favorite weapons. Primary weapons should cover your preferred engagement style while secondaries compensate for primary weaknesses. Solo raiders benefit from flexible setups, with a Renegade for mid-range control paired with a Bobcat for close-range bursts giving strong survivability and reliable engagement options.
Range Coverage Strategy
Every loadout needs answers for both close and distant threats. Carrying two long-range weapons leaves you vulnerable during building assaults or surprise close encounters, while dual close-range weapons invite elimination from distant snipers before you can return effective fire. The classic combination pairs a precision rifle with a spray weapon, giving you tools for any situation.
Use weapons with heavy ammo or energy clips, as they offer stronger armor penetration needed for tougher ARC enemies, ensuring at least one weapon in your loadout can damage heavily-armored targets effectively. Against human opponents, armor penetration matters less than damage output and fire rate, but mixed PvPvE scenarios demand loadouts that handle both threat types.
Weight management influences combat effectiveness beyond simple inventory calculations. Heavier loadouts reduce mobility and stamina regeneration, making you easier to track down and eliminate. Lighter configurations sacrifice raw firepower for superior positioning capability, often proving more valuable than slightly higher damage numbers.
Ammo Type Considerations
Carrying weapons that use the same ammunition type streamlines inventory management by requiring fewer different ammo stacks. However, this approach creates risk if you encounter sustained combat that depletes your single ammo type completely. Mixing medium and heavy ammo weapons provides flexibility while still allowing reasonable stack management.
Light ammo weapons offer the highest round counts per inventory slot, making them ideal for extended raids where resupply opportunities remain uncertain. Medium ammo strikes a balance between damage and availability, while heavy ammo delivers maximum per-shot impact at the cost of inventory efficiency. Your ammo selection should align with raid duration expectations and planned combat intensity.
Crafting costs vary significantly between ammunition types. Light and medium ammo remain relatively cheap to produce at your workbench, while heavy ammo and specialized rounds demand more expensive materials. Factor ammunition crafting expenses into your overall loadout economics, as weapons become liabilities when you cannot afford to shoot them.
FAQ
Q: What is the absolute best weapon in Arc Raiders for beginners? A: The Ferro offers unmatched value for new players. It costs just five metal parts and two rubber parts to craft while delivering devastating heavy ammo damage that remains effective throughout your entire progression.
Q: Should I upgrade weapons or craft new ones? A: Upgrading favorite weapons typically provides better performance value than constantly crafting new alternatives. A fully-upgraded common weapon often outperforms higher-rarity base models.
Q: How do I get rare weapon blueprints quickly? A: Focus on security lockers after unlocking level 36 Survive skill, farm Blue Gate Village during night raids, and participate in Harvester events for guaranteed rare blueprint drops.
Q: Are epic and legendary weapons worth the crafting cost? A: Only if you have excess materials and rarely lose loadouts. Budget weapons like the Ferro and Anvil deliver comparable combat results at a fraction of the resource investment.
Q: What attachments should I prioritize crafting first? A: Extended magazines provide the most universal benefit across all weapons. Craft these before investing in specialized attachments like compensators or stocks.
Q: Can I use the same loadout for both PvP and PvE? A: Partially. Weapons with heavy ammo and strong armor penetration work for both, but dedicated PvP loadouts favor faster-firing medium ammo weapons while PvE benefits from single-shot heavy hitters.
Q: How much ammo should I bring per raid? A: Carry at least 60-90 rounds for your primary weapon and 30-45 for your secondary. Adjust based on weapon fire rate and your typical combat frequency.
Q: Is the Venator still good after the nerf? A: Yes, though it requires more skillful play than pre-nerf. The double-shot mechanic remains devastating in the right hands despite reduced fire rate and increased weight.
Q: Should I sell duplicate blueprints? A: Yes, duplicate blueprints sell for 5,000 coins each. Once you learn a blueprint, additional copies provide pure profit that funds other purchases.
Q: What’s the best weapon combo for Stella Montis? A: The Il Toro shotgun paired with a medium-range rifle like the Tempest dominates Stella Montis’ close-quarters building interiors while maintaining capability for outdoor transitions.
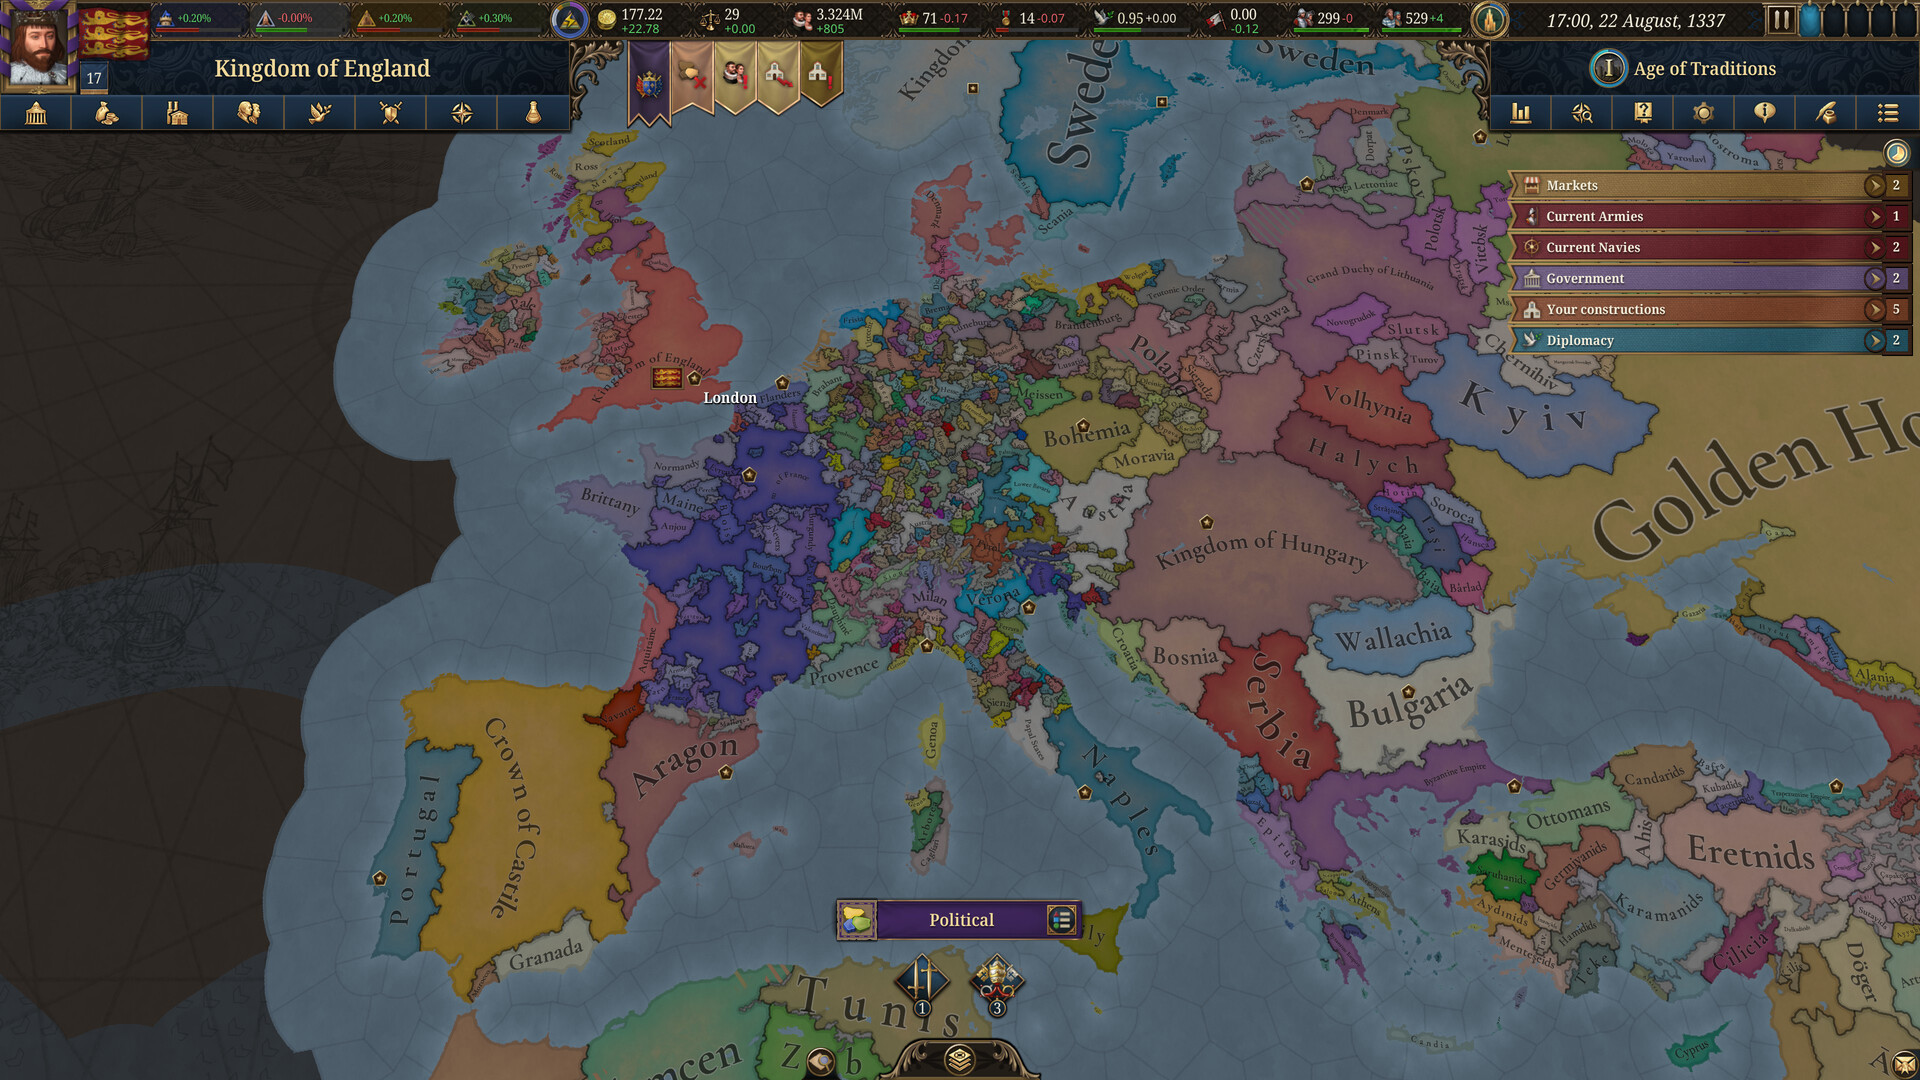
Europa Universalis V launched on November 4, 2025, marking the triumphant return of Paradox Interactive’s flagship grand strategy franchise. This massive historical simulator lets you control any nation across nearly 500 years of world history, from 1337 to 1837. Whether you’re guiding the mighty Ottoman Empire, building a colonial powerhouse as Portugal, or transforming a tiny European duchy into a continental hegemon, EU5 delivers unprecedented depth and complexity for strategy gamers.
After five years of development by Paradox Tinto, this sequel to 2013’s Europa Universalis IV brings revolutionary changes to the beloved formula. The game eliminates the controversial mana system, introduces sophisticated population simulation, and features over 20,000 locations across an enhanced world map. With generally favorable reviews from critics and an 82% positive rating from players, Europa Universalis V represents the series at its most ambitious.
What Makes Europa Universalis V Different from Previous Games
The new population system features individual population units with their own needs, making independent decisions shaped by cultural and religious influences. This complex simulation appears directly on the world map and replaces many abstract systems from earlier Europa Universalis games. Each pop contributes to your economy, military, and social stability in ways that feel organic and historically authentic.
The removal of monarch mana fundamentally changes how you develop your nation. Instead of abstract points, the game introduces situations – dynamic challenges based on real historical events or structural crises. These situations create meaningful decision points that reflect the actual problems rulers faced during the early modern period. You’ll deal with noble revolts, religious reformations, succession crises, and economic disruptions that demand strategic responses rather than simple point spending.
Unlike previous editions, most gameplay elements can be automated at your discretion, allowing you to focus on specific mechanics like trade or military while delegating other systems to the AI. This automation feature makes the game accessible to newcomers while letting veterans concentrate on their preferred aspects of empire management. You can toggle automation for population management, trade, diplomacy, and military operations through a simple menu system.
Core Gameplay Systems and Mechanics
Population and Society Management
Your nation consists of living, breathing populations with distinct characteristics. Nobles demand political power, clergy seek religious influence, burghers want economic opportunities, and peasants need food security. The Crown Estate system positions you as one estate among many, with your interests often conflicting with other power brokers. This creates realistic tension between centralization and autonomy that defined the era.
Population growth, migration, and promotion happen dynamically based on local conditions. A prosperous province with good trade connections will attract migrants and see populations advance from peasants to burghers. War, plague, and economic collapse devastate your demographics in ways that take decades to recover. Managing these demographic shifts becomes crucial for long-term success.
Economy and Trade Revolution
EU5’s market system represents the most sophisticated trade mechanics in any Paradox game, featuring actual supply and demand for specific goods across dynamic markets rather than abstract trade nodes. Local markets handle basic goods like grain and livestock, responding to population changes and external disruptions. Regional markets connect territories, enabling profitable arbitrage opportunities when you buy cheap agricultural surplus and sell it to urban centers at premium prices.
Production chains matter significantly. You’ll need to ensure provinces have necessary input goods for specialized industries. A textile manufacturer requires wool or cotton, shipyards need timber and iron, and luxury goods production demands specific raw materials. Price fluctuations reflect real economic forces – plague reduces grain demand while potentially increasing textile prices due to reduced supply.
Diplomacy and International Relations
Diplomacy has evolved into a living system where influence and trust are tracked, making betrayals leave lasting marks on your reputation. Alliances aren’t static commitments anymore. Former rivals can become trusted allies, while long-standing partnerships may dissolve when strategic interests diverge. The AI now proposes deals, breaks pacts, and manipulates alliances based on sophisticated calculations of relative power and mutual interests.
Trust building takes time and consistent behavior. Honor your commitments, support allies in wars, and avoid aggressive expansion that threatens neighbors. One misstep can cascade into coalition formation where multiple nations unite against your ambitions. Managing antagonism scores through diplomatic relations becomes essential for avoiding catastrophic multi-front wars.
Military System and Warfare
Military forces evolve from medieval levies and mercenaries to vast standing armies and impenetrable fortresses through social development. Early game warfare relies on raising temporary levies and hiring expensive mercenaries for campaigns. As your society advances, you can maintain professional standing armies that provide consistent military power without constant mobilization costs.
Commanders matter significantly. Skilled generals and admirals provide crucial advantages in battle through superior tactics and morale management. Logistics play a bigger role than previous entries, with supply lines, attrition, and terrain creating realistic challenges for military operations. A numerically superior army can starve in enemy territory without proper supply infrastructure.
Best Nations for Beginners
Starting your first Europa Universalis V campaign can feel overwhelming with hundreds of playable nations. Selecting the right nation shapes your entire learning experience, providing space to master core mechanics without immediate existential threats.
Top Starter Nations
France stands as the ultimate beginner choice. This European powerhouse offers a forgiving economy, strong military traditions, and sufficient resources to recover from mistakes. You’ll learn warfare, diplomacy, and internal management while protected by natural borders and powerful vassals.
Portugal excels at teaching colonial mechanics and trade networks. Your small size means manageable armies, while your alliance with England provides security. You’ll master exploration, trade companies, and overseas expansion without juggling massive European politics.
England provides a completely different learning path. Island protection allows you to focus on naval supremacy and colonial expansion. The English economy thrives on trade, teaching market mechanics without constant invasion threats. Your early continental holdings in France create interesting strategic decisions about defending or consolidating island power.
Ottoman Empire delivers immediate action for players seeking dynamic gameplay. The Rise of the Turks event provides rapid territorial expansion opportunities while teaching conquest mechanics. Your strong military position enables bold moves, but overextension can create dangerous rebellions and economic instability.
Nations to Avoid Initially
Avoid Byzantium, Granada, or Holy Roman Empire minors for your first campaign, as these nations require advanced knowledge of specific mechanics and face immediate existential threats. The Byzantine Empire struggles against overwhelming Ottoman power, Granada faces imminent Spanish conquest, and HRE minors navigate incredibly complex imperial mechanics while surrounded by aggressive neighbors.
Essential Beginner Tips and Strategies
Leverage Automation Systems
EU5 provides intelligent automation that handles complex systems while you learn, with Population Management Automation being the highest priority to enable immediately. The AI handles population promotion, migration, and growth decisions far better than beginners. You’ll observe optimal patterns without micromanaging thousands of decisions.
Trade Automation deserves special attention. The new market system feels overwhelming initially, but automation teaches through observation as you watch the AI manage supply chains, price fluctuations, and resource allocation. Enable market automation and study the patterns before taking manual control.
Focus on Key Relationships
Start with one strong alliance and steadily improve relations with nearby powers. Watch your antagonism scores with neighboring nations and use diplomats to improve relations with countries showing high antagonism to encourage them to leave coalitions. Aggressive expansion without diplomatic groundwork leads to devastating coalition wars where half of Europe unites against you.
Manage Estates Carefully
Provinces are living parts of your empire with autonomy levels and estate influence, with each estate playing roles in taxes, levies, and loyalty. Focus on infrastructure and stability early. Keep provinces loyal, build roads and production hubs, and integrate new territories slowly. Rapid expansion without addressing autonomy or estate management triggers rebellions that can tear your nation apart.
Build Economic Infrastructure First
Don’t rush military expansion. Invest in economic buildings, improve trade infrastructure, and ensure your population has access to necessary goods. A strong economic foundation enables sustained military campaigns later. Players who expand rapidly without economic support often face bankruptcy and collapse when war costs exceed income.
Technical Specifications and Performance
System Requirements
To run Europa Universalis V, you’ll need substantial hardware given the game’s simulation complexity. Minimum requirements include Intel Core i7-8700K or AMD Ryzen equivalent, 16 GB RAM, and Nvidia GeForce GTX 1060 (6GB) or AMD Radeon RX 580 (8GB) on Windows 10 Home 64-bit.
Recommended specifications target Intel Core i7-14700K or AMD Ryzen equivalent, 32 GB RAM, and Nvidia GeForce RTX 3060 Ti (8GB) or AMD Radeon RX 6700 XT (12GB) on Windows 11 64-bit. These specs provide smoother performance during late-game campaigns when simulation complexity peaks.
The game requires up to 100GB of storage space, with future DLC likely expanding these demands significantly. Installing on an SSD dramatically improves loading times and day-turn processing speed.
Component
Minimum Specs
Recommended Specs
OS
Windows 10 Home 64-bit
Windows 11 64-bit
Processor
Intel Core i7-8700K / AMD Ryzen equivalent
Intel Core i7-14700K / AMD Ryzen equivalent
Memory
16 GB RAM
32 GB RAM
Graphics
GTX 1060 (6GB) / RX 580 (8GB)
RTX 3060 Ti (8GB) / RX 6700 XT (12GB)
Storage
Up to 100GB
Up to 100GB (SSD recommended)
Platform Availability
Europa Universalis V launches exclusively for PC via Steam, with no plans for PlayStation, Xbox, Linux, macOS, or Xbox Game Pass releases. This PC-exclusive focus allows Paradox Tinto to maximize the simulation depth and modding capabilities that define the series.
Editions and DLC Roadmap
Available Editions
The Standard Edition costs $60/€60/£50 and includes the complete base game with all core mechanics. The Premium Edition at $85/€85/£75 includes three DLC packs, a cosmetic pack featuring eight sacred sites, and the Europa Universalis IV soundtrack.
Premium Edition DLC includes Fate of the Phoenix (Immersion Pack focused on Byzantine Empire), Across the Pillars (Chronicle Pack covering Iberian struggles), and additional regional content. Paradox has announced first downloadable content packs releasing in 2026, following their traditional post-launch support model.
Expected Playtime
Single campaigns require at least 50+ hours, with many careers stretching well beyond 100 hours, especially for players attempting the full timeline from April 1337 to the final end date nearly 500 years later. The game features 45 achievements across various difficulty levels, providing long-term goals for dedicated players.
Multiplayer and Community Features
Europa Universalis V includes multiplayer features allowing you to browse other players’ games, join specific server IDs, or host your own save games, with chat options including whispering to players alongside public chats. Multiplayer campaigns offer unique diplomatic challenges as you negotiate with human opponents whose strategic thinking exceeds any AI.
The modding community will undoubtedly create extensive content, though mods rarely exist at launch. Paradox games traditionally attract talented modders who expand historical depth, add new nations, and create total conversion mods. The developer provides modding tools similar to EU4, ensuring community creations flourish.
Frequently Asked Questions (FAQ)
Is Europa Universalis V available on console? No, Europa Universalis V is exclusively available on PC through Steam. There are no announced plans for PlayStation, Xbox, or Nintendo Switch versions.
Can beginners enjoy Europa Universalis V? Yes, the automation systems make EU5 more accessible than previous entries. New players can automate complex mechanics while learning, then gradually take manual control as they gain experience.
How long does a complete campaign take? A full campaign from 1337 to 1837 typically requires 50-100+ hours depending on your nation, playstyle, and how much you engage with different mechanics.
What’s the main difference between EU5 and EU4? EU5 eliminates mana points, introduces detailed population simulation, features dynamic situations instead of abstract events, and includes comprehensive automation options while maintaining the core grand strategy experience.
Does Europa Universalis V require previous series experience? No, EU5 is designed to welcome new players through automation features and improved tutorials. Veterans will recognize familiar concepts but must adapt to significantly revised systems.
Are there multiplayer options in Europa Universalis V? Yes, the game supports multiplayer gameplay where you can join or host campaigns with other players, creating dynamic diplomatic situations impossible with AI opponents.
What DLC is planned for Europa Universalis V? Paradox has confirmed multiple DLC packs releasing throughout 2026, including Chronicle Packs and Immersion Packs focused on specific regions and historical scenarios.
Can I play tall instead of expanding aggressively? Yes, EU5’s refined economy and development systems support tall gameplay focused on internal development, trade dominance, and diplomatic influence rather than territorial conquest.
Final Thoughts
Europa Universalis V represents Paradox Interactive’s most ambitious grand strategy project to date. The revolutionary population system, sophisticated economic simulation, and intelligent automation create an experience that feels both historically authentic and approachable. Whether you’re a series veteran adapting to new mechanics or a strategy newcomer discovering grand strategy gaming, EU5 offers hundreds of hours of compelling empire management.
The game’s launch state shows strong fundamentals with room for refinement through patches and expansions. Performance optimization continues, but the core systems deliver the depth and complexity strategy enthusiasts demand. With robust modding support and years of planned content updates ahead, Europa Universalis V establishes itself as the definitive historical grand strategy experience for this generation.
Your journey from medieval backwater to global superpower awaits. Will you restore Byzantine glory, unite the Holy Roman Empire, build a colonial empire spanning continents, or rewrite history entirely? The choice is yours across five centuries of ambition, conflict, and triumph.
Sacred 2 Remaster launched on November 11, 2025, bringing the beloved 2008 action RPG back to modern platforms with enhanced visuals and quality-of-life improvements. But does this remaster justify its existence in a gaming landscape dominated by Diablo 4 and Path of Exile 2? Let’s dive into everything you need to know about Sacred 2 Remastered to help you decide if this trip back to Ancaria is worth your time and money.
What Is Sacred 2 Remastered?
Sacred 2 Remaster is a modernized version of Sacred 2: Fallen Angel that features refined combat mechanics, a modern UI, full controller support, and includes all expansions in one definitive edition. The game returns players to Ancaria, a massive fantasy realm where T-Energy – once a source of prosperity – now fuels corruption and chaos.
Developed by SparklingBit, Funatics, and Nukklear and published by THQ Nordic, the remaster is available on PC, PlayStation 5, and Xbox Series X/S. This version bundles both the base game and the Ice & Blood expansion, offering hundreds of hours of content for action RPG enthusiasts.
Sacred 2 Remaster Release Date and Platforms
The game officially launched on November 11, 2025, making it available across multiple platforms simultaneously. PC gamers can grab it on Steam, while console players have access through the PlayStation Store and Microsoft Store.
The pricing structure differs by platform. PC players pay $19.99 / €19.99, while console versions cost $29.99 / €29.99. This price difference reflects the different development considerations for each platform, though the core experience remains consistent across all versions.
Seven Playable Classes in Sacred 2 Remaster
The remaster retains all seven original classes, each with unique skill trees and play styles. Choosing your hero is one of the most important decisions you’ll make, as each class offers a dramatically different gameplay experience.
The seven classes include:
Seraphim – A balanced hybrid character combining melee combat, defensive abilities, and light magic. Perfect for newcomers to the genre who want a forgiving learning curve.
Shadow Warrior – Heavy armor specialist built for close-range combat, crowd control, and sustained damage output.
High Elf – Elemental magic specialist who dominates area-of-effect combat with devastating fire, ice, and arcane spells.
Dryad – Nature-focused ranger mixing poison arrows, companion creatures, and support buffs for versatile gameplay.
Temple Guardian – Mechanical warrior wielding lightning-based attacks and technological gadgets for unique combat scenarios.
Inquisitor – Dark magic caster trading defensive capabilities for explosive burst damage potential.
Dragon Mage – Hybrid spellblade introduced in later content, offering strong scaling options for veteran players.
For newcomers, the Seraphim and Shadow Warrior are recommended as straightforward, durable choices that reward players even without deep build optimization.
What’s New in Sacred 2 Remaster?
The remaster brings several important updates to modernize the 17-year-old game. Gameplay enhancements include refined combat mechanics, improved animations, and fully remappable controller layouts that make the experience more accessible to modern players.
Quality-of-life improvements such as auto-loot, improved quest tracking, and better inventory management address many frustrations from the original release. The updated UI presents information more clearly, though some players find it optimized more for controllers than keyboard and mouse.
Visual upgrades include high-resolution textures, improved lighting effects, and better view distances that bring Ancaria into the modern era. However, these improvements are evolutionary rather than revolutionary – don’t expect a ground-up remake.
Sacred 2 Remaster Performance and Technical Issues
Performance varies significantly across platforms. On Steam Deck, the game defaults to high graphical settings but is heavily dependent on single-thread CPU performance, causing frame rate fluctuations between 30-60 FPS. Locking to 40 FPS provides the most consistent experience on portable hardware.
Console versions have faced more serious problems. The PlayStation 5 version suffers from crashes, choppy cutscenes, audio sync issues, and framerate problems that detract from the experience. While patches have addressed some concerns, technical stability remains inconsistent.
PC players generally report the smoothest experience, though issues with hit detection and menu navigation persist across all platforms. The development team has released patches, but significant problems remain unresolved weeks after launch.
Sacred 2 Remaster Reviews – The Critical Consensus
Critical reception has been decidedly mixed. Metacritic shows a Metascore of 61 based on critic reviews, while user scores sit at just 1.1 out of 10. This dramatic divide reflects deep dissatisfaction from longtime fans.
Many reviewers note the remaster accomplishes some things – reminding players the original was ambitious with its wide-open world and deep progression systems – but also highlights that the original’s technical issues and combat problems persist.
Steam shows 51% positive reviews from over 1,000 users, indicating a community split between those enjoying the nostalgic return and those disappointed by what they see as a minimal effort remaster.
Positive reviews praise the inclusion of all content, improved controller support, and quality-of-life features. Several critics describe it as successfully reviving a beloved German action RPG with improved visuals, smoother controls, and modern features, though best suited for fans of classic hack-and-slash adventures rather than those seeking modern reinvention.
Sacred 2 Remaster Controversy – What Players Are Saying
The community response reveals significant concerns beyond technical performance. Players have compiled detailed lists documenting downgrades to gameplay and quality-of-life features compared to Sacred 2 Gold, including reduced quick slots for abilities and equipment.
The most controversial decision? Console versions removed multiplayer entirely, eliminating online co-op that was a defining feature of the original. Only PC maintains multiplayer functionality through Steam invite-only sessions – no cross-platform play, no public matchmaking.
Other complaints include:
Reduced inventory slots making loot management more frustrating
Fewer combat art slots limiting build flexibility
Changed relic system affecting defensive strategies
Controller-focused UI that feels clunky with mouse and keyboard
Small enemy hitboxes making targeting difficult with mouse controls
Some reviewers describe the remaster as purposefully less functional than Sacred 2 Gold, with developers explaining reduced slots as encouraging “tactical thinking” – a justification many players reject.
Sacred 2 Remaster vs Original – Should You Upgrade?
If you own Sacred 2 Gold on PC, the remaster offers a complicated value proposition. The original game still functions well, especially with community mods that address many issues. The remaster provides better controller support and a cleaner interface, but removes features longtime players valued.
PC players do get cross-platform online play with friends, better UI, and controller support for $20, which represents reasonable value for those prioritizing these features. However, the absence of substantial new content makes this a tough sell for veterans.
Console players have a clearer decision. The remaster represents the only way to play Sacred 2 on modern PlayStation and Xbox hardware, though the removal of multiplayer and persistent technical issues significantly diminish the package.
Sacred 2 Remaster Gameplay – What to Expect
At its core, Sacred 2 delivers classic action RPG gameplay focused on exploration, loot collection, and character building. The massive open world of Ancaria dwarfs most contemporaries, offering hundreds of quests and dozens of hours of content.
Combat remains deliberately paced by modern standards. Animations are tighter and attacks connect faster than the original, but movement and combat pacing stay true to 2008 design philosophy. Players who enjoyed Diablo 2 or Titan Quest will feel at home, while those expecting Diablo 4’s fluidity may find it sluggish.
The loot system drives progression through constant equipment upgrades. Character customization runs deep, with extensive skill trees and build possibilities for each class. However, the game lacks modern conveniences like respec options, demanding commitment to your build choices.
Quest design leans heavily on fetch quests and kill objectives. While locations feel lovingly handcrafted with interesting details, side missions rarely rise above genre conventions. The optimal approach focuses on the main campaign rather than completionist exploration.
Sacred 2 Remaster Characters – Building Your Hero
Character progression offers satisfying complexity. Each class features multiple skill trees allowing diverse builds within the same character archetype. The Seraphim alone can specialize in defensive tanking, aggressive melee, or magic-focused hybrid approaches.
Combat Arts form the foundation of your character’s abilities. Unlike traditional cooldown-based skills, Combat Arts level independently through use, encouraging you to focus on core abilities rather than spreading points thin. This system rewards specialization and mastery.
Equipment slots include weapons, armor, jewelry, and relics providing resistance bonuses. The remaster reduced relic slots from the original, changing how players approach elemental damage mitigation and forcing more selective defensive planning.
Mount system adds flavor with unique creatures for each class. These aren’t just cosmetic – mounted combat changes your tactical options and movement speed significantly impacts exploration efficiency.
Sacred 2 Remaster World – Exploring Ancaria
The game world spans a genuinely massive continent divided into distinct regions. From lush forests to barren deserts, frozen tundras to volcanic wastelands, environmental variety keeps exploration engaging despite dated visuals.
Many locations feature interesting details and fun text descriptions making areas feel handcrafted even when quest design disappoints. Secret areas reward thorough exploration, though the lack of modern navigation conveniences occasionally frustrates.
Towns serve as quest hubs and commerce centers. NPCs dispense missions and services, though character interaction remains superficial. The story unfolds through quest text and occasional cutscenes rather than dynamic storytelling.
Dungeons provide concentrated combat challenges with unique enemies and boss encounters. While not as intricate as modern dungeon designs, they offer satisfying loot opportunities and break up open world exploration.
Is Sacred 2 Remaster Worth It? – The Verdict
Whether Sacred 2 Remaster deserves your money depends heavily on your gaming background and expectations.
Buy Sacred 2 Remaster if you:
Never played the original and want to experience this piece of ARPG history
Love classic action RPGs like Diablo 2 or Titan Quest
Prioritize controller support and modern UI conveniences
Have patience for dated mechanics and technical quirks
Can find it on sale significantly below full price
Play on PC and want Steam multiplayer with friends
Skip Sacred 2 Remaster if you:
Own and enjoy Sacred 2 Gold with community mods
Expect modern ARPG polish and fluidity
Want console multiplayer – it doesn’t exist
Have low tolerance for technical issues and bugs
Prefer focused dungeon crawling over open world exploration
Need cutting-edge graphics and presentation
At €20 for PC, it represents fair value for genre fans, while the €30 console price feels steep given removed features. Patient gamers should wait for sales and additional patches before diving in.
Sacred 2 Remaster Alternatives – Better Options?
If Sacred 2 Remaster doesn’t appeal, several modern ARPGs offer superior experiences. Diablo 4 provides cutting-edge visuals and refined gameplay, though at a significantly higher price point. Path of Exile 2 enters early access soon with deep systems appealing to hardcore theorycrafters.
Grim Dawn delivers excellent Diablo 2-style gameplay with modern quality-of-life features. Last Epoch combines traditional ARPG mechanics with innovative time travel mechanics. Both regularly go on sale and offer more polished experiences than Sacred 2 Remaster.
For those specifically interested in exploring Ancaria, tracking down a discounted copy of Sacred 2 Gold and installing community patches provides a arguably superior experience to the remaster – at least on PC. Console players lack this option entirely.
Sacred 2 Remaster Tips for New Players
Starting your Ancaria adventure? Keep these tips in mind:
Choose the right class for your playstyle. Seraphim and Shadow Warrior provide forgiving learning curves. High Elf dominates if you prefer casting from range. Experiment in the early game before committing fully to skill investments.
Focus your Combat Arts rather than spreading thin. Leveling a few core abilities produces better results than using many mediocre ones. Read skill descriptions carefully to understand synergies.
Don’t ignore resistances. Elemental damage kills quickly in higher difficulties. Balance offensive gear with appropriate resistance bonuses for the enemies you’re facing.
Activate resurrection monoliths regularly. Death penalties sting more without nearby respawn points. Explore methodically and claim these checkpoints as you progress.
Use auto-loot liberally. The auto-loot feature lets you collect all nearby items with a button press, saving enormous time during extended farming sessions.
Manage inventory proactively. With reduced inventory slots in the remaster, you’ll fill up quickly. Sell or dismantle regularly rather than letting junk accumulate.
Sacred 2 Remaster Mods and Community Support
The PC community has already begun developing mods addressing remaster shortcomings. Popular modifications include UI changes restoring original minimap layouts, inventory expansion mods reversing slot reductions, and portal unlock mods enabling immediate fast travel.
Quality-of-life mods skip intro videos, remove default armor for character customization, and adjust item sizes for better inventory management. While mod support is less extensive than Sacred 2 Gold, the community actively works to improve the experience.
Console players lack mod access entirely, leaving them dependent on official patches to address issues. This represents another disadvantage for PlayStation and Xbox versions compared to PC.
Frequently Asked Questions About Sacred 2 Remaster
Does Sacred 2 Remaster have multiplayer? PC version includes online multiplayer through Steam invite-only sessions, while console versions removed multiplayer entirely. No cross-platform play exists even on PC.
What’s included in Sacred 2 Remaster? The remaster includes all expansions and updates in one definitive edition, featuring both the base game and Ice & Blood expansion content with all seven playable classes.
Is Sacred 2 Remaster worth buying? At €20 on PC, it offers fair value for action RPG fans who appreciate classic gameplay, though the €30 console price feels steep given technical issues and removed features.
Can I play Sacred 2 Remaster on Steam Deck? Yes, though performance requires locking to 40 FPS for consistency due to heavy single-thread CPU dependency. Expect 2.5-3.5 hours battery life depending on Deck model.
Does Sacred 2 Remaster include Sacred 2 Gold? Yes, every purchase includes the original Sacred 2 Gold as a bonus, allowing players to experience both versions and compare improvements.
How long is Sacred 2 Remaster? Main campaign takes 30-40 hours, but completionists can easily spend 100+ hours exploring Ancaria, completing side quests, and building multiple characters.
Final Thoughts on Sacred 2 Remastered
Sacred 2 Remaster delivers a functional but flawed return to Ancaria. The game successfully reminds players of the original’s ambition – its wide-open world and deep progression systems still hold appeal – while also highlighting that technical issues and combat limitations persist.
For newcomers curious about action RPG history, the remaster provides the most accessible entry point to a cult classic. Patient players who enjoy exploration-focused gameplay and don’t mind dated mechanics will find dozens of hours of enjoyment. The $20 PC price point makes experimentation relatively low-risk.
However, serious technical problems, controversial feature removals, and minimal modernization efforts prevent this from being an enthusiastic recommendation. The remaster feels like a preservation effort rather than meaningful modernization, appealing primarily to nostalgic fans rather than attracting new audiences.
In a market crowded with excellent modern action RPGs, Sacred 2 Remaster struggles to justify its existence beyond servicing nostalgia. Wait for deep discounts unless you specifically want to experience this particular piece of gaming history. The world of Ancaria awaits, but it demands patience and understanding from those who enter.