If you’ve ever interacted with the Linux command line, you’re likely familiar with the sudo command, short for “super user do.” This command allows you to execute actions with elevated privileges, essentially running it as root. This is necessary for system administration tasks inaccessible to regular users without the required privileges. As an administrator, you can configure sudo to be accessible only to you, preventing others from using it.
Excitingly, Microsoft has recently announced the introduction of sudo for Windows. This isn’t a third-party addition; it’s built directly into the Windows operating system. At the time of writing, you’ll need an insider build starting with build 26052 to access this feature. Over time, this will gradually roll out to the beta channel and eventually to mainstream users. The version of Windows you’ll need to enable this feature will depend on when you’re reading this article.
But what does sudo for Windows allow? In this post, I’ll guide you through enabling sudo and using it to run commands with elevated privileges. Also feel free to check out the video on the topic above.
How to enable sudo for Windows

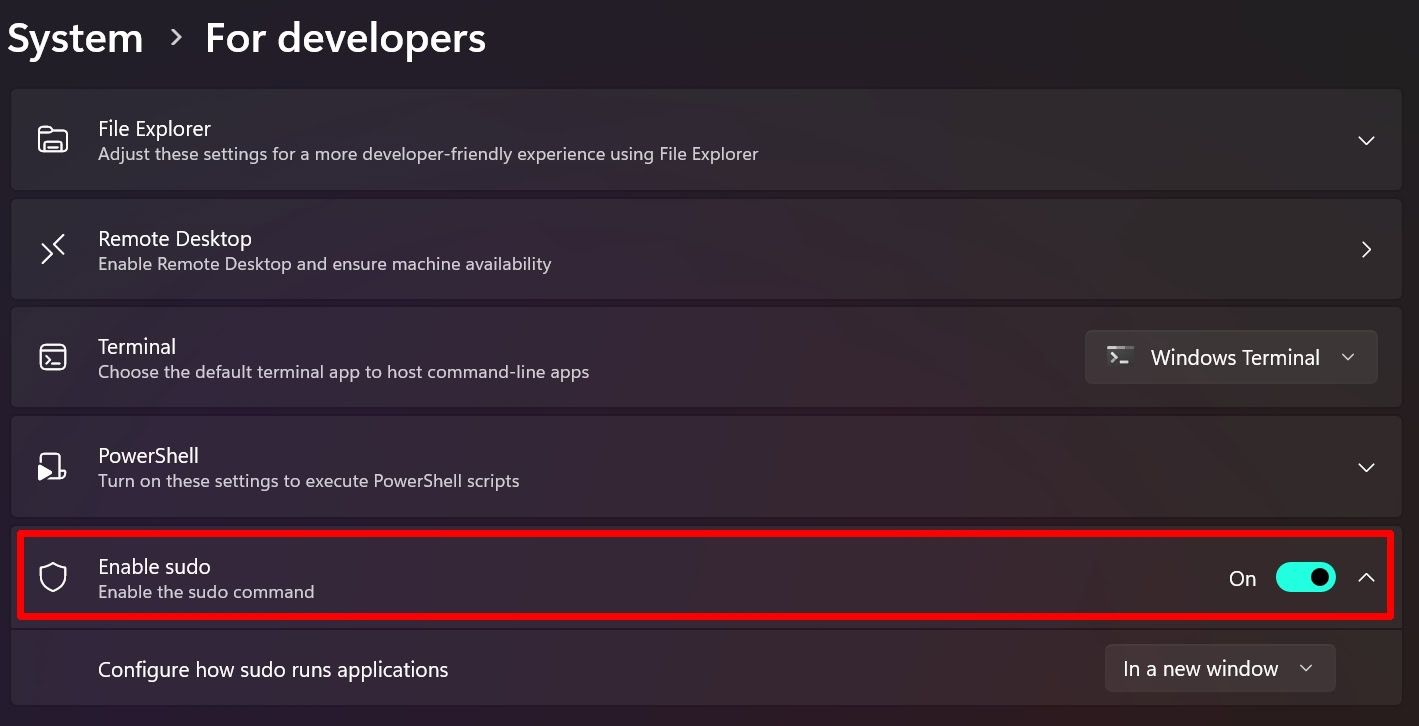
Sudo for Windows isn’t operational by default. Here’s how to enable sudo for Windows:
- Navigate to the Start Menu.
- Select Settings.
- Select System.
- Scroll down to For developers.
- Find the option to Enable sudo and toggle it on.
Be aware that running the sudo command could potentially expose your device and personal data to security risks.
Once sudo is enabled, you must open a PowerShell window using the Windows Terminal. Now, if you entersudo dir, this will execute the dir command with elevated privileges.
How to adjust sudo for Windows configuration

By default, when you run sudo, it launches in a separate window. To change this, return to the Settings where you enabled sudo and adjust the configuration under Configure how sudo runs applications in a new window. There are three options available. The first means there’s no input coming into it, and the second runs it inline, which I prefer. Once you’ve adjusted this setting to inline, you can return to the terminal and try again. Now, when you run sudo dir, it will execute within the window, similar to the experience on Linux.
Interestingly, you can also adjust this configuration using the command line. To force a new window, you’ll need to enter sudo config --enable force New Window. It’s essential that “New Window” is capitalized. To execute this command, you must be an administrator. You’ll need to enter sudo before the command, making it sudo sudo. To revert to the inline setting, simply type sudo sudo normal.
What can sudo for Windows do?
Let’s explore a couple of examples. Using sudo for Windows, you can now run applications with elevated privileges. For instance, if you want to run Notepad with these privileges, you can do so. This can be particularly useful when you need to edit a configuration file that requires administrator rights.
Another practical example is creating a directory in a location that requires elevated privileges. For instance, if you navigate to cd\ cd "program files" and attempt to create a directory named zob, you’ll be denied access. However, if you enter sudo mkdir zob you’ll be able to create the directory. The same applies to removing the directory with rmdir zob. Any task requiring administrative rights or elevated privileges can now be executed from the command line using sudo.


