Path of Exile 2 Fate of the Vaal League Guide
Path of Exile 2’s Patch 0.4 drops players into something familiar yet fresh. The Fate of the Vaal league mechanic brings back memories of PoE1’s Incursion system, but don’t let that fool you – this isn’t just a nostalgia trip. Grinding Gear Games took what worked and amplified it, creating a league mechanic that rewards strategic thinking and high-risk crafting decisions.
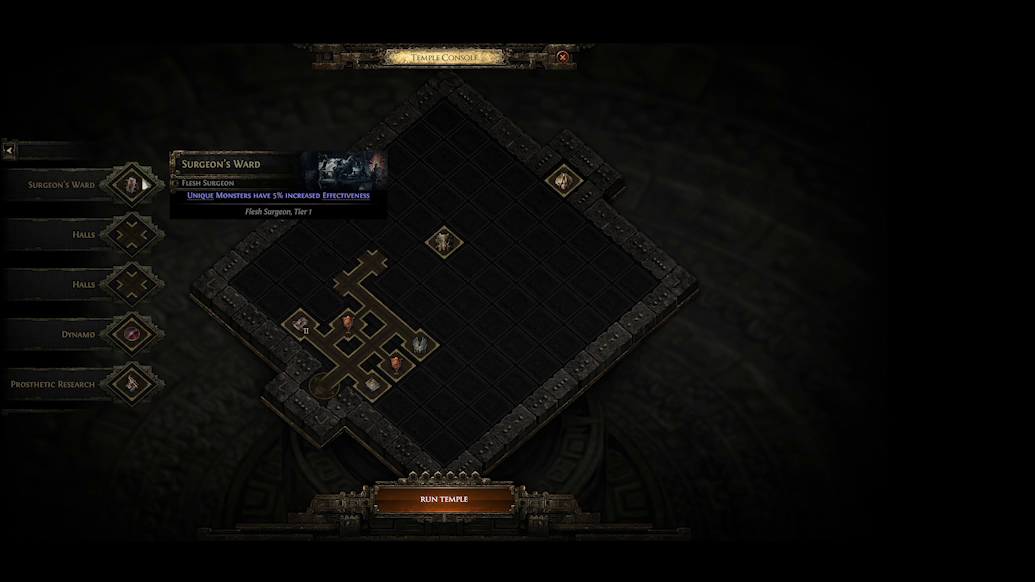
How the Fate of the Vaal League Mechanic Works
The system starts simple enough. You’re mapping through zones when you spot a Vaal Beacon – marked clearly on your minimap with a triangular temple icon. These beacons corrupt nearby monster packs, and your job is straightforward: kill everything.
Each beacon you clear lights up one of six crystals. Fill all six, and you unlock access to the Temple of Atziri. But here’s where it gets interesting – at endgame, you can stack up to 10 temple runs before actually diving in. This means you can grind Waystones without interruption, then dedicate a session purely to temple exploration.
The beacon encounters themselves pack some surprises. Sometimes you’ll face wave after wave of corrupted enemies. Other times, a unique monster rises up on the beacon itself, dropping a satisfying pile of loot when defeated. Just remember to physically step on the beacon after clearing – it won’t register completion otherwise.
Building Your Perfect Temple Layout
This is where Fate of the Vaal separates itself from typical league mechanics. When you enter the temple’s antechamber, you’ll find a console that lets you construct your own dungeon. You’re handed six room cards each visit, and these cards determine everything – monster types, rewards, even modifiers that affect the entire temple.
Path placement follows specific rules. You can only place paths if they connect to existing paths. Named rooms can only touch paths or rooms they upgrade. It sounds restrictive, but the system highlights valid placements in bright green, making optimization intuitive rather than frustrating.
Room upgrades are the real prize here. Each room starts at Tier 1, but meeting certain conditions – usually placing specific adjacent rooms – bumps them up. Tier 3 rooms unlock the league’s most powerful rewards, so planning your layout around these upgrades becomes critical. The system even shows you exactly where to place rooms for upgrades, removing guesswork without eliminating strategy.
Temple Decay and Medallion Management
Here’s the catch that keeps you coming back. Every time you close your temple after a run, random rooms decay and disappear. Your carefully constructed layout? It might survive intact, or it might lose your best reward rooms. This randomness creates genuine tension.
![]()
![]()
![]()
Medallions offer some control over chaos. These special items drop from room bosses and function as extra room cards with unique effects. Some upgrade room tiers directly. Others lock rooms to prevent decay. Your medallion inventory caps at three, so decision-making matters – use them early for immediate gains, or hoard them for crucial moments?
The medallion system adds a layer of resource management that feels rewarding rather than tedious. You can apply medallions before or after running the temple, giving you flexibility to react to both good drops and bad decay luck.
High-Risk Crafting That Actually Matters
Tier 3 rooms contain crafting devices that can fundamentally change your gear. These aren’t minor stat tweaks – they’re build-defining modifications.
The Locus of Corruption stands out as the most dangerous option. Double-corrupting already corrupted items carries a 50% chance to destroy the item entirely. But landing two powerful corruption implicits on the same piece? That’s the kind of power spike that defines entire builds. The risk-reward calculation here is brutal and exciting in equal measure.
Juatalotli’s Triumph lets you reroll modifiers on corrupted Vaal uniques. Up to two modifiers get replaced with random alternatives from a special pool. This crafting method can create truly broken items by removing downsides and adding powerful new stats. It can also brick valuable uniques by removing their signature modifier. The randomness cuts both ways.
Other Tier 3 crafting options include the Transcension Device, which replaces your limbs with mechanical versions granting passive bonuses (lost on death), and the Corrupted Precursor Machine, which corrupts tablets to potentially add extra modifiers or uses. Each crafting device can be converted into a tradeable currency orb, creating a new economy around these high-risk modifications.
Fighting Atziri and the Royal Architect
The Royal Architect boss room comes pre-placed in every temple. Defeating this boss in level 75+ temples drops a medallion that places the Royal Access Chamber – your gateway to fighting Atziri herself.
Atziri represents the league’s pinnacle challenge. As the last Queen of the Vaal, she wields power corrupted by communing with The Beast. Her exclusive drops include items like Atziri’s Rule, which grants the Mirror of Refraction skill. This skill creates mirrors around your character that projectiles can fire into, creating nova explosions. It’s the kind of build-enabling unique that makes the endgame grind worthwhile.
Both boss fights cause significant temple decay afterward, resetting your progress and forcing you to rebuild. This creates a natural gameplay loop – construct your temple, push for the Architect, decide whether to fight Atziri or preserve other reward rooms, then rebuild from the decay.
Campaign vs Endgame Temples
Acts 1-3 offer a streamlined introduction. You’ll explore the temple in its present-day form, with limited room variety and toned-down rewards. No pinnacle bosses appear here.
Everything changes in Act 4. The temple shifts to its past incarnation, unlocking the full roster of rooms, crafting options, and boss encounters. This progression feels natural – new players get time to understand the core systems before facing the full complexity.
Strategic Considerations and Final Thoughts
The Fate of the Vaal mechanic rewards planning over pure speed. Rushing through beacons without considering room placement leaves rewards on the table. The most valuable temples require deliberate construction – identifying which Tier 3 rooms you’re targeting, planning upgrade paths, and managing medallions to protect key rooms from decay.
The mechanic also scales well with player knowledge. Beginners can place rooms randomly and still get reasonable rewards. Veterans can optimize layouts to consistently access multiple Tier 3 crafting stations or stack modifiers for maximum difficulty and loot.
Xipocado’s Console in the Royal Architect’s room offers one final twist. This special console places exclusive room cards with unique placement rules, requiring you to work toward distant reward rooms. Accessing it causes massive temple decay, forcing you to choose between immediate powerful rewards and your existing temple construction.
Path of Exile 2’s Fate of the Vaal league takes a proven concept and executes it with enough new systems to feel fresh. The combination of strategic temple building, high-risk crafting, and meaningful boss encounters creates a league mechanic that respects player time while offering genuine depth for those who engage with its systems fully.

