Co-op action RPG Atlas Fallen gets a full free revamp in 2024 with the Reign of Sand update
19. Srpen 2024 v 23:00

We live in an era of digital transformation, and the concept of a "smart home" is becoming popular due to its convenience and efficiency. From security to lights and temperature, these technologically advanced homes are equipped with interconnected smart devices to make our lives comfortable and easier. Like other electronics, they can have issues.
![]()
Minecraft is a popular sandbox video game enjoyed by millions worldwide, but it seems like Minecraft Launcher Error Code 0x87e5003a is giving headaches to a wide range number of fans.
If you are facing this error, don’t worry; this guide will walk you through some proven methods to fix it and get you back to your block-building adventures.
When encountering the Minecraft Launcher Error Code 0x87e5003a, users are often met with a pop-up error message indicating that the game failed to start, accompanied by the error code.
This particular error code emerges and presents the gamer with the following message: “This game is already running. If you just quit the game, it should be ready to launch again in a moment”.
While this could potentially be a passing glitch, more often than not, this generally indicates that the ability to partake in the game will remain unavailable even following a waiting period.
Time needed: 2 minutes
It seems like forcing closing any active related instances is one of the best solutions to get rid of our today’s issue.
![]()
If the error persists on your display, you might consider utilizing the previous version of the Minecraft launcher. If you lack familiarity with this option, you can access the Minecraft alternatives to acquire comprehensive details, along with discovering alternative Minecraft launchers.
Related articles:
By following the methods mentioned in this guide, you should now be able to fix the Minecraft Launcher Error Code 0x87e5003a.
Now, you can dive back into the fascinating world of Minecraft and enjoy your adventures without any hindrance. Happy gaming!
In case you encounter any additional questions, feel free to leave a comment in the dedicated section below.
The post Minecraft Launcher Error Code 0x87e5003a: Try These Fixes appeared first on Games Errors.
Fortnite has captivated millions of players with its exciting gameplay and vibrant world. However, encountering errors, like Fortnite Error code 0, can be frustrating and disrupt your gaming experience.
It seems like this error is pretty popular among worldwide users, so have no fear! There are plenty of solutions to fix it without effort.
In this comprehensive guide, we will walk you through various troubleshooting steps to help you fix Error 0 and get back to the Battle Royale action.
Before getting into our main solutions, we recommend trying these fast fixes:
Now, in case you didn’t manage to solve the problem, move to the following solutions:
Time needed: 3 minutes
Resetting your network settings seems to be one of the most efficient solutions to fix Fortnite error code 0.
The error code 0 in Fortnite could refer to a variety of issues, such as problems with game files, network connectivity, or other technical glitches.
Some users might suggest disabling antivirus software as a way to rule out the possibility that the antivirus is interfering with the game’s functionality.
Related articles:![]()
Fortnite Error code 0 can be a minor setback, but with the troubleshooting steps provided in this guide, you should be able to fix the issue and jump back into the action-packed world of Fortnite.
The below comment section is dedicated to you, so make sure you use it in case of having any other related questions or curiosities.
The post Fortnite Error Code 0: Fix It Now appeared first on Games Errors.
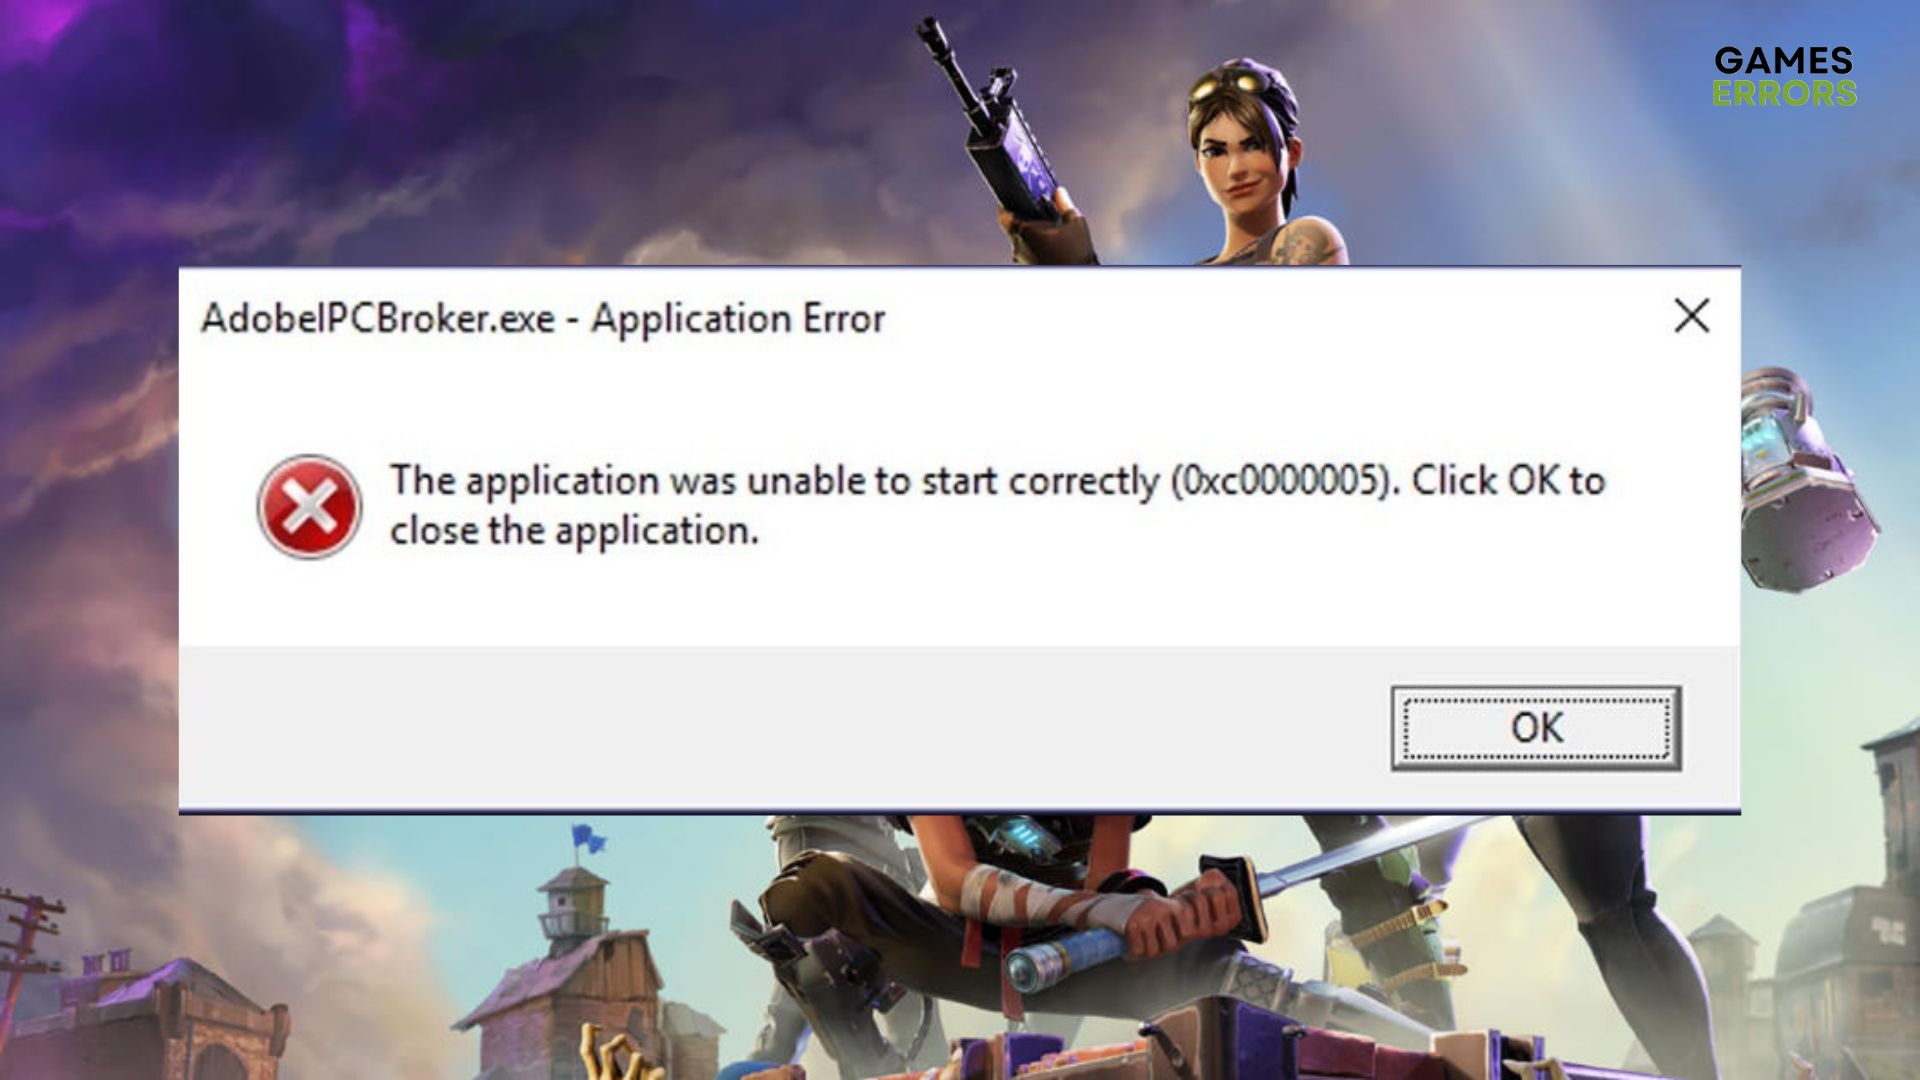
Fortnite is a highly popular and addictive online battle royale game played by millions of players worldwide, but the 0xc0000005 error seems to sometimes generate headaches among fans.
Like any other software, it can encounter various errors and issues that disrupt the gaming experience. The 0xc0000005 error is one of the most common occurrences for some players.
If you’re facing this error while trying to play Fortnite, don’t worry! This guide will walk you through several troubleshooting steps to help you resolve the issue and get back into the game.
Error code 0xc0000005 is a common Windows error that can occur when running various applications, including games.
This error is officially known as the Access Violation error and indicates that an application attempted to access a memory address that it was not allowed to access.
In simpler terms, it means that a program tried to read or write to a memory location that it doesn’t have permission to use, resulting in a crash or termination of the application.
There are several reasons why this error can occur in games:
Before going deeper into the main solutions, we suggest first ensuring these quick steps:
Now, if none of the above options worked, let’s discover some additional solutions you can try to get rid of the Fortnite 0xc0000005 Error.
Time needed: 5 minutes
![]()
![]()
![]()
![]()
SFC/scannow Related articles:
Encountering the Fortnite 0xc0000005 Error can be frustrating, but armed with the right troubleshooting steps, you can swiftly overcome this hurdle and get back to the exhilarating world of Fortnite.
In case of facing any additional questions, feel free to use the comment section listed below.
The post Fortnite 0xc0000005 Error: Try These Fixes appeared first on Games Errors.
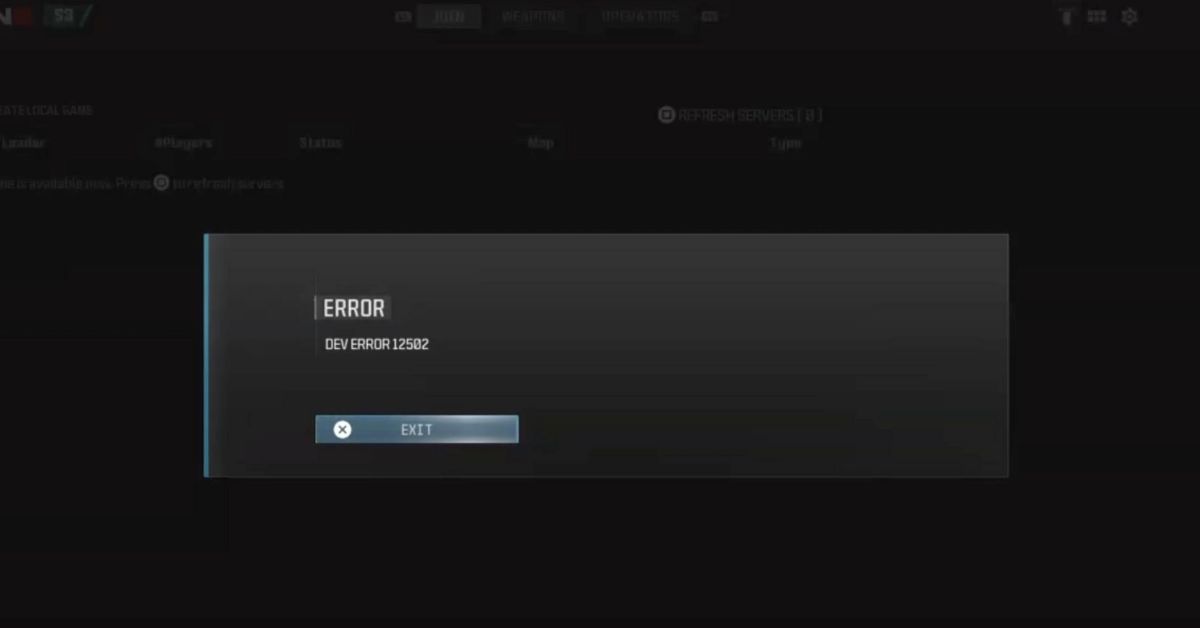
Call of Duty: Modern Warfare 3 (MW3) is a cornerstone of the CoD franchise, offering intense multiplayer action and a gripping campaign. However, the gaming experience can sometimes be ruined by various errors, one of which is the notorious Dev Error 12502. This technical problem can stop players in their tracks, leaving many to wonder about its nature and, more importantly, how to fix it.
In this guide, we’ll explore what Dev Error 12502 is and provide you with reliable methods to get you back into the action as swiftly as possible.
Dev Error 12502 is a common issue that players of Call of Duty: Modern Warfare 3 might encounter. This error generally signifies a problem related to the game’s files or settings that prevents it from running smoothly. It can be triggered by a variety of factors, including corrupted game files, outdated graphics drivers, or incorrect game settings.
To resolve Dev Error 12502 and restore your gaming experience, consider the following preliminary solutions:
Updating your game is a crucial step in resolving MW3 Dev Error 12502, as developers often release patches to fix bugs and improve game performance. Here’s how you can ensure that Modern Warfare 3 is up to date:
Keeping MW3 and your game launcher updated ensures you have the latest content and fixes. If automatic updates are disabled in your launcher, consider enabling them to automatically receive these improvements in the future.
Adjusting your system’s paging file size can be an effective way to fix MW3 Dev Error 12502, especially if the error is related to insufficient system memory. Follow these detailed steps to adjust your paging file size for Windows:
sysdm.cpl and press Enter. This command opens the System Properties window.Adjusting the paging file size can help accommodate games that require a lot of memory, like MW3, especially if you’re running several applications simultaneously or have limited RAM. If you’re unsure about the best settings for your system, it’s a good idea to consult Windows’ recommendations in the Virtual Memory window or seek advice from a knowledgeable source to avoid system instability.
Disabling game overlays can significantly improve game performance and potentially resolve MW3 Dev Error 12502. Many gaming applications provide overlays that offer convenient features like FPS counters, instant messaging, and live streaming, but they can also cause conflicts or use valuable resources. Here’s how to disable the most common game overlays:
After disabling these overlays, restart your game to see if Dev Error 12502 persists. Turning off these features can not only solve compatibility issues but also free up resources for a smoother gaming experience. If you’re not using a particular overlay feature, keeping it disabled during gameplay is generally a good practice.
Tackling Dev Error 12502 in Modern Warfare 3 feels a bit like detective work, doesn’t it? You’ve got your list of potential problems—outdated game versions, mischievous system settings, those sneaky overlays—and it’s all about patiently ruling them out one by one.
The key is to keep calm and troubleshoot on, starting with the basics like ensuring your game is up to date, then maybe diving into the more techy stuff like tweaking your virtual memory settings if needed. And, if you ever feel lost, remember that Activision’s official support is like the detective’s handbook, always there to guide you with the latest insights. By methodically following these steps, you’re not just trying to fix an error; you’re ensuring your gaming setup is as robust as can be, ready for uninterrupted action. Here’s to smoother gaming ahead!
The post How to Fix Dev Error 12502 in Call of Duty: Modern Warfare 3 appeared first on Games Errors.
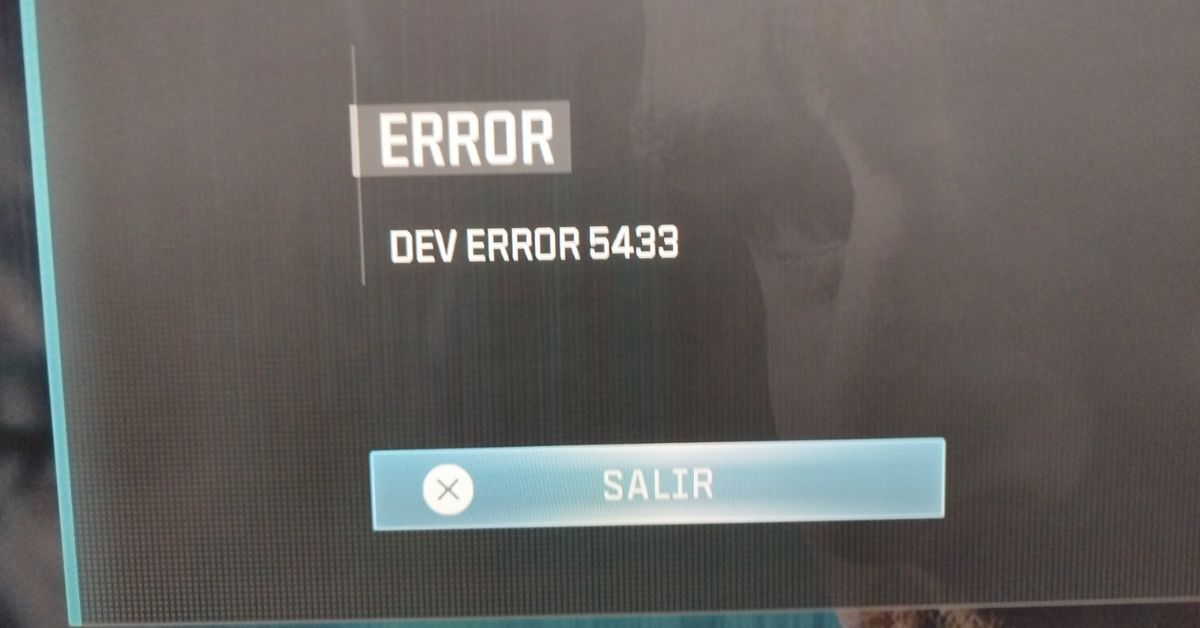
The Call of Duty series has been a staple of the first-person shooter genre, offering players intense combat scenarios and a rich, narrative-driven experience. However, like any complex games, it’s not immune to technical problems.
One such issue that has been a thorn in players’ sides is the MW3 Dev Error 5433, especially within the game’s zombie mode.. This error can abruptly halt your gaming session, leaving you searching for solutions.
Dev Error 5433 in Modern Warfare 3 typically indicates an issue within the game’s system that prevents it from operating correctly. Such errors usually relate to problems with game files, graphics settings, system configurations, or compatibility issues with hardware or drivers.
To fix Dev Error 5433, try disconnecting and then reconnecting your internet connection. This quick fix has helped some users, although it may not be a long-term solution.
Additionally, run the game as an administrator and remove unnecessary background tasks.
Table of contents
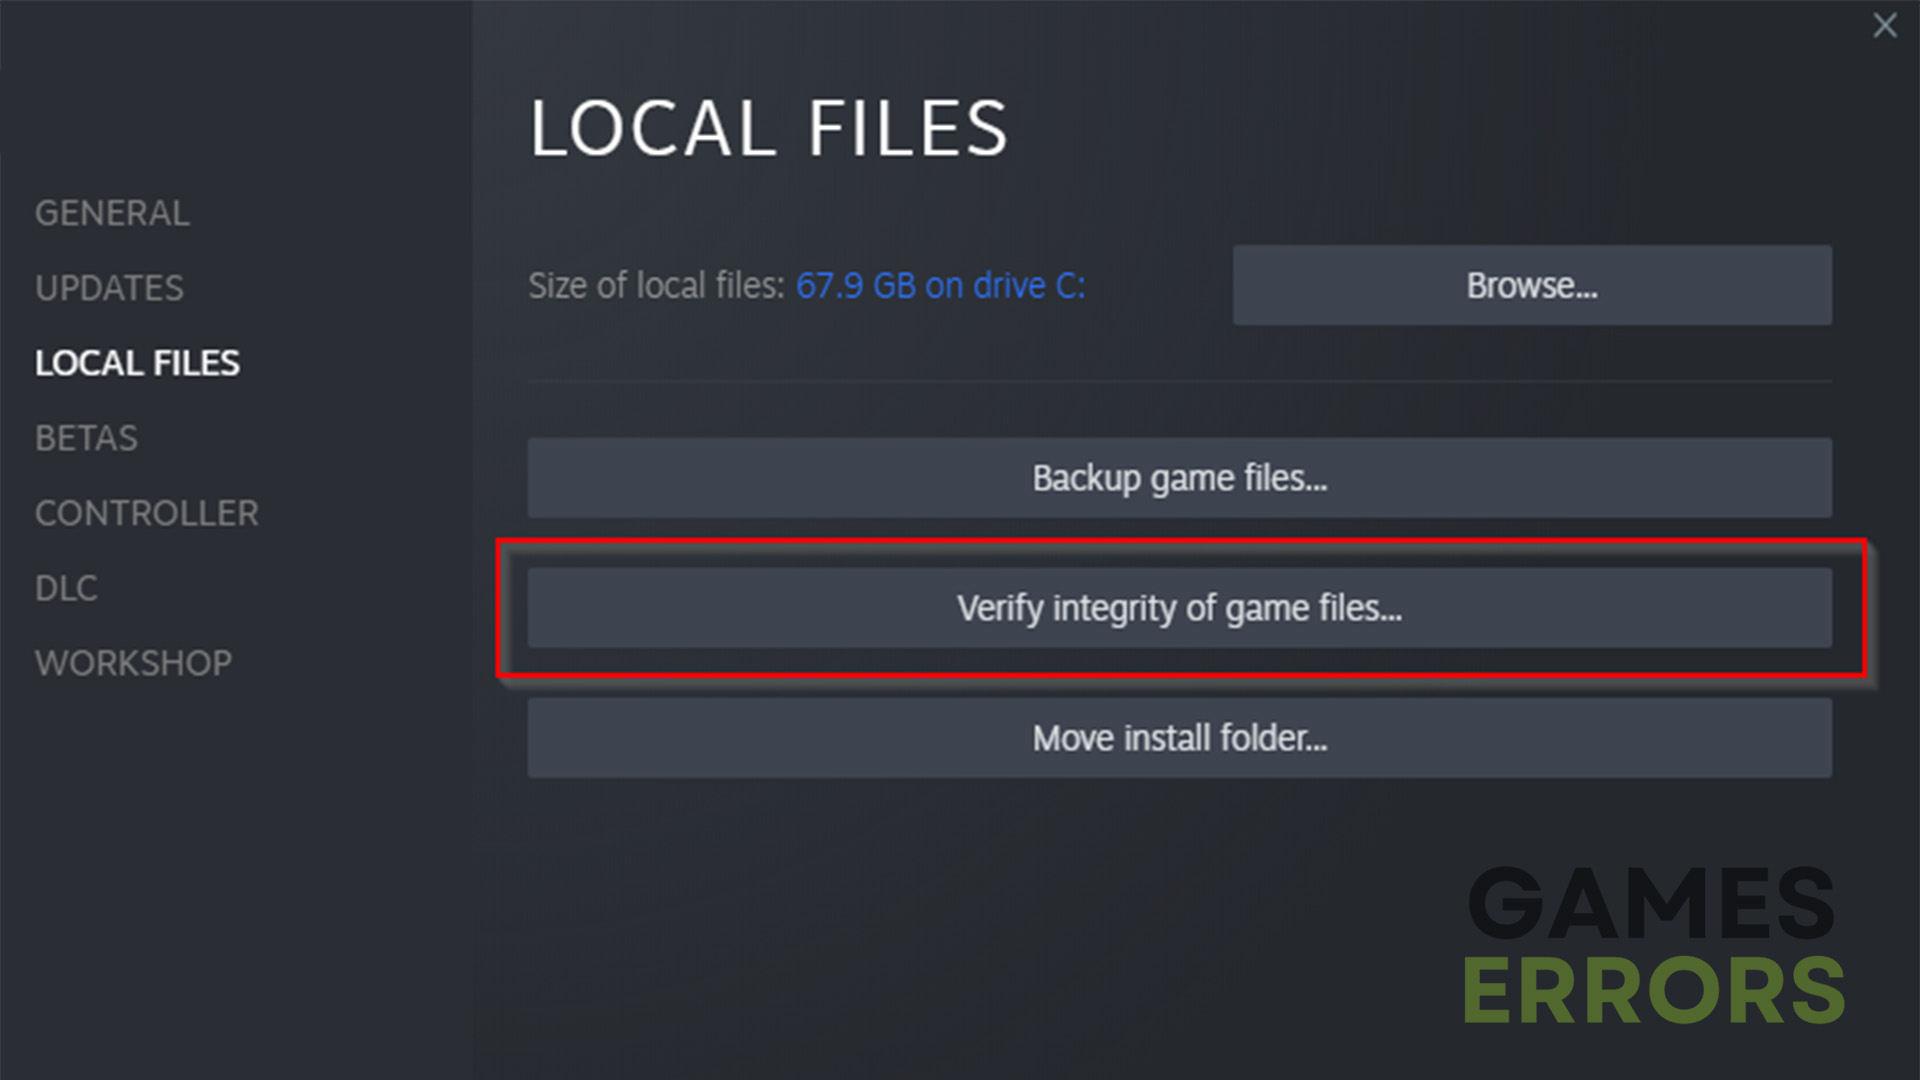
Corrupted game files are a common cause of MW3 Dev Error 5433. Regularly checking the integrity of your game files can help prevent this issue. Here’s a simplified process:
This method ensures your game files are intact and can often clear up errors related to file corruption.
Ensuring your game is up to date is another key strategy in resolving MW3 Dev Error 5433. Game developers frequently release updates that fix bugs and errors. Follow these steps to update the game:
Keeping the game updated ensures you have the latest fixes and game improvements, potentially resolving the Dev Error 5433 and enhancing your gaming experience.
Keeping your operating system and drivers up-to-date is crucial for fixing MW3 Dev Error 5433. Updates often include patches for software bugs that could be causing the error. Here’s how to go about it:
These updates can enhance system compatibility and performance, potentially resolving the Dev Error 5433 in MW3.
Adjusting the game’s priority to high in your system’s task manager can potentially resolve MW3 Dev Error 5433 by allocating more system resources to the game. Here’s a simplified guide:
This action tells your computer to prioritize MW3’s operations over less critical processes running in the background, which could smooth out performance issues and mitigate the dev error.
Optimizing your internet connection can play a critical role in preventing MW3 Dev Error 5433, especially in online play where a stable connection is vital. Here’s how to ensure your internet is in the best shape for gaming:
By following these steps, you’re not just addressing Dev Error 5433 but also enhancing your overall online gaming experience.
These steps target the common causes of Dev Error 5433 on PS5, focusing on system and game software health, as well as network stability.
Navigating through the annoyance of Dev Error 5433, whether on PS5 or PC, requires a mix of system checks, game updates, and internet optimization. Each suggested solution targets a potential root cause, from software glitches and outdated files to unstable network connections.
Implementing these fixes not only aims to resolve the specific error but also enhances the overall gaming experience by ensuring your system and network are optimized for performance. Remember, persistence is key; if one solution doesn’t work, move on to the next until you find the right fix for your situation. Happy gaming, and may your sessions be error-free!
The post MW3 Dev Error 5433: How To Fix It Easily appeared first on Games Errors.
Packet loss severely impacts Counter Strike 2 and its players globally. Experiencing high ping and packet loss while playing CS2 can lead to frustrating delays and lagging. Aware of this problem, I made this guide to show you how to fix CS 2 Packet Loss. Unfortunately, I dealt with this problem a few times since CS:GO turned into Counter Strike 2, but the solutions below helped me fix it in no time.
Playing CS2 can be incredibly frustrating if you’re experiencing high ping and packet loss. These issues can cause lag and delay, making it difficult or impossible to play the game smoothly. Various factors could cause packet loss:
To fix packet loss in CS2, first make sure that your internet connection works as it should without any interruptions. We recommend starting with these simple steps:
If you still encounter packet loss in Counter Strike 2, apply these tips:
Packet loss in CS2 may indicate that you are using an outdated network driver. I encountered this problem on one of my older devices. To fix it, update your network driver as follows:
Disclaimer: We are affiliated with the following Driver Update Tool.
We suggest utilizing PC HelpSoft to streamline the laborious process of updating your computer’s system drivers. This tool automates the task, guaranteeing a quicker and more dependable solution without requiring manual updates or scouring the internet for authentic drivers.
If you are experiencing packet loss in Counter Strike 2, you can attempt to resolve the issue by flushing your DNS to clear the cache. This will remove any saved IP addresses and DNS records that may be causing connectivity issues. Follow these steps:
1. Press Win+R to show the Run dialog box.
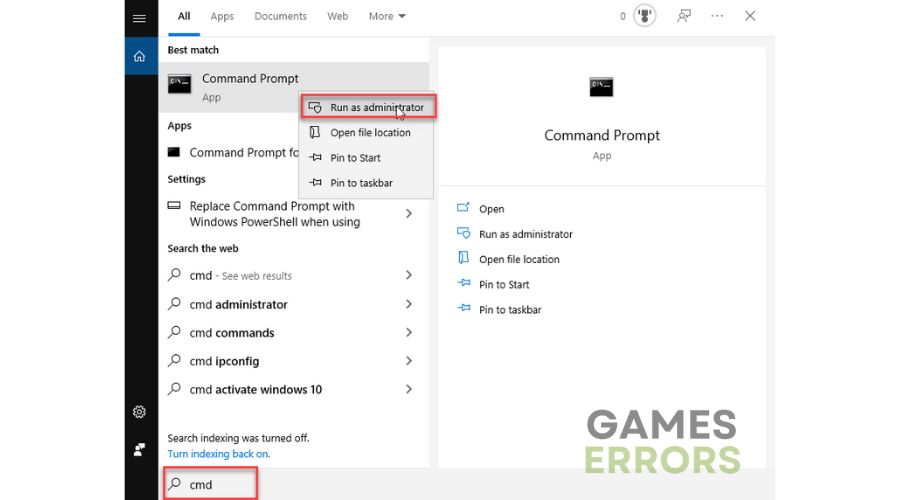
2. Type; “cmd” and press Ctrl+Shift+Enter keys to open Command Prompt as administrator.
3. Type “ipconfig /flushdns” and press Enter.
4. Type “ipconfig /registerdns” and press Enter.
5. Type “ipconfig /release” and press Enter.

6. Type “ipconfig /renew” and press Enter.
7. Type “netsh winsock reset” and press Enter.
8. Reboot the PC, launch CS2, and check if the issue is gone.
Time needed: 1 minute
We recommend entering commands in the game launch options that promote an efficient and stable connection to optimize the communication between your PC and the CS2 server.
Right-click on the CS2 and choose Properties.![]()
Enter the following command in the Launch Options:
rate 128000 cl_cmdrate 128 cl_interp 0 cl_interpratio 1 cl_lagcompensation 1![]()
Play CS2 to check if the issue is gone.
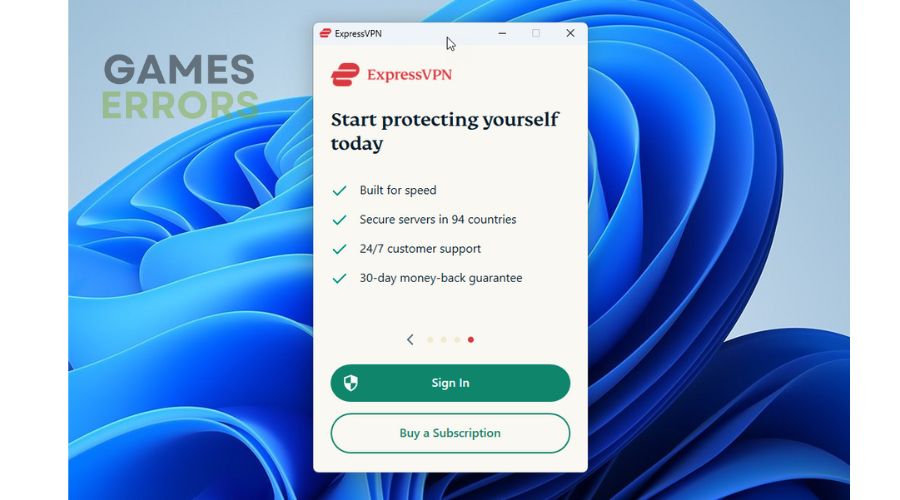
Improve your gaming experience with a reliable VPN like ExpressVPN. It can lower ping, avoid packet loss, and provide fast and stable connectivity. Choose from many servers in different countries for playing with friends online. It should be noted that a VPN can solely enhance your ping if your ISP imposes limits on your connection.
1. Download and install ExpressVPN.
2. During installation, provide your email address; you will get the code to access your ExpressVPN dashboard.
3. Click on Sign In.
4. Connect to a desired server.
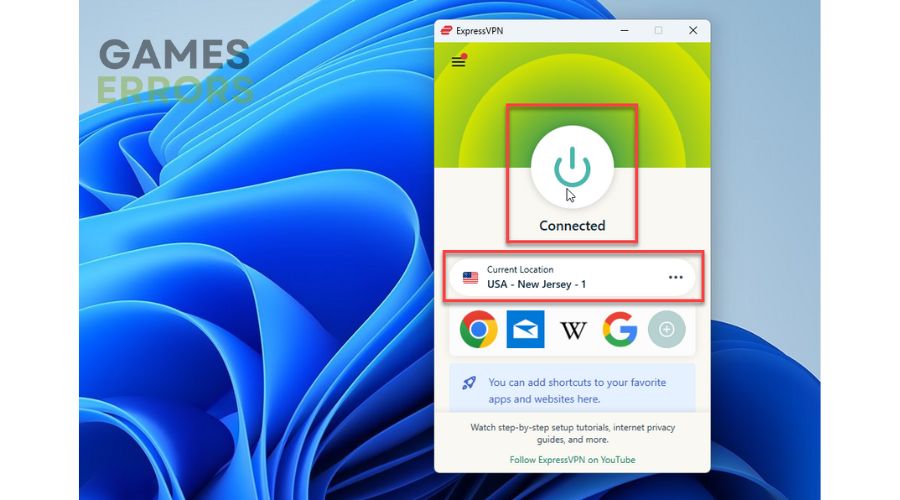
5. Launch CS 2 and check if the issue is gone.
If you’re playing CS 2 and experiencing packet loss, it’s recommended that you first check for any server or internet connection issues. Other possible solutions include flushing your DNS, updating your network driver, using launch options for the game, disabling any unnecessary background apps, or utilizing a trustworthy VPN service. If you have any additional solutions, feel free to add them to the comments. We will test them on our devices, and add them to the list.
The post Fix CS2 Packet Loss Easily [Simple Instructions] appeared first on Games Errors.
Minecraft is a popular sandbox video game enjoyed by millions worldwide, but it seems like Minecraft Launcher Error Code 0x87e5003a is giving headaches to a wide range number of fans.
If you are facing this error, don’t worry; this guide will walk you through some proven methods to fix it and get you back to your block-building adventures.
When encountering the Minecraft Launcher Error Code 0x87e5003a, users are often met with a pop-up error message indicating that the game failed to start, accompanied by the error code.
This particular error code emerges and presents the gamer with the following message: “This game is already running. If you just quit the game, it should be ready to launch again in a moment”.
While this could potentially be a passing glitch, more often than not, this generally indicates that the ability to partake in the game will remain unavailable even following a waiting period.
Time needed: 2 minutes
It seems like forcing closing any active related instances is one of the best solutions to get rid of our today’s issue.
![]()
If the error persists on your display, you might consider utilizing the previous version of the Minecraft launcher. If you lack familiarity with this option, you can access the Minecraft alternatives to acquire comprehensive details, along with discovering alternative Minecraft launchers.
Related articles:
By following the methods mentioned in this guide, you should now be able to fix the Minecraft Launcher Error Code 0x87e5003a.
Now, you can dive back into the fascinating world of Minecraft and enjoy your adventures without any hindrance. Happy gaming!
In case you encounter any additional questions, feel free to leave a comment in the dedicated section below.
The post Minecraft Launcher Error Code 0x87e5003a: Try These Fixes appeared first on Games Errors.
Fortnite has captivated millions of players with its exciting gameplay and vibrant world. However, encountering errors, like Fortnite Error code 0, can be frustrating and disrupt your gaming experience.
It seems like this error is pretty popular among worldwide users, so have no fear! There are plenty of solutions to fix it without effort.
In this comprehensive guide, we will walk you through various troubleshooting steps to help you fix Error 0 and get back to the Battle Royale action.
Before getting into our main solutions, we recommend trying these fast fixes:
Now, in case you didn’t manage to solve the problem, move to the following solutions:
Time needed: 3 minutes
Resetting your network settings seems to be one of the most efficient solutions to fix Fortnite error code 0.
The error code 0 in Fortnite could refer to a variety of issues, such as problems with game files, network connectivity, or other technical glitches.
Some users might suggest disabling antivirus software as a way to rule out the possibility that the antivirus is interfering with the game’s functionality.
Related articles:![]()
Fortnite Error code 0 can be a minor setback, but with the troubleshooting steps provided in this guide, you should be able to fix the issue and jump back into the action-packed world of Fortnite.
The below comment section is dedicated to you, so make sure you use it in case of having any other related questions or curiosities.
The post Fortnite Error Code 0: Fix It Now appeared first on Games Errors.
Fortnite is a highly popular and addictive online battle royale game played by millions of players worldwide, but the 0xc0000005 error seems to sometimes generate headaches among fans.
Like any other software, it can encounter various errors and issues that disrupt the gaming experience. The 0xc0000005 error is one of the most common occurrences for some players.
If you’re facing this error while trying to play Fortnite, don’t worry! This guide will walk you through several troubleshooting steps to help you resolve the issue and get back into the game.
Error code 0xc0000005 is a common Windows error that can occur when running various applications, including games.
This error is officially known as the Access Violation error and indicates that an application attempted to access a memory address that it was not allowed to access.
In simpler terms, it means that a program tried to read or write to a memory location that it doesn’t have permission to use, resulting in a crash or termination of the application.
There are several reasons why this error can occur in games:
Before going deeper into the main solutions, we suggest first ensuring these quick steps:
Now, if none of the above options worked, let’s discover some additional solutions you can try to get rid of the Fortnite 0xc0000005 Error.
Time needed: 5 minutes
![]()
![]()
![]()
![]()
SFC/scannow Related articles:
Encountering the Fortnite 0xc0000005 Error can be frustrating, but armed with the right troubleshooting steps, you can swiftly overcome this hurdle and get back to the exhilarating world of Fortnite.
In case of facing any additional questions, feel free to use the comment section listed below.
The post Fortnite 0xc0000005 Error: Try These Fixes appeared first on Games Errors.
Call of Duty: Modern Warfare 3 (MW3) is a cornerstone of the CoD franchise, offering intense multiplayer action and a gripping campaign. However, the gaming experience can sometimes be ruined by various errors, one of which is the notorious Dev Error 12502. This technical problem can stop players in their tracks, leaving many to wonder about its nature and, more importantly, how to fix it.
In this guide, we’ll explore what Dev Error 12502 is and provide you with reliable methods to get you back into the action as swiftly as possible.
Dev Error 12502 is a common issue that players of Call of Duty: Modern Warfare 3 might encounter. This error generally signifies a problem related to the game’s files or settings that prevents it from running smoothly. It can be triggered by a variety of factors, including corrupted game files, outdated graphics drivers, or incorrect game settings.
To resolve Dev Error 12502 and restore your gaming experience, consider the following preliminary solutions:
Updating your game is a crucial step in resolving MW3 Dev Error 12502, as developers often release patches to fix bugs and improve game performance. Here’s how you can ensure that Modern Warfare 3 is up to date:
Keeping MW3 and your game launcher updated ensures you have the latest content and fixes. If automatic updates are disabled in your launcher, consider enabling them to automatically receive these improvements in the future.
Adjusting your system’s paging file size can be an effective way to fix MW3 Dev Error 12502, especially if the error is related to insufficient system memory. Follow these detailed steps to adjust your paging file size for Windows:
sysdm.cpl and press Enter. This command opens the System Properties window.Adjusting the paging file size can help accommodate games that require a lot of memory, like MW3, especially if you’re running several applications simultaneously or have limited RAM. If you’re unsure about the best settings for your system, it’s a good idea to consult Windows’ recommendations in the Virtual Memory window or seek advice from a knowledgeable source to avoid system instability.
Disabling game overlays can significantly improve game performance and potentially resolve MW3 Dev Error 12502. Many gaming applications provide overlays that offer convenient features like FPS counters, instant messaging, and live streaming, but they can also cause conflicts or use valuable resources. Here’s how to disable the most common game overlays:
After disabling these overlays, restart your game to see if Dev Error 12502 persists. Turning off these features can not only solve compatibility issues but also free up resources for a smoother gaming experience. If you’re not using a particular overlay feature, keeping it disabled during gameplay is generally a good practice.
Tackling Dev Error 12502 in Modern Warfare 3 feels a bit like detective work, doesn’t it? You’ve got your list of potential problems—outdated game versions, mischievous system settings, those sneaky overlays—and it’s all about patiently ruling them out one by one.
The key is to keep calm and troubleshoot on, starting with the basics like ensuring your game is up to date, then maybe diving into the more techy stuff like tweaking your virtual memory settings if needed. And, if you ever feel lost, remember that Activision’s official support is like the detective’s handbook, always there to guide you with the latest insights. By methodically following these steps, you’re not just trying to fix an error; you’re ensuring your gaming setup is as robust as can be, ready for uninterrupted action. Here’s to smoother gaming ahead!
The post How to Fix Dev Error 12502 in Call of Duty: Modern Warfare 3 appeared first on Games Errors.
The Call of Duty series has been a staple of the first-person shooter genre, offering players intense combat scenarios and a rich, narrative-driven experience. However, like any complex games, it’s not immune to technical problems.
One such issue that has been a thorn in players’ sides is the MW3 Dev Error 5433, especially within the game’s zombie mode.. This error can abruptly halt your gaming session, leaving you searching for solutions.
Dev Error 5433 in Modern Warfare 3 typically indicates an issue within the game’s system that prevents it from operating correctly. Such errors usually relate to problems with game files, graphics settings, system configurations, or compatibility issues with hardware or drivers.
To fix Dev Error 5433, try disconnecting and then reconnecting your internet connection. This quick fix has helped some users, although it may not be a long-term solution.
Additionally, run the game as an administrator and remove unnecessary background tasks.
Table of contents
Corrupted game files are a common cause of MW3 Dev Error 5433. Regularly checking the integrity of your game files can help prevent this issue. Here’s a simplified process:
This method ensures your game files are intact and can often clear up errors related to file corruption.
Ensuring your game is up to date is another key strategy in resolving MW3 Dev Error 5433. Game developers frequently release updates that fix bugs and errors. Follow these steps to update the game:
Keeping the game updated ensures you have the latest fixes and game improvements, potentially resolving the Dev Error 5433 and enhancing your gaming experience.
Keeping your operating system and drivers up-to-date is crucial for fixing MW3 Dev Error 5433. Updates often include patches for software bugs that could be causing the error. Here’s how to go about it:
These updates can enhance system compatibility and performance, potentially resolving the Dev Error 5433 in MW3.
Adjusting the game’s priority to high in your system’s task manager can potentially resolve MW3 Dev Error 5433 by allocating more system resources to the game. Here’s a simplified guide:
This action tells your computer to prioritize MW3’s operations over less critical processes running in the background, which could smooth out performance issues and mitigate the dev error.
Optimizing your internet connection can play a critical role in preventing MW3 Dev Error 5433, especially in online play where a stable connection is vital. Here’s how to ensure your internet is in the best shape for gaming:
By following these steps, you’re not just addressing Dev Error 5433 but also enhancing your overall online gaming experience.
These steps target the common causes of Dev Error 5433 on PS5, focusing on system and game software health, as well as network stability.
Navigating through the annoyance of Dev Error 5433, whether on PS5 or PC, requires a mix of system checks, game updates, and internet optimization. Each suggested solution targets a potential root cause, from software glitches and outdated files to unstable network connections.
Implementing these fixes not only aims to resolve the specific error but also enhances the overall gaming experience by ensuring your system and network are optimized for performance. Remember, persistence is key; if one solution doesn’t work, move on to the next until you find the right fix for your situation. Happy gaming, and may your sessions be error-free!
The post MW3 Dev Error 5433: How To Fix It Easily appeared first on Games Errors.
Packet loss severely impacts Counter Strike 2 and its players globally. Experiencing high ping and packet loss while playing CS2 can lead to frustrating delays and lagging. Aware of this problem, I made this guide to show you how to fix CS 2 Packet Loss. Unfortunately, I dealt with this problem a few times since CS:GO turned into Counter Strike 2, but the solutions below helped me fix it in no time.
Playing CS2 can be incredibly frustrating if you’re experiencing high ping and packet loss. These issues can cause lag and delay, making it difficult or impossible to play the game smoothly. Various factors could cause packet loss:
To fix packet loss in CS2, first make sure that your internet connection works as it should without any interruptions. We recommend starting with these simple steps:
If you still encounter packet loss in Counter Strike 2, apply these tips:
Packet loss in CS2 may indicate that you are using an outdated network driver. I encountered this problem on one of my older devices. To fix it, update your network driver as follows:
Disclaimer: We are affiliated with the following Driver Update Tool.
We suggest utilizing PC HelpSoft to streamline the laborious process of updating your computer’s system drivers. This tool automates the task, guaranteeing a quicker and more dependable solution without requiring manual updates or scouring the internet for authentic drivers.
If you are experiencing packet loss in Counter Strike 2, you can attempt to resolve the issue by flushing your DNS to clear the cache. This will remove any saved IP addresses and DNS records that may be causing connectivity issues. Follow these steps:
1. Press Win+R to show the Run dialog box.
2. Type; “cmd” and press Ctrl+Shift+Enter keys to open Command Prompt as administrator.
3. Type “ipconfig /flushdns” and press Enter.
4. Type “ipconfig /registerdns” and press Enter.
5. Type “ipconfig /release” and press Enter.
6. Type “ipconfig /renew” and press Enter.
7. Type “netsh winsock reset” and press Enter.
8. Reboot the PC, launch CS2, and check if the issue is gone.
Time needed: 1 minute
We recommend entering commands in the game launch options that promote an efficient and stable connection to optimize the communication between your PC and the CS2 server.
Right-click on the CS2 and choose Properties.![]()
Enter the following command in the Launch Options:
rate 128000 cl_cmdrate 128 cl_interp 0 cl_interpratio 1 cl_lagcompensation 1![]()
Play CS2 to check if the issue is gone.
Improve your gaming experience with a reliable VPN like ExpressVPN. It can lower ping, avoid packet loss, and provide fast and stable connectivity. Choose from many servers in different countries for playing with friends online. It should be noted that a VPN can solely enhance your ping if your ISP imposes limits on your connection.
1. Download and install ExpressVPN.
2. During installation, provide your email address; you will get the code to access your ExpressVPN dashboard.
3. Click on Sign In.
4. Connect to a desired server.
5. Launch CS 2 and check if the issue is gone.
If you’re playing CS 2 and experiencing packet loss, it’s recommended that you first check for any server or internet connection issues. Other possible solutions include flushing your DNS, updating your network driver, using launch options for the game, disabling any unnecessary background apps, or utilizing a trustworthy VPN service. If you have any additional solutions, feel free to add them to the comments. We will test them on our devices, and add them to the list.
The post Fix CS2 Packet Loss Easily [Simple Instructions] appeared first on Games Errors.
Warzone 2 keeps crashing on your PC? Crashing errors are one of the problems you’ll run across with this game, and you’ll keep getting kicked from it. This can be irritating, especially if it happens when you are having an intense match of Warzone 2 and the game crashes ![]()
Players report that the Warzone 2 crashing problem occurs on devices like their personal PC, Xbox, PS4, and PS5. Also, players notices that the crushes might happen during startup, mid-game, every game, and after an update.
Solving the COD Warzone 2 crashing issue is not hard. We carefully tested and dropped the easiest ones for you.
Warzone 2 keeps crashing on startup, mid-game, upon setup, on the menus, and so on because of outdated GPU drivers or corrupt game files. Also, your PC might not meet the minimum system recommendations of the game.
We will present you with various solutions for Warzone 2 crashing. You should test each one until it resolves the difficulties you are experiencing with the game freezing or failing.
Warzone 2 is a very demanding game in terms of computer hardware and software, so you’ll need to make sure everything is up to date and working well enough to help avoid the game from crashing.
To fix the Warzone 2 crash on PC problem, you can update the drivers or use the repair tools provided by either the Steam or Battle.Net applications. Also, you will find step-by-step guides for the methods mentioned and for other solutions that have been helpful to other players.
![]() Before considering additional fixes, you should restart the game whenever Call of Duty Warzone 2 crashes on your PC.
Before considering additional fixes, you should restart the game whenever Call of Duty Warzone 2 crashes on your PC.
Any temporary errors brought on by outdated cookies and cache or by other system software interfering with your gaming program will be resolved by restarting the game.
Table of contents:
First, ensure that COD Warzone 2 can be played on your Windows PC. If your computer doesn’t meet the minimal requirements, it should at least correspond with the suggested requirements. If either of these specifications is not met by your PC, COD Warzone 2 will crash frequently.
I occasionally see folks reporting Warzone 2 crashes, and it turns out that their graphics drivers haven’t been updated in a while. By visiting the official websites, updating your graphic drivers is very simple:
Time needed: 4 minutes
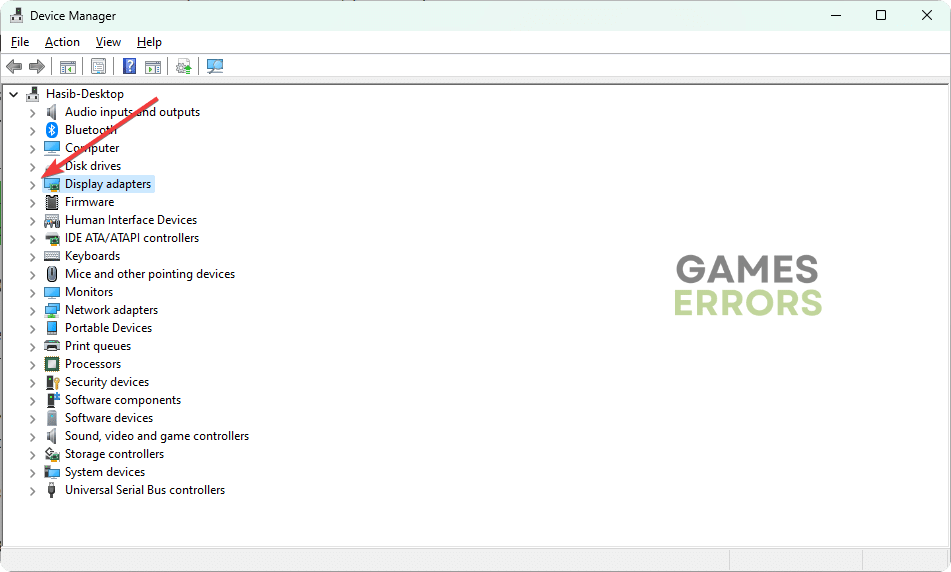
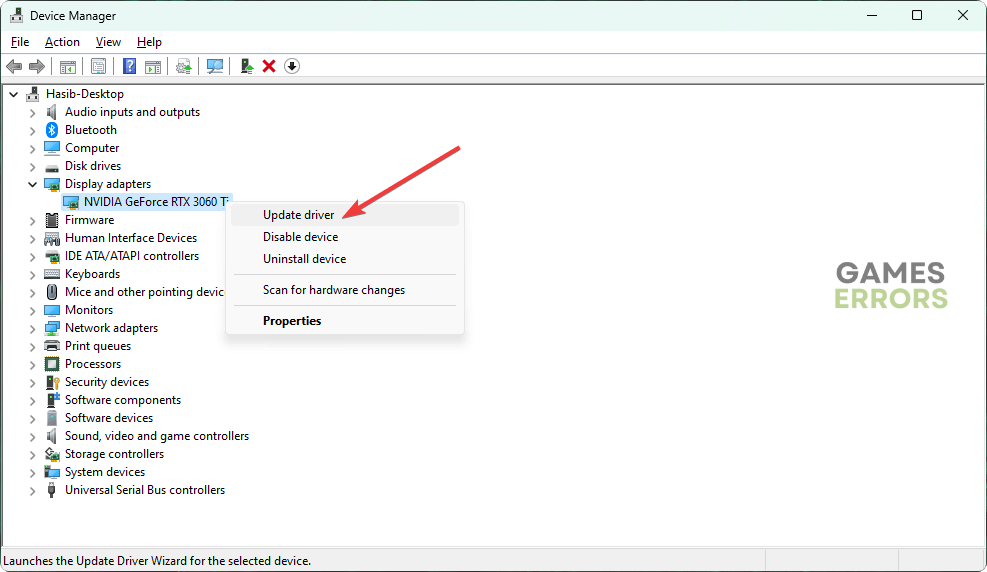
One of the first steps you should take if a game is giving you difficulties is to ensure that your computer’s drivers and operating system are up to date. Even a trusted source as Activision recommends this. Update your GPU drivers using Device Manager:
![]()
![]()
![]()
Sometimes updating your GPU driver manually might be a bit hard or time-consuming, knowing that you can update your drivers automatically with a dedicated third-party app like Outbyte Driver Updater. You can use it for any driver that you want to update, and it works in just a couple of clicks. Here is how you do it:
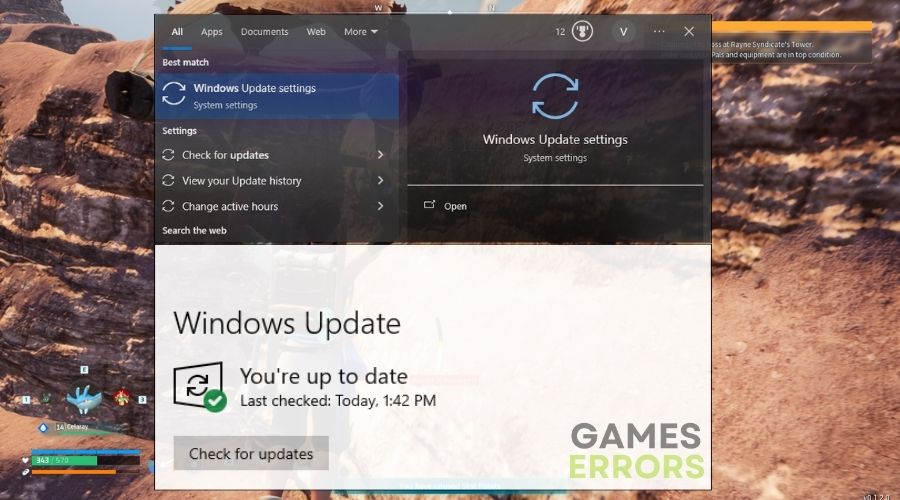
If you encounter the Warzone 2 crashing on PC issue, ensure that you have Windows 10/11’s most recent updates installed, and to check that, follow the steps below:
3. If updates have been found, click on the Install now button.
If you encounter the Warzone 2 crash on startup issue, your GPU cache might contain faulty files. The best way to deal with this problem is to clear the GPU cache accessible through %localappdata%. Learn how to do it by checking the steps below:
2. Type the following command into the address bar, then press Enter: %localappdata%
3. Locate the NVIDIA folder, open it, then open the DXCache folder and delete all the items in it.
4. Go back, open the GLCache folder and delete all the items in it.
5. Go back to the %localappdata% folder and find the NVIDIA Corporation folder, then open it.
6. Open the NV_Cache folder and delete all the files in this folder.
7. Restart your PC.
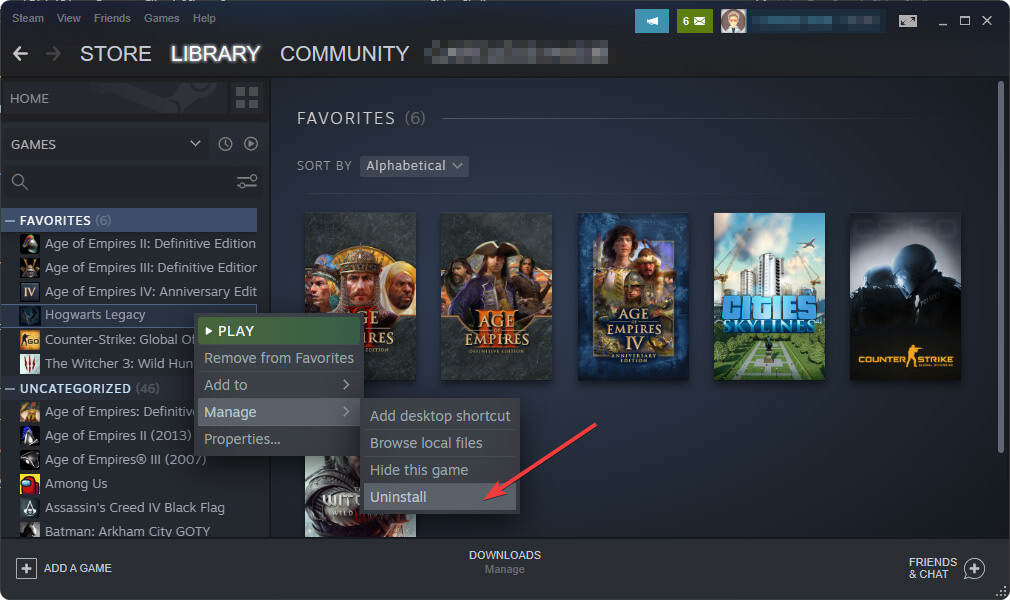
If nothing until this step has worked for you, consider this method – reinstalling the game. I realize that many people are uncomfortable doing it because it requires installing the game again.
Severe coding issues that the standard troubleshooting techniques can’t resolve may occasionally be resolved by performing a clean install.
The fact that several programs are using too many resources in the background of your PC when you are playing COD might be the reason why you encounter the Warzone 2 crash on startup issue.
If you want more additional capacity, like RAM and CPUs, close the unnecessary background processes you aren’t using while playing the game. Since COD Warzone 2 is a CPU and graphics-intensive game, extra resources are required.
Using the Task Manager, you can check what background apps put pressure on your CPU and you can simply End Task and continue enjoying your game. Here is how to do it:
The most commonly encountered problem is Warzone 2 crashing on startup. However, it can be easily fixed and Verifying the integrity of the game files will help. If you are not sure how to do it, follow the steps below:
Steam users:
Battle.net users:
Find out if the Windows firewall prevents the game from running by disabling it before you open Call of Duty. However, you might also try to enable the game through the firewall to fix errors like Warzone 2 crashes on startup. Follow the steps below to learn how to do it.
Enable Warzone 2 through Windows Firewall
Shut down your Firewall
If you updated your GPU driver recently and Warzone 2 is crashing on PC, rollback your GPU driver. To do so, try to check the forums for a more stable version of your graphics driver, and then look for it on the official Nvidia, AMD, or Intel site.
Once you find the stable version, download it, completely uninstall the version you are using now, and then install the one you just downloaded.
If Warzone 2 keeps crashing, and none of the solutions above worked you might have some system related problems. To fix them, try the solutions below:
Other related articles:
Final thoughts ![]()
Warzone 2 crashing every game is a problem that may be caused by numerous factors, including out-of-date GPU drivers, corrupted game files, or a computer that doesn’t fulfill the system requirements.
We hope one of the solutions above helps you to fix the Warzone 2 crashing issue. If not, it’s also advisable to check out our expert guide on how to stop games from crashing.
However, if you still have problems with crashing, reach out to Activision Support or wait until the developers share new updates.
In the end, feel free to share your feedback by leaving a comment in the section below.
The post Warzone 2 Keeps Crashing on PC: 9 Ways to Fix It for Good appeared first on Games Errors.
While exploring the Palpagos Islands in Palworld, you might encounter connection issues that hinder your multiplayer adventures. Unfortunately, my friends encountered a few of them as some couldn’t join servers, while others had lag. So I’ve compiled a comprehensive guide to help you resolve these connection problems and ensure you can embark on seamless multiplayer adventures with your Pals.
To fix the connection issues in Palworld, before trying the intricate solutions, try the quick tips and tricks below.
If none of the previous methods fixed the connectivity issues for you, try out all of the following:
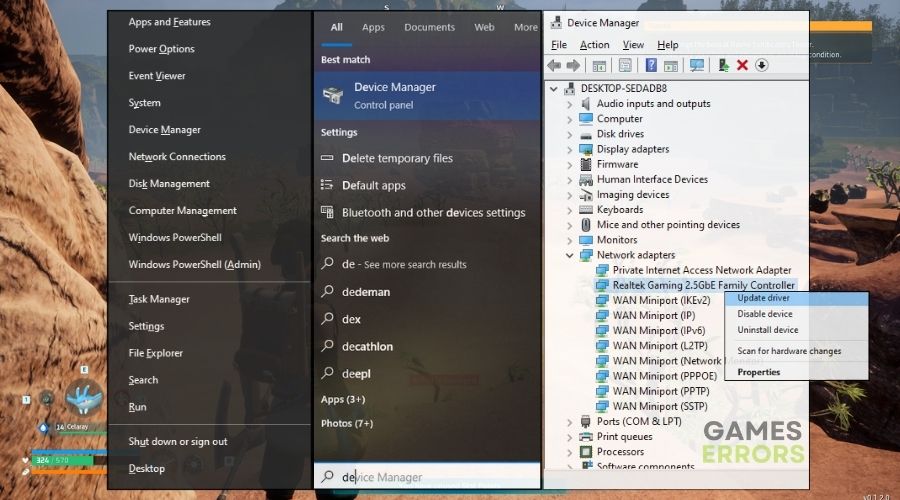
Updating your drivers is a very important step that you should do every once in a while because the latest versions might contain fixes of their own which could solve the connection related issues in Palworld and other games.
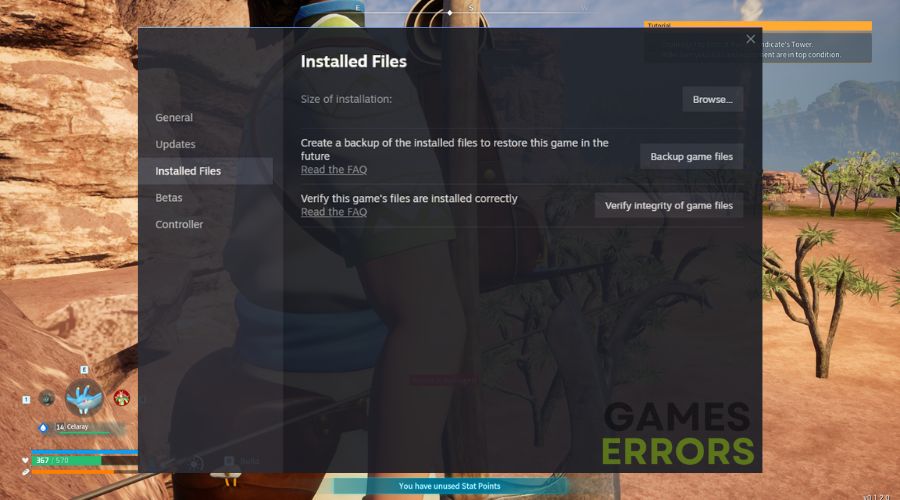
Sometimes corrupted game files might cause latency issues, especially in new releases like Palworld. So, it is best to verify the game files every now and then to make sure that they aren’t the culprit.
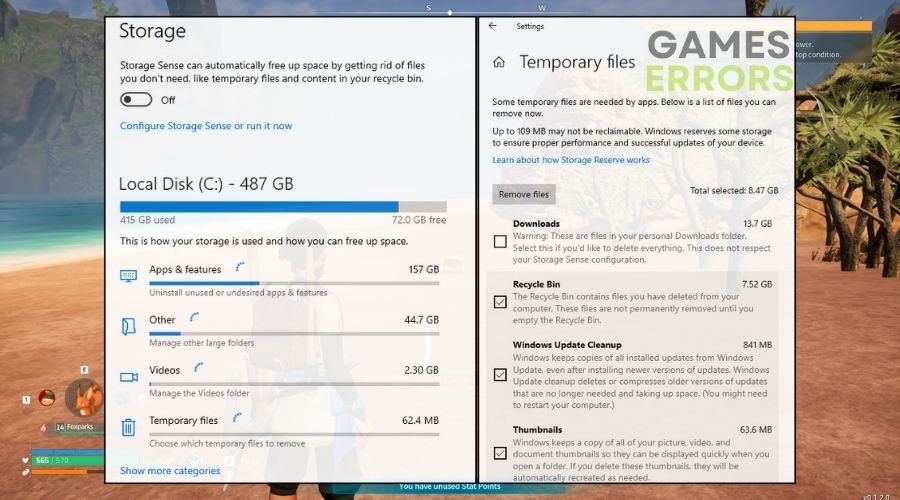
Temporary files might also come along with damaged data, which could be the cause of connection issues, especially if you are playing Palworld on multiplayer servers.
By allowing Palworld through the firewall, I make sure that the game isn’t interrupted and that there aren’t any blocked game files.

I sometimes improve my online experience in Palworld by changing my DNS settings, reducing latency and resolving connection issues for a smoother and more responsive gameplay.
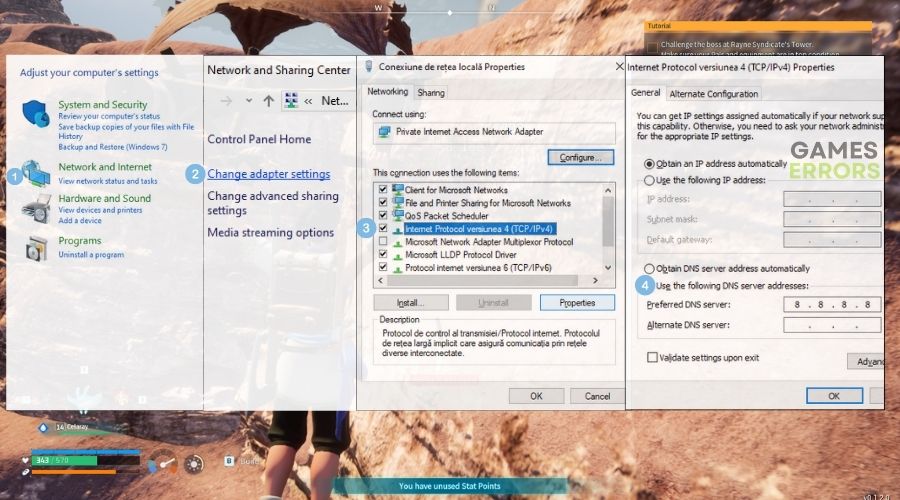
To fix the latency and connection problems in Palworld I reset my network settings, clearing any potential glitches or conflicts that may be impacting the stability of my online connection.
I recommend that you update your Windows regularly. Like this, it will automatically update your drivers and other needed processes that could fix the connection issues and lag in Palworld.
A good VPN for gaming can optimize the connection route, reduce latency, and potentially resolve connection issues, ensuring a more stable and enjoyable gameplay environment. I frequently use them to protect myself while playing on public servers.
Palworld is having connection issues primarily as a result of defective or missing game files, obsolete network drivers, broken routers or modems, and IPS-related issues. However, the distance between you and the server’s host could also be the source of the latency issue.
Hopefully, the solutions mentioned will help you fix the connectivity issues in Palworld Multiplayer. Keep in mind that the best practice to get rid of such problems is to update your device frequently. Additionally, if you discover any other methods to fix the latency and network-related issues in Palworld, feel free to share them in the comments.
Additional Articles:
The post Palworld Connection Issues: Easy Ways to Fix Them appeared first on Games Errors.
Many players reported that Hogwarts Legacy is crashing on their PCs, turning the magical adventure into a technical nightmare. If you’re also facing this issue, do not panic! You are not alone.
Like every other game that runs smoothly on your PC, you can expect good performance for this masterpiece almost most of the time, unless Hogwarts Legacy keeps crashing on your PC or console. And while this happens rarely, it seems to be pretty common to experience random crashes while playing Hogwarts Legacy.
We are here to take your worries away with our fixes and solutions. The best part is that most of them worked for other players and for us.
The main reason why Hogwarts Legacy keeps crashing is because a device doesn’t meet the system requirements or because gamers are trying to play this title on the highest graphics available. However, if that’s not the case for you, here are some other common reasons why Hogwarts Legacy crashes:
You may also have noticed the Hogwarts Legacy crashing on startup, after an update, or on the loading screen. Don’t worry, our solutions will fix this problem in no time.
To fix the Hogwarts Legacy crashing problems, make sure that the game is updated. There might be a fix in one of the patches. Yet, if you have the latest version and the game crashes randomly, try all the solutions below:
We have found the most effective methods to get rid of the Hogwarts Legacy crashing problem. However, before going through the main methods, we want you to apply these basic fixes:
If you still continue facing the same problem, do the following things to solve this crashing issue:
Time needed: 4 minutes
To tackle this crashing problem, you should update the graphics card driver to the latest version before trying other methods. It is because, in most cases, the driver issue is the most common reason that triggers this type of problem.
To update the GPU driver from your Windows PC, follow these steps:
![]()
We also suggest you use Outbyte Driver Updater to update the graphics card driver. Windows Device Manager often fails to get the latest driver. But third-party tools like Outbyte Driver Updater can easily update any drivers on your PC and solve game crashing problems.
⇒ Get Outbyte Driver Updater
We also strongly recommend checking our dedicated guide on how to update your graphics driver for better gaming performance. There, you’ll discover some detailed explanations that might help.
Now, see if it has solved the Hogwarts Legacy crash problem or not. If not, go through the next methods.
To provide Hogwarts Legacy more room to utilize system resources and reduce the possibility of third-party service interference with the game, disable as many unnecessary background tasks as possible. For this, follow these steps:

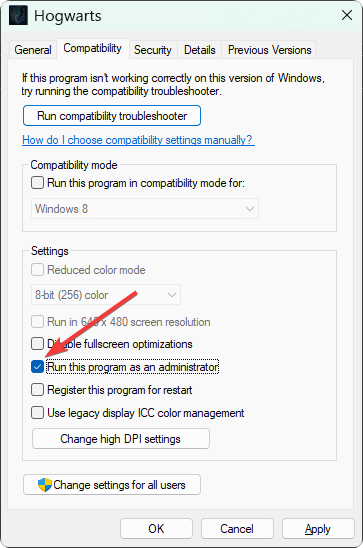
If you encounter the Hogwarts Legacy crashing on startup issue, try to run the game as administrator. For many users, it has worked like magic. Here are the steps to do it:
Most of the Hogwarts Legacy crash problems could be the result of corrupted, missing, or faulty game files. However, you can be fix this problem in a matter of minutes by using the verify integrity of game files option provided by most launchers. If you don’t know how to do it, follow the steps below:
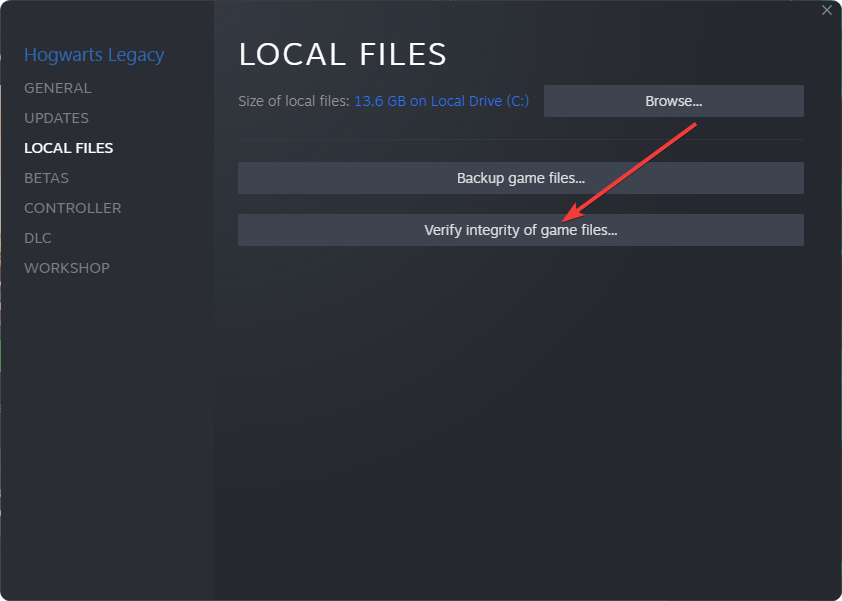
If you have another game launcher other than Steam, we suggest you figure out a similar way to validate the game files. This method works with crashing problems not only for Hogwarts Legacy but also for many other games.
The clean boot state means no third-party services will be active. When you boot into this mode, you will easily understand if any third-party service is affecting the game or not. To do it, follow these steps:
msconfig
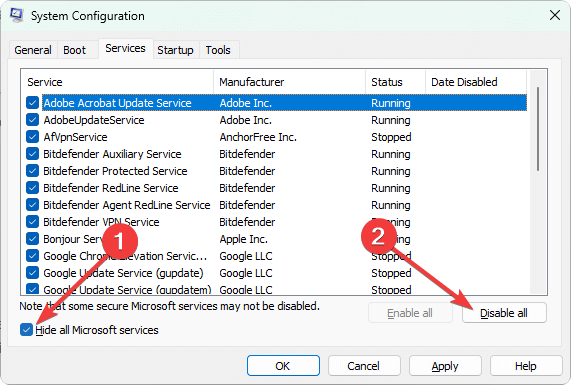
Now, if you managed to get rid of the Hogwarts Legacy crashes on startup, it means a third-party service is responsible. You can enable the services one by one to find out which one it is. Then, keep it disabled or uninstall the related software.
Ray-tracing software can be finicky and could be the reason of Hogwarts Legacy crashing problems if the hardware is not appropriately set up and optimized for it, particularly with a specific game. You can disable it easily by following the the steps:
Turning off ray tracing could be a useful and speedy solution to resolve the problem of Hogwarts Legacy crashing on a PC.
Keep in mind that disabling ray tracing might also work if Hogwarts Legacy is out of video memory. If you ever experience this issue, make sure to check our dedicated fixing guide.
Overclocking can be both beneficial and harmful. If your CPU or GPU are older, they might not hold as the newer components, and you might end up having decreased FPS, a higher temperature on your GPU and a high usage rate, which might lead to a Hogwarts Legacy crash on startup problem, or other issues.
I like playing games with the VSync on. It was a bit troublesome when I started using it because some games were moving slower, but thanks to it, I stopped having stuttering issues and random freezes. Additionally, it can fix the Hogwarts Legacy crash problems. However, it might also cause them based on your system specifications because it limits your GPU to match the refresh rate of your monitor.
If you prefer playing games with the highest graphics available, expect FPS drops and Hogwarts Legacy crashes. The problem is that the game is not yet well-optimized. This results in a variety of other problems. I prefer playing it on medium graphics, and it still looks decent. However, I recommend turning off the Shadow Quality.
DirectX is an essential component for running games and is often included in game installation files.
However, if your PC is using an outdated version of DirectX, it may cause crashing issues when playing Hogwarts Legacy on Windows.
Unfortunately, DirectX cannot be installed separately since it’s already a part of Windows. Therefore, to avoid these problems, it’s important to make sure your operating system is up-to-date with the latest version.
This security feature might cause more harm than good when it comes to Hogwarts Legacy. It is mostly here to combat memory corruption and other problems. Yet, it can affect your performance. The best thing you can do is to disable it for a while.
As a last resort or a first option for some, reinstalling the game is a way to fix Hogwarts Legacy Crash problems. However, it takes time, and sometimes it might not work if the problem comes from another source. It worked for me a couple of times, but I rarely used this method.
Sometimes the oldest trick in the book is the best one, by changing your graphics settings you will be able to minimize the resource usage of the game, thus you might stop Hogwarts Legacy from crashing and also boost your game performance.
If no other methods work, re-installing the game should work. It may take some time to do, but it is extremely useful.
You may still encounter the crashing issue. In this case, it may be because of your PC specifications or a hardware-related problem. It may be also a known bug. In this case, keep patience until the developer releases a patch.
If none of the above options worked for you, and you are still wondering why does Hogwarts Legacy keeps crashing, here’s what you can do as a bonus solution:
Related articles:
Final Thoughts
This article has described how you can fix the Hogwarts Legacy crash problem. If you have any suggestions or opinions on this or have a better method that may help others, feel free to write them in the comment box below.
The post Hogwarts Legacy Keeps Crashing: Why & How to Fix Guide appeared first on Games Errors.

Is the new Sci-Fi game Starfield crashing on your PC? Don’t go mad if it keeps happening. In this article, you will find your most expected solution.
The Starfield is another masterpiece from the Bethesda Game Studios. This new open-world space RPG action game has many things to offer. However, if you are a passionate gamer and often encounter crashing issues while playing this title, you may lose interest at a time.
Disclaimer: The solutions mentioned below are based on thorough research and were tested by gaming experts.
To stop Starfield from crashing, verify if your PC meets the system requirements of Starfield and make sure that your game is updated before applying the main methods. Also, we suggest you do these quick things:
Now, try the following methods one by one if Starfield keeps crashing:
Time needed: 3 minutes
The most effective solution when it comes to crashing problems in games is to update the graphics drivers. We tested it in Starfield on Windows 10 and 11, and it has worked so far.
![]()
Sometimes, you might encounter the Starfield Crashing on PC problem on AMD and Nvidia high-end drivers, too, which could be caused by the driver update, and as a fix, you should roll back the GPU driver.
Disclaimer: We are affiliated with the following Driver Update tool.
Why should you use this tool?
Outbyte Driver Updater works great when it comes to automatic driver updates because it keeps the right order of the drivers and uses the best updates available.
So far, I haven’t encountered any issues like driver conflicts or faulty installations, and everything works as it should. I’ve used other tools in the past too, but they weren’t as efficient, and I ended up having to manage driver conflicts manually (which is a pain) or use the system recovery tool.
⇒ Get Outbyte Driver Updater
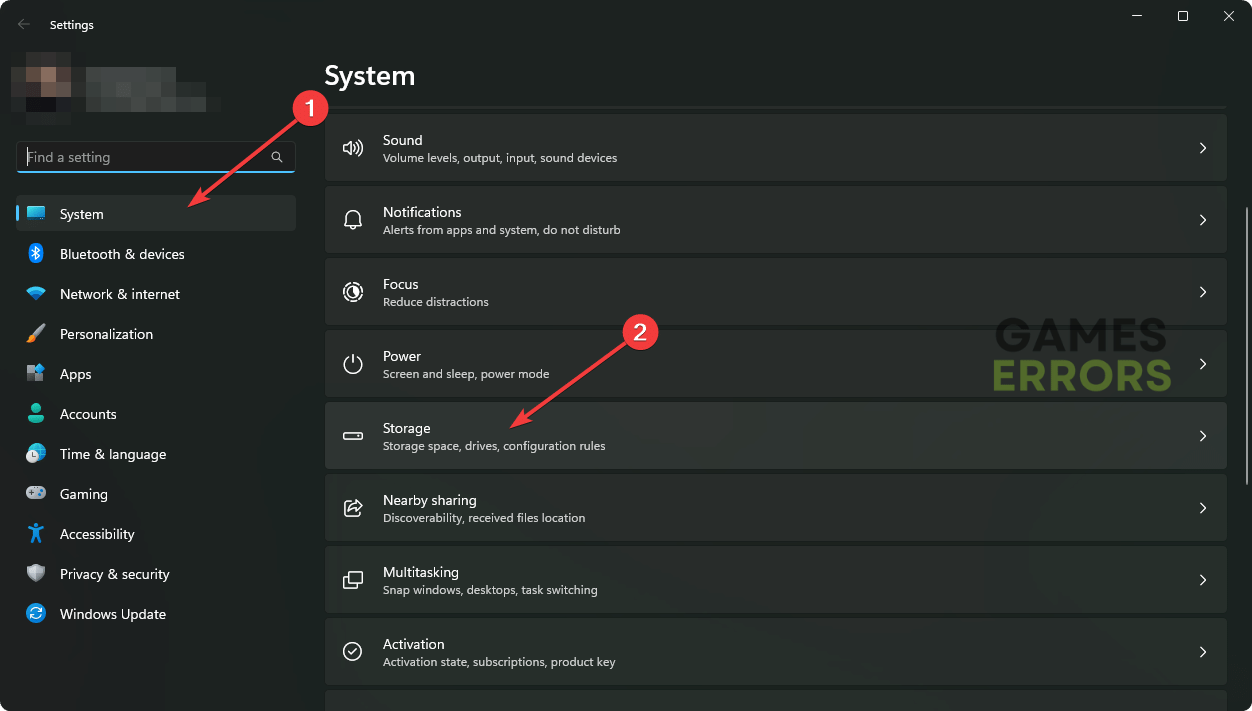
To prevent Starfield crashes, consider cleaning up your DirectX Shader Cache. It is an easy process, you just need to follow the steps below:
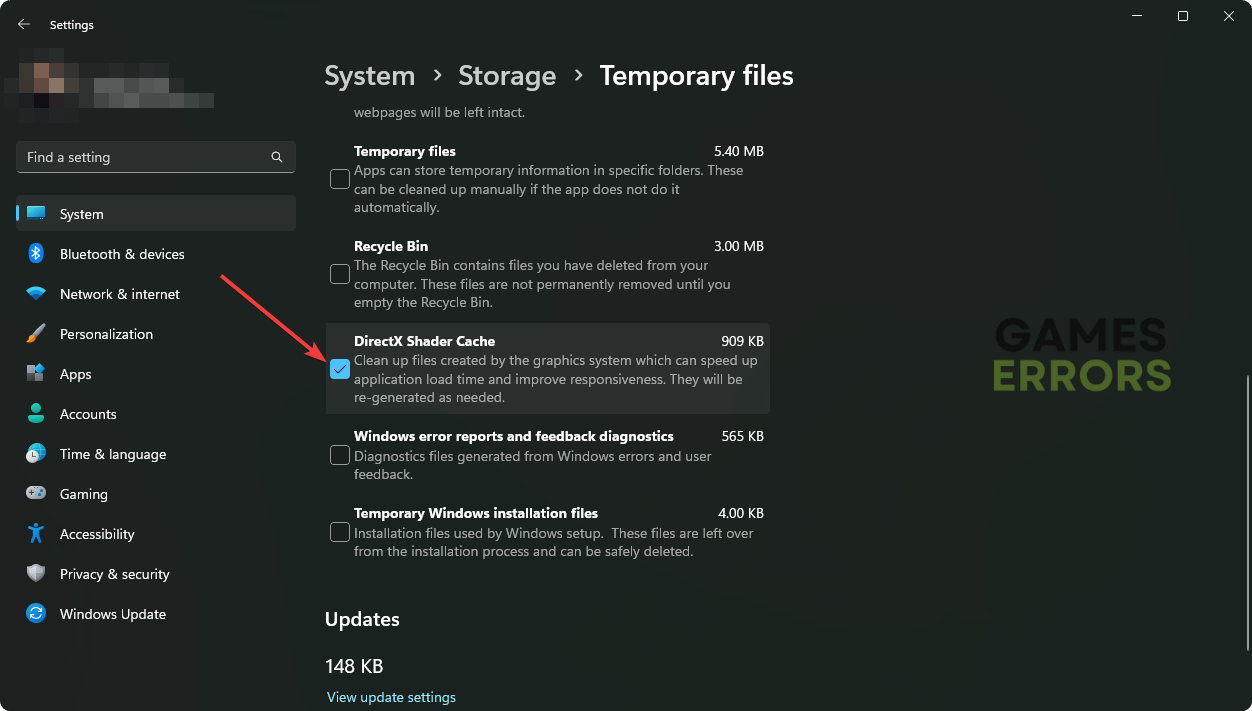
Additionally, you can also tick the following boxes:
They are mostly unnecessary files which are taking some of your space, and if you leave them unattended you will have a lot of storage space occupied.
Now, relaunch the game. It will reset and rebuild the shader cache, and it might also fix your Starfield random crashes.
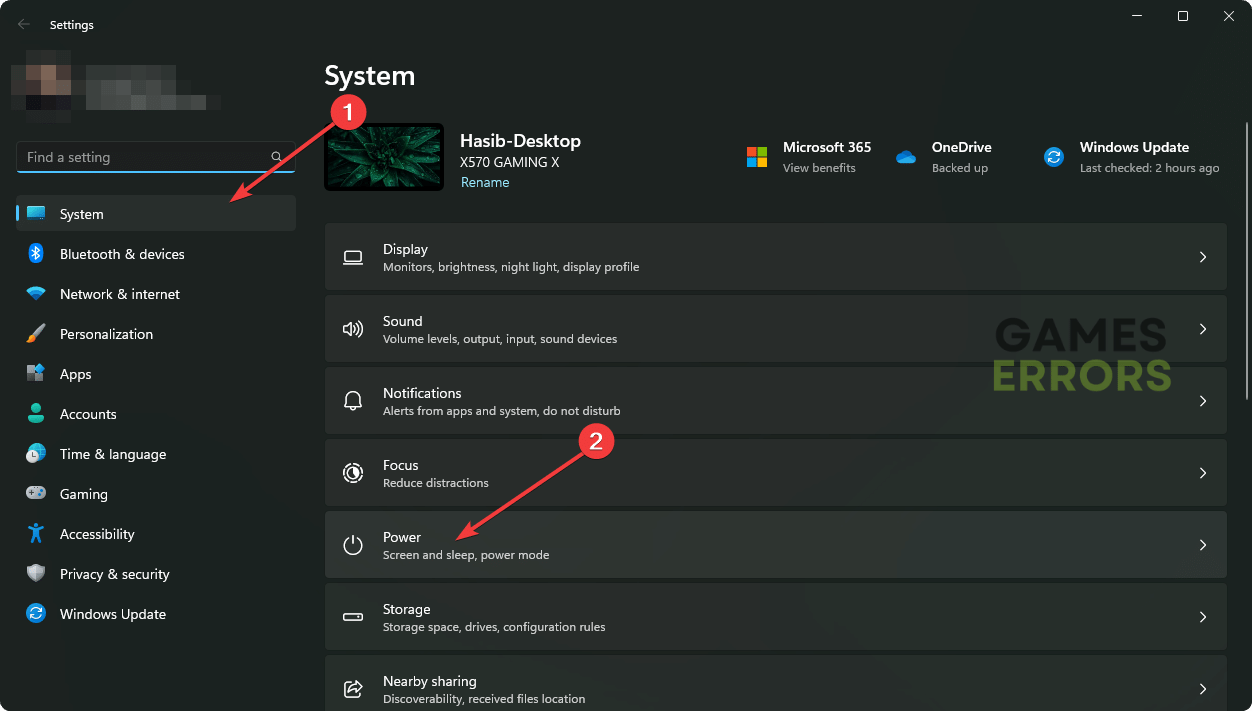
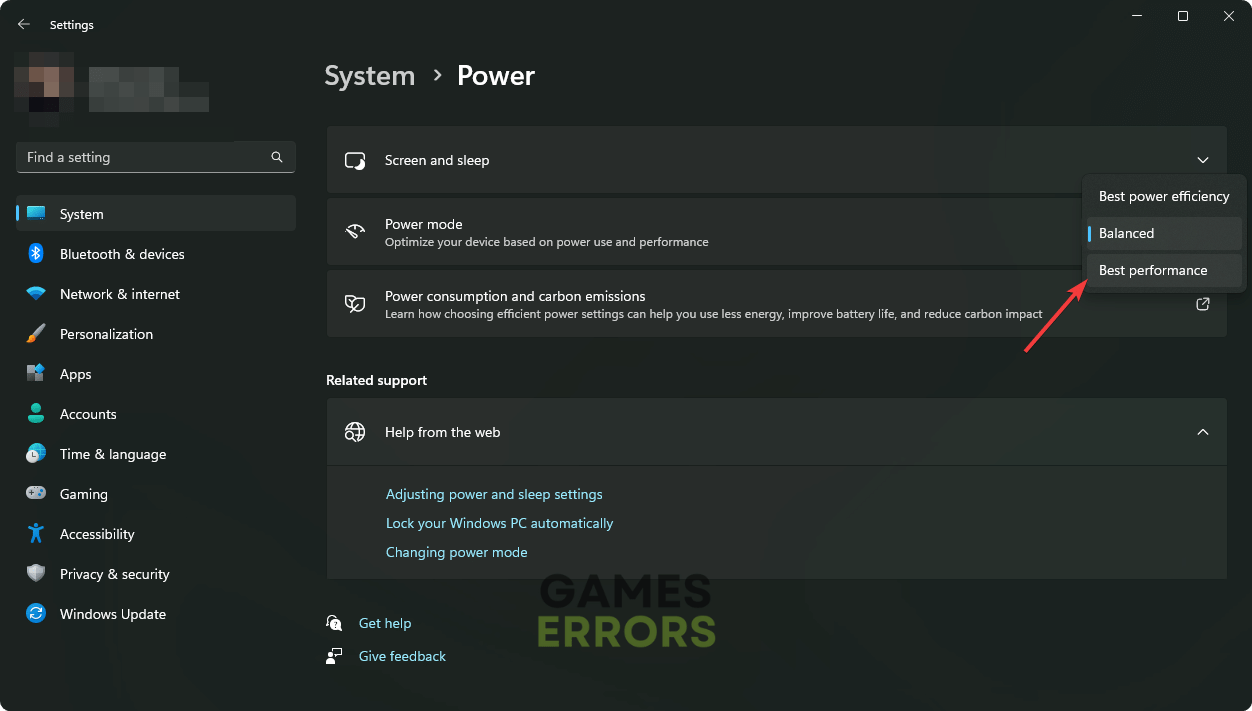
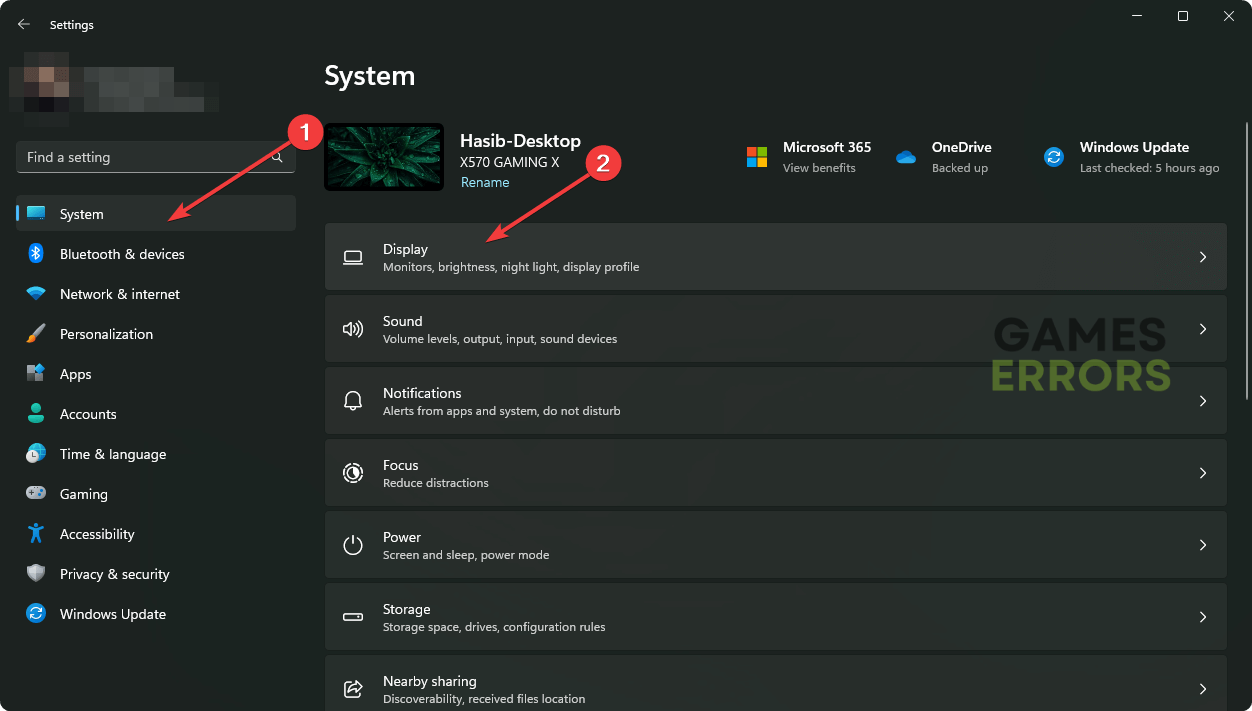
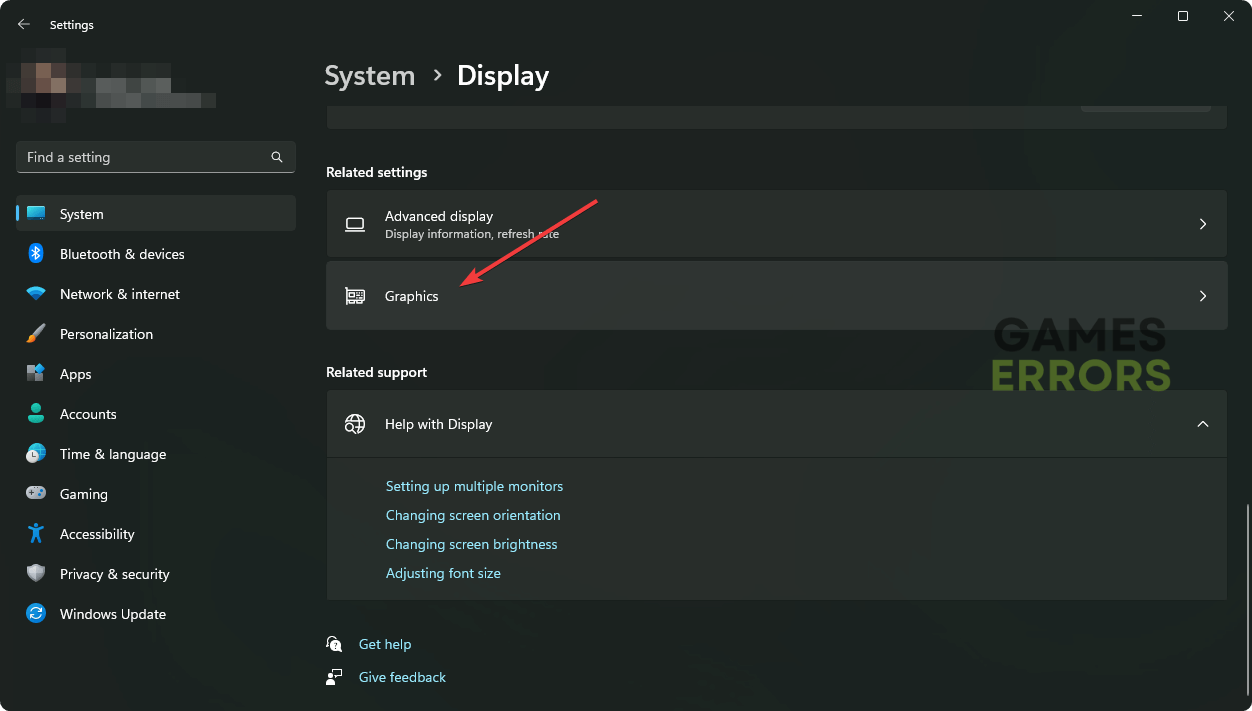
Activating the best performance mode and tweaking the graphics preference can help to get rid of this crashing issue on Starfield. For this, try these steps:

Most games like Starfield use the Visual C++ package, and sometimes parts of it are damaged by Windows updates and other downloads. Therefore, it is not a bad thing to upgrade, repair, or reinstall the package from time to time to ensure that you don’t encounter errors such as Starfield crashing.
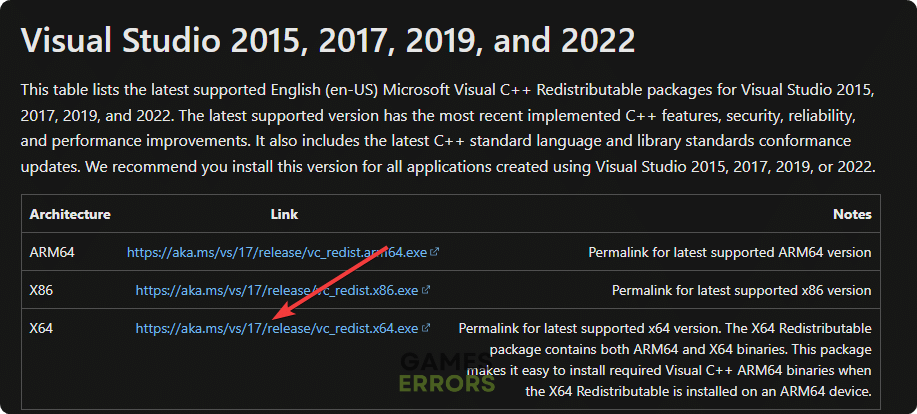
After installing this library file, restart your computer. Then, launch Starfield and start playing to see if the crashing issues still appear or not.
A brand new method to fix the Starfield CTD (crash to desktop) problem is to turn the Variable Rate Shading off. Follow the steps below to learn how to do it:
Most of the time, Starfield keeps crashing because of outdated graphics drivers. After all, it is common for outdated drivers to malfunction and create conflicts with the updated ones. Yet, there can be many other reasons for these crashes. However, behind any crashing problem in this Sci-Fi open-world title, these are the most common reasons:
If nothing worked and you still wonder how to fix most of the random Starfield crashes, know that a small number of gamers may still experience the same problem. In this case, the following methods can be helpful:
Disclaimer: All the solutions provided above were tested by gaming technicians familiar with Starfield and its bugs and errors. Thus, you should make sure that you didn’t skip any of them.
Related Articles:
Conclusion:
To sum up, the methods above should fix the Starfield crashing problem. However, you can also consider resetting Windows and running the memory diagnostic tool if no other methods work. Keep in mind that the game might also need some additional fixes and optimizations, and they might come soon enough on all devices. If you have any other solutions, feel free to share them with everybody in our comments. Also, bookmark our page! We will keep updating it with tested fixes and solutions when they are available.
The post Starfield Keeps Crashing on PC? Here’s How to Fix it! appeared first on Games Errors.
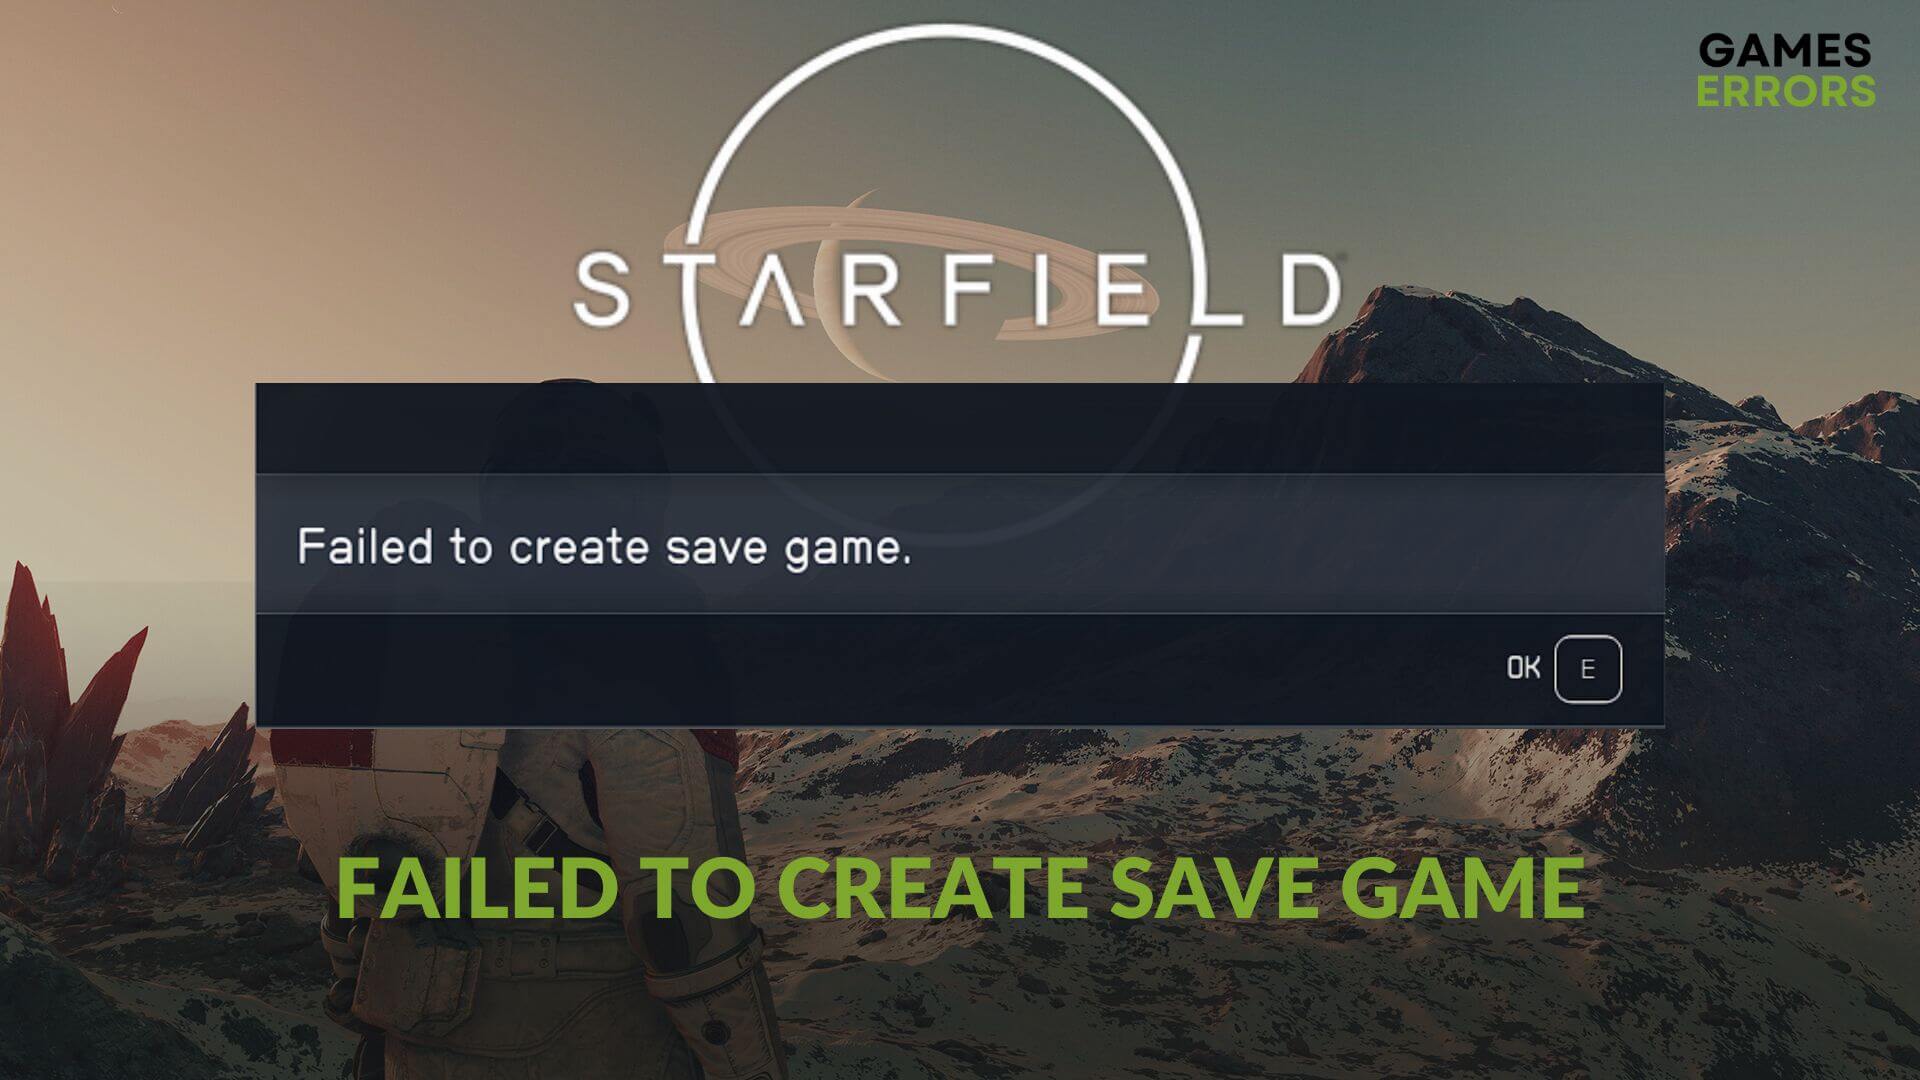
For several gamers, the failed to create save game error on Starfield is affecting the overall experience. As they are unable to save the in-game progress, they are also losing interest in this space adventure RPG.
Both Steam and Xbox app users on PC are currently having this issue. To fix this game-saving problem on Starfield, you can follow several effective methods. However, before that, it’s better to know about the reasons behind this situation.
If necessary, learn how to fix crashing issues on Starfield.
Usually, gamers are unable to save Starfield game progress due to the following reasons:
Luckily, we have found 100% successful methods to resolve this save game-related problem. But first, we suggest you do these quick things:
![]() After ensuring the above things, try the following solutions to fix the failed to create save game error on Starfiedl:
After ensuring the above things, try the following solutions to fix the failed to create save game error on Starfiedl:
Now, run Starfield, play it and try to save your progress and see whether it still fails to create the save game file or not.
Time needed: 2 minutes
To fix the failed to create save game error on Starfield, you must allow this game on Windows Security or the security program you are using.
![]()
![]()
![]()
![]()
After that, play Starfield and try to save again to see if the unable to create save game still appears or not. If you use a different antivirus program, you must whitelist this game from there.
Additionally, to fix the Starfield Failed to Create Save Game error, you should consider disabling controlled folder access by switching off the button seen on step 4.
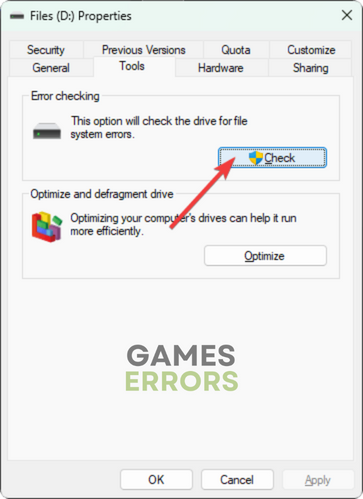
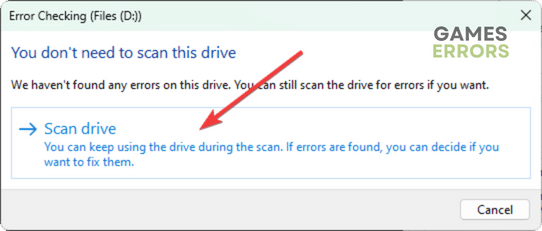
Sometimes, disk problems can prevent an app from writing on it. So, repairing the common disk-related issues can help you to get rid of this save game creation error on Starfield. Here are the methods to follow:
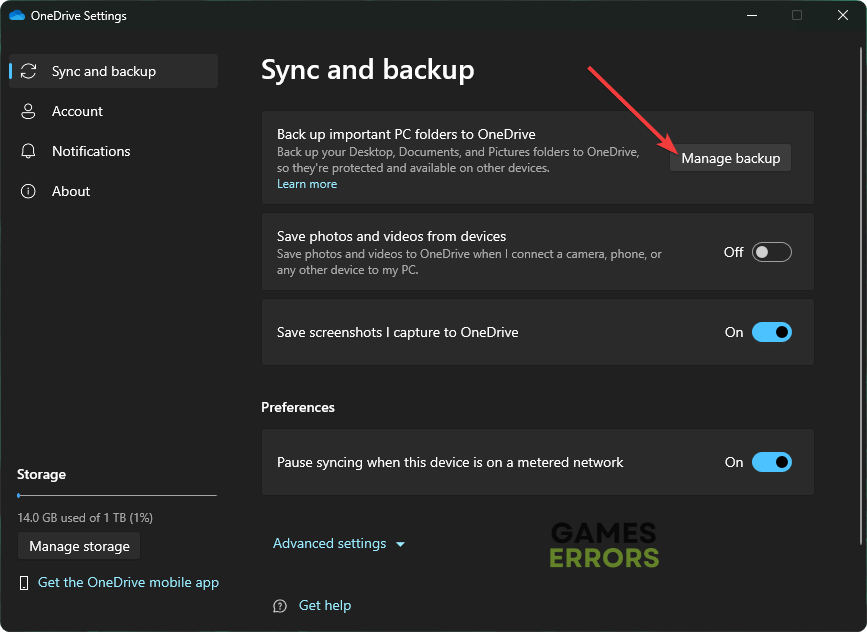
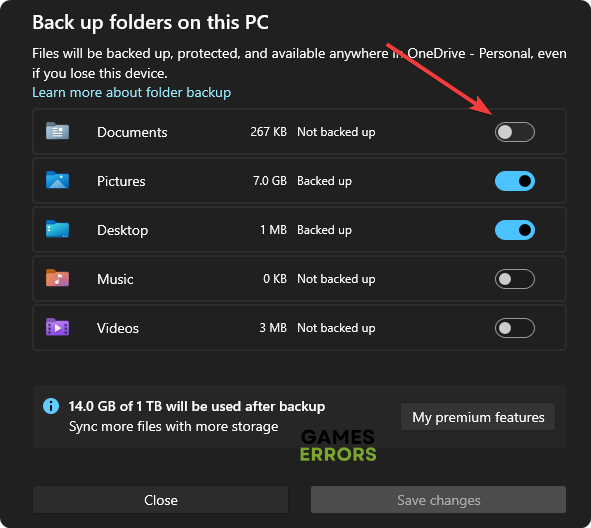
If you have uninstalled OneDrive in past, but the folder is still there, this method is applicable for you.
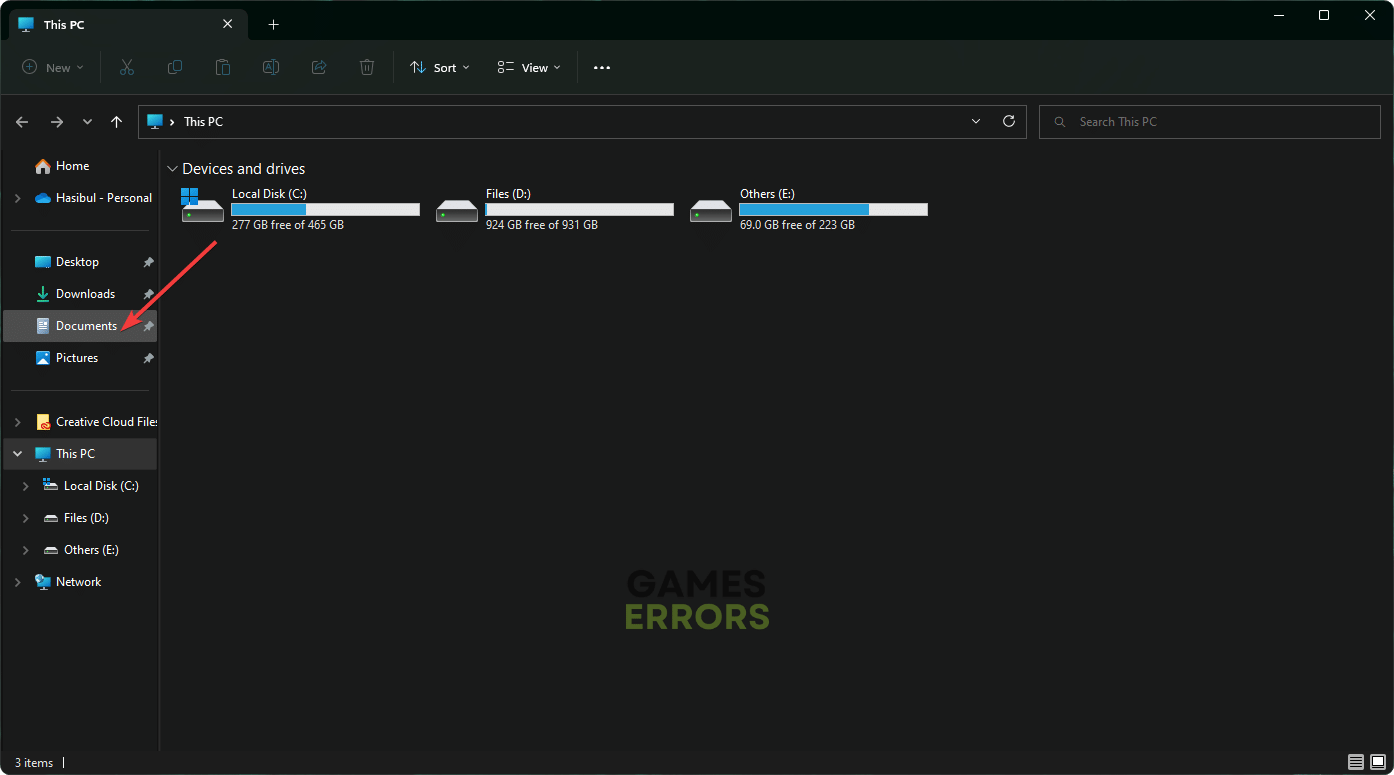
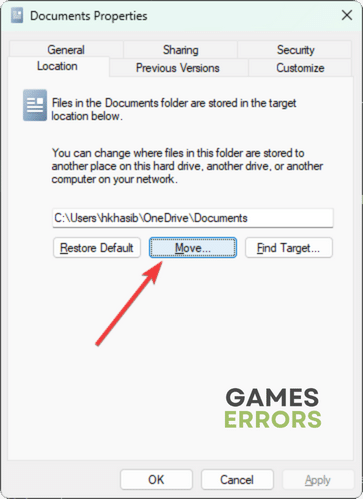
After changing the Documents‘ location, relaunch Starfield and try to save again and see whether the failed to create save game error appears or not.
Even though the above ones are the most successful methods, you may have this problem. So, follow these methods as well:
Learn how to fix Starfiled stuck on the loading screen if necessary.
Hopefully, the suggestions featured in this article will help to fix the Starfield failed to create save game. However, if it persists, consider re-installing this title. Also, if you have a better suggestion, feel free to let us know in the comment box.
The post Starfield Failed to Create Save Game [Fixed] appeared first on Games Errors.